Creamy Mushroom Pasta

One of the great things about going to the farmers market every weekend has been the unexpected food finds. Last weekend was my second time as a vendor at Woodlawn farmers market. I was located next to a mushroom vendor, Harvest Moon Mushrooms, who grows mushrooms right here in Portland! Jeff went over to buy a few that we could have in an omelette the next day. He asked what they recommended and he came back with these beauties! All their mushrooms are beautiful. And wow, they are delicious. We still had a few left and it looked like enough for a pasta dish so that’s what I made. This is sort of a no-recipe recipe that’s easy enough to put together without exact measurements, but I’ll put a recipe below regardless. 

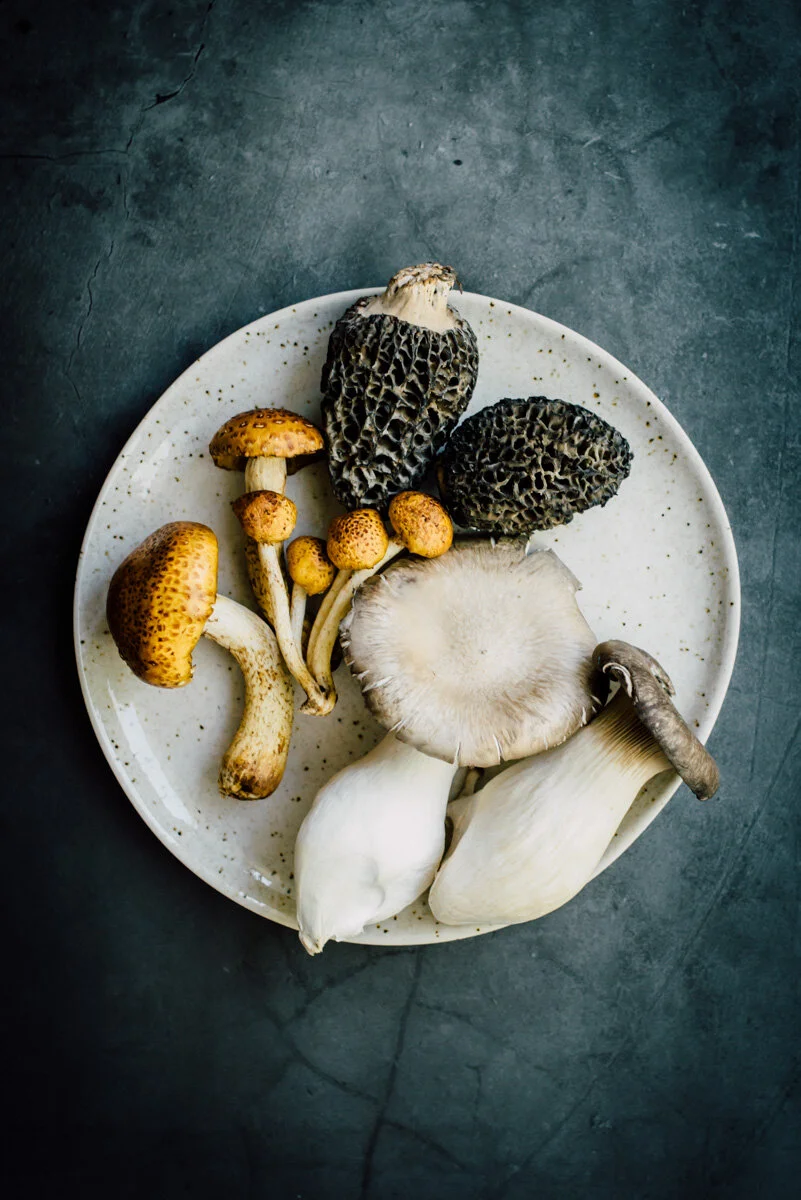
The mushrooms here are Chestnut, Morels and Black Pearl (going clockwise). The mushroom guy made a point to eat all of the Black Pearl, don’t throw away the stem, it’s really tasty! The recipe below is one-pot cooking at its best. I made this in the morning since it was going to be a very hot day and it was easy to reheat for dinner. 

Speaking of the heat, this weekend is going to be a scorcher, my weather app has been showing anywhere from 104°-108° on Saturday. So I’m not sure if the market will be open or will have to change the hours, but I have a feeling it might not be happening, I’ll post to my Instagram stories and update the webpage if anything changes. 

One more thing, I added some fresh thyme and oregano on top of the pasta for the photos, but I added too much! The oregano was strong and overtook the rich umami flavors of the mushrooms, I wouldn’t add anything more than a bit of parmesan cheese.

Enjoy!

Creamy Mushroom Pasta

  • 1/2 lb pasta shells

  • 2 cups mushrooms roughly chopped (Morels, Black Pearl and Chestnut mushrooms)

  • 3 tablespoons olive oil

  • 2 tablespoons salted butter

  • 1/4 white wine or dry vermouth 

  • Salt to taste

  • 12 oz Alfredo sauce

If you don’t have a jar of Alfredo sauce:

  • 8 oz creme fraiche

  • 1/2 cup grated parmesan

In a large dutch oven bring water to boil and cook pasta as directed. Drain in colander and stir in a bit of olive oil to keep it from sticking, set aside. 

In the same pot heat the olive oil and butter until melted on a medium heat, add the chopped mushrooms and a pinch of salt, stir as needed for about 5-10 minutes, when mushrooms look about half way done, add the white wine, give a stir and let cook for another 5-10 minutes on a lower heat. Your mushrooms should be soft and tender at this point, if not let it cook a few more minutes.

If you’re using a ready made Alfredo sauce you can add it at this point, heat another 5 minutes or so. If not add the creme fraiche and parmesan cheese, stir to combine, add the pasta and heat a few more minutes.

Serve with a pinch or two of parmesan. 

Potato and Broccoli Cakes + Charred Scallion Yogurt Sauce

potato_broccoli_cakes-1.jpg

Potato and Broccoli Cakes with Charred Scallion Yogurt Sauce. I’ve made these about three times now, they are so good! The recipe is from Sprouted Kitchen Cooking Club which I joined about a year and a half ago. And the sauce I’ve made a few times now as well. They make a great side dish for dinner, but even better is having one or two with an egg on top for breakfast or lunch the next day. I made a couple changes to the recipe, I found the patties hold together better with a half cup of breadcrumbs added, the mixture was too wet and some of them were falling apart. And I used Panko breadcrumbs rather than seasoned breadcrumbs, you can use what you have or prefer, but I like the crunch of Panko breadcrumbs. 

The Charred Scallion Yogurt Sauce is super tasty, you can add some fresh or charred jalapeño to it as well. The recipe makes about 12 ounces of sauce, and this is great to use leftover on sandwiches or roasted vegetables, it will stay fresh in the fridge for up to 2 weeks. 

I hope you try this recipe, it’s so good I had to share it with you. Enjoy!

potato_broccoli_cakes-2.jpg
potato_broccoli_cakes-3.jpg
potato_broccoli_cakes-4.jpg
potato_broccoli_cakes-5.jpg

Potato and Broccoli Cakes

  • 1 lb. of Yukon gold potatoes

  • 2 Tbsp. of butter

  • 1/3 cup of cream (or milk)

  • 1 tsp. of sea salt

  • fresh ground pepper

  • 2 eggs

  • 1/2 cup of grated parmesan, divided

  • 6-8 oz. of steamed broccoli (about 1 cup finely chopped)

  • 1 1/2 cup of Panko breadcrumbs, divided

  • avocado or olive oil for cooking

Peel the potatoes and boil until tender, about 10 minutes. Drain and remove to a mixing bowl, along with the butter, cream, salt and pepper. Let them cool down slightly. Mash everything until smooth. Whisk in the eggs and 1/4 cup of the parmesan. Make sure the broccoli is super, super well chopped, stir that into the potato mixture.  Add 1/2 cup of the breadcrumbs. It should look like meatball dough - damp but holds form.

Mix the breadcrumbs and remaining parmesan cheese in a shallow bowl.

Heat a generous slick of oil in a non-stick skillet over medium heat. Form small, 3 x 1” thick patties out of the potato mixture, dredge it in the parm breadcrumbs to get a little coat, then pan fry them for 2-3 minutes per side until golden brown. Set aside to cool. Repeat with the remaining potato mixture, adding a fresh slick of oil to the pan between batches. Makes 8 cakes.

Serve warm or room temperature with yogurt sauce


Charred Scallion Yogurt Sauce

  • 1 bundle of scallions (green onions) - ends trimmed

  • 1 tsp. of extra virgin olive oil

  • pinch of sea salt

  • 1 tsp. of sea salt

  • pinch of fresh ground pepper

  • 1 1/2 cups of plain, whole milk, Greek yogurt

  • 2 Tbsp. of extra virgin olive oil

  • 1 cup of chopped, flat leaf parsley

  • 1/4 cup of chopped fresh dill (or 1 tsp. dried dill)

  • 1 lemon - juiced (about 3-4 Tbsp.)

  • 1 Tbsp. of white wine vinegar

  • Dash of hot sauce or pinch of red pepper flakes

  • 2 Tbsp. of water (as needed for consistency)

Preheat your oven to 425°, or grill on high heat. Trim the scallions and rub them with a bit of oil and salt. Place them on foil or parchment and pop them in the oven to roast for 15-20 minutes in oven (10-15 minutes on grill) until browned and tender. Set aside to cool.

Into a blender or food processor, pulse the scallions and salt and pepper. Add the yogurt, parsley, dill, lemon juice, vinegar, hot sauce, water and pulse until flecked and smooth-ish. If it still seems too thick, add another splash of water.

Store in an airtight jar in the fridge for 1-2 weeks.

Buttermilk Pull-Apart Dinner Rolls

Buttermilk_Pull-Apart_Dinner_Rolls-1.jpg

Buttermilk Pull-Apart Dinner Rolls. Ok, so rarely on this blog do I insist “You have to make these!” but I am now. I made these Buttermilk Pull-Apart Dinner Rolls last week for Thanksgiving and they tasted so incredibly good! But on my second try here they are even better! Last week I made the original recipe, halved, 12 rolls (rather than 24) and they didn’t really fill out the 9” square pan, although they were really good, I didn’t get the pull-apart effect I was expecting and they were on the small side. So this recipe I made slightly larger rolls in a smaller 8” round pan and they came out great! The recipe is adapted from Alexandra’s Kitchen, she has a great blog and I recommend watching her videos, they’re awesome! 

If you saw my Instagram stories you remember I made a buttermilk-brind chicken for Thanksgiving, and also made the Dried Cherries and Sausage Stuffing. Along with that we had mashed potatoes with roasted garlic, Rainbow Chard, Cranberry relish, and a Butternut Squash Kaddu which I really should blog about. I made this apple pie but decided on a crumble topping instead, which I really liked, I like a pie that has three different flavor experiences - pie crust, fruit, crumble (and/or cream). 

Getting back to the dinner rolls, they are soft and airy and still have a bit of chew on the outside, they are just so good. 

I thought these were called Parker House Rolls, but the wiki page on them describes something quite different, something moon shaped! Going back to the 19th century with angry pastry cooks throwing unfinished rolls into the oven? Anyways you won’t be throwing these around and only into your mouth.

Good stuff! Enjoy and I hope to get you some more recipes before the xmas holiday.

Also, these tastes great with butter and jam for a snack. :)

Buttermilk_Pull-Apart_Dinner_Rolls-2.jpg
Buttermilk_Pull-Apart_Dinner_Rolls-3.jpg
Buttermilk_Pull-Apart_Dinner_Rolls-4.jpg
Buttermilk_Pull-Apart_Dinner_Rolls-6.jpg
Buttermilk_Pull-Apart_Dinner_Rolls-5.jpg
Buttermilk_Pull-Apart_Dinner_Rolls-7.jpg
Buttermilk_Pull-Apart_Dinner_Rolls-8.jpg

Buttermilk Pull-Apart Dinner Rolls 

  • 2 cups all-purpose flour, plus more for shaping

  • 1 teaspoon kosher salt

  • 1 tablespoon sugar 

  • 1 teaspoon instant yeast

  • 1/2 cup boiling water 

  • 1/2 cup buttermilk*

  • 2 tablespoons melted butter

  • 1 tablespoon melted butter and flaky sea salt for topping

*You can make buttermilk by adding 1 tablespoon vinegar or lemon juice to a 1/2 cup of whole milk and let it sit for 5-10 minutes.

In a large bowl, whisk together the flour salt, sugar, and instant yeast.

In a 1-cup liquid measuring cup pour the boiling water over the buttermilk and let stand for 10 minutes, the buttermilk will look curdled then give it a stir.

Pour the buttermilk mixture and the 2 tablespoons of melted butter over the flour mixture. Stir until a sticky ball of dough forms. Cover the bowl with plastic wrap and set aside in a warm place to rise for 2 hours or until doubled in bulk.

Grease an 8×8-inch baking dish or 8” round cake pan. Flour a work surface and sprinkle flour lightly over the dough and around the edges. Gently fold the dough out of the bowl onto the floured work surface and shape into a rough ball, if it’s sticky add more flour. Use a bench scraper to divide the ball into 3 equal portions. Shape each portion roughly into a ball, then use a bench scraper to divide each ball into 3 roughly even portions to create 9 small round pieces total. If the sizes look odd just tear off the big ones to get the smaller ones up to size, the dough is very forgiving and won’t ruin the rolls!

Place the dough balls into the prepared pan, spacing them evenly apart.

Preheat the oven to 375°.

At this point, you can cover the pan and refrigerate overnight. Otherwise let the dough rise covered with plastic wrap for 25 to 35 minutes, or until the dough pieces have puffed to almost fill the pan. (Note: If you refrigerate overnight, remove the pan 30 to 45 minutes prior to baking.) 

Place the baking pan in the oven and bake for 20-25 minutes, or until golden brown. Remove pan from the oven and immediately brush the surface of the rolls with one tablespoon of melted butter, then sprinkle flaky salt over top. Let the rolls cool in the pan for a 10 minutes or so, then turn the pan out onto a cooling rack and invert onto a plate or serving platter. Serve warm with more butter on the side. 

Crunchy Veggie Lentil Salad

crunchy_veggie_lentil_salad-1.jpg

Crunchy Veggie Lentil Salad. I haven’t had lentil salad in a long time. And this was one of the recipes that came up on Sprouted Kitchen Cooking Club this week. Sarah called it “Crunchy Lunchy Lentils.” This is the type of salad you make ahead. It can last for days in the fridge and generally (always) tastes better after it’s had time to sit for a day or so. I’ve made a few adjustments to the recipe but didn’t deviate all that much. I used a trio of green, brown and black sprouted lentils that cooked in 6 minutes versus French lentils that take about 20 minutes. I think my ratios of veggie to lentils were off a bit, I think there should have been more lentils, but it still worked out to a great salad regardless. 

This month has been pretty crazy. A few weeks ago there were a series of fires that erupted here in Oregon, then came a wind storm that blew all the smoke over here in Portland. We had to literally seal all the openings in the house because the air quality outside was hazardous, it was coming in from the fireplaces, any opening in the house, and remained like that for nearly 10 days. When that started I had already begun my project to paint the kitchen cabinets and countertop, the kitchen was in complete disarray but I had to move forward and get it done. We had air purifiers and fans running 24/7. It was pretty horrible happening on top of a pandemic, we couldn’t spend time outside at all. A lot of businesses and restaurants (that are already hurting) had to close, and there were some days where I couldn’t get grocery delivery or take-out, which was kind of big deal because we couldn’t use the kitchen much, everything was covered in drop cloths, so not much cooking other than microwaving something or eating sandwiches. I had prepared a couple of dishes in advance and was planning on grilling outside while the kitchen was unusable, but that didn’t work out. It was just one disaster layered on top of another. Many people lost their homes due to the fires, so we were lucky that we didn’t have to go through anything like that. I finished my kitchen project, the outside air cleared up and it rained and rained. And now we’re having a beautiful week of sunshine, with windows open and fresh air everywhere. But I feel a little PTSD from the smoke episode, all this sunshine and dry weather is dangerous this time of year, even with a burn ban people still do stupid stuff and light camp fires or whatever. I’m so afraid of new fires and that smoke coming back. It was just too much. I think I should just have a cocktail and enjoy a few rays of sunshine for now. And really, we had so much rain last week I think things are ok and I shouldn’t worry so much.

Anyways, if you’re still reading, I hope you enjoy this salad, it’s vegetarian and could be vegan if you skip the feta cheese, but I just love cheese in this salad. Enjoy!

crunchy_veggie_lentil_salad-2.jpg
crunchy_veggie_lentil_salad-3.jpg
crunchy_veggie_lentil_salad-4.jpg
crunchy_veggie_lentil_salad-5.jpg

Crunchy Veggie Lentil Salad

  • 3/4-1 cup of French / De Puy lentils

  • 2 Persian cucumbers (or a 1/3 of an English Cucumber) - seeded

  • 1 apple

  • 1 medium fennel bulb - fronds reserved

  • 1 small shallot or 1/2 large shallot

  • 1/2 cup of pecans (or walnuts) chopped

  • 1/3 cup feta or parmesan cheese (+ more for serving)

  • 1/2 cup of fresh mint leaves

  • 1/4 cup of fresh basil leaves

For the vinaigrette

  • 1 clove of garlic, minced

  • 1 lemon - juiced

  • 2 Tbsp. of apple cider vinegar

  • 1 Tbsp. of maple syrup

  • 3 Tbsp. of extra virgin olive oil

  • 1/2 tsp. of dried dill

  • 1/2 tsp. of coriander

  • flaky sea salt

  • fresh ground pepper

Rinse your lentils. Put them in a pot with 1 ½ cups of salted water or broth. Bring the liquid up to a simmer, put the cover on ajar and cook for 20 minutes until tender. (if using different Lentils, cook per package instructions) Fluff the lentils, and set them aside to cool completely.

While the lentils cook, fine dice the cucumbers. Core and finely dice both the apple and fennel and mince the shallot. Chop the herbs.

In the bottom of your mixing bowl, combine all the vinaigrette ingredients and whisk to combine. Add the cooled lentils, all your chopped vegetables, walnuts, cheese and herbs. Toss to coat. Chill in the fridge for at least an hour, the longer it sits the better it tastes! It will keep a few days in the fridge, so this is a great side dish or lunch throughout the week. Top with fennel fronds when serving.

Raspberry Pistachio Oat Scones

raspberry_pistacio_oat_scones-1.jpg

I haven’t made scones in a long long time. There are a couple recipes here in the archives but I haven’t made them like this before. Last week I saw Teresa posted this recipe on Instagram and it sounded really good. Plus I still have raspberries in the freezer from last summer’s harvest! I had to rinse and defrost them so they basically mushed into the batter, but not a big deal as they really tasted great. Two things I like about this recipe. 1. there is no added sugar other than maple syrup, and 2. I really like the texture of the oats in the scones. This recipe was also different in that you have sort of a shaggy loose dough, so you form it in a circle on your baking sheet, then pre-cut the slices (but not separating them), bake, then slice them apart afterward. The recipe was super easy and like I said I think it tastes great, these are not the dried out scones of yesteryear. You know what I mean? Like the ones Larry David prefers? Have you been watching the most recent Curb Your Enthusiasm? I’m trying to find a link to the scone scene, but all I can find is this part where he wants to open a spite store next door to Mocha Joe’s after being banned from there, and he thinks he knows what is the BEST scone to serve at his new spite cafe. Anyway it’s pretty funny because his scones are dry as the Sahara and nobody likes them. I promise these are not dry scones. Also, there’s an optional glaze I’ve included below in the recipe, I didn’t use it and kinda like this barely-sweet scone. However if you’re wanting something sweeter be sure to top them with the glaze. Enjoy!

raspberry_pistacio_oat_scones-3.jpg
raspberry_pistacio_oat_scones-2.jpg
raspberry_pistacio_oat_scones-4.jpg

Raspberry Pistachio Oat Scones

  • 1 cup all-purpose flour

  • 1 cup oats

  • 1 tablespoon baking powder

  • 1/2 teaspoon salt

  • 4 tablespoons butter, softened almost melted

  • 1/4 cup pure maple syrup

  • 1 tablespoon vanilla extract

  • 1 large egg

  • 1/4 cup whole milk greek yogurt

  • 1 cup raspberries

  • 1/2 cup chopped pistachios

Preheat oven to 400°F. Line a baking sheet with parchment paper and set aside. 

In a large bowl whisk together flour, oats, baking powder and salt in a bowl. Set aside.

In a separate bowl whisk together the butter, maple syrup, vanilla extract, egg, and whole milk yogurt.

Add the wet ingredients to dry ingredients and stir to combine with a wooden spoon. Gently fold in raspberries and pistachios. They will get a bit smushed. (mine did a lot!)

Place batter on top and round it into a disk shape. Batter will be sticky. Cut into 6-8 pieces (depending on the size of scone you want, I did 6) so when they come out of the oven you can run the knife through again to fully separate. 

Bake for 20-25 minutes, rotating the sheet half-way through to ensure even cooking. When done, they should be slightly firm. Finish cutting and enjoy! (They can keep on the counter, covered, for one day, but I recommend refrigerating any more than that because of the fresh fruit)

Glaze (optional)

  • 1 cup powdered sugar

  • 4-5 tablespoons milk

  • 1/2 teaspoon vanilla extract

Whisk together all the ingredients until smooth and drizzle over cooled scones.

Adapted from @aloveafare

Crispy Thin Chocolate Chip Cookies

crispy_thin_chocolate_chip_cookies-1.jpg

Crispy Thin Chocolate Chip Cookies. I’ll tell you right now, this recipe is a keeper! I’ve been eager to make these cookies ever since I saw David Lebovitz’s blog post recently. I’ve made chocolate chip cookies before, you might remember my 2-ways post back a few years ago with that giant cast-iron pan cookie! And while those are good, these are much much better. These are absolutely delicious. They’re similar to Tate’s Chocolate Chip Cookies. What makes them thinner and crisper? I compared the two recipes and while they’re quite similar in ingredients, this one here has less flour, less egg and the addition of water. Water? Maybe that’s the secret ingredient! 

In any case I made a couple changes, using dark brown sugar rather than light brown sugar, I think it works fine. And I chopped up 7 ounces of 72% Cacao dark chocolate bars rather than using chocolate chips, it’s up to you but I like the big chocolate pieces in the cookie. David has the dough balls scooped out around a 1/4 cup each, I think that might be too much, I used a heaping tablespoon of cookie dough, rounded it out into a ball and they were pretty large, you can see from my photo below that even spacing them out a lot they still ran into each other. You basically want a 1”-1 1/4” ball. I got out my big-ass baking sheet on the next round so they had plenty of room to spread. The following batches I went for more of a 1” size ball. And all of them were done more close to 15 minutes. Not only will the time depend on the size of the cookie, but if the cookie dough is left out of the fridge longer they might be done a minute or two sooner. So keep an eye on them towards the end.

It’s January which marks the 7th anniversary of this blog! I can’t believe I’m still doing this, lol. I’ve learned a lot and have become much more comfortable cooking and baking and of course photographing the whole business. Much thanks to those that stop by to see what I’m up to, I appreciate your comments and such. I know blogging is not so much a thing these days but personally appreciate everyone out there that’s sticking to it and sharing recipes, how-tos and all that. The internet has become so toxic over the years, sometimes it’s nice to just chill out and read about cookies. I have quite a few recipes I want to share with you over the next few weeks, some of my favorites that have been on repeat. I think you’ll enjoy them. Speaking of enjoy, please please make these cookies, you won’t be disappointed.  David’s recipe is adapted from Joanne Chang’s Pastry Love: A Baker’s Journal of Favorite Recipes.

crispy_thin_chocolate_chip_cookies-2.jpg
crispy_thin_chocolate_chip_cookies-3.jpg
crispy_thin_chocolate_chip_cookies-4.jpg
crispy_thin_chocolate_chip_cookies-5.jpg
crispy_thin_chocolate_chip_cookies-6.jpg
crispy_thin_chocolate_chip_cookies-7.jpg
crispy_thin_chocolate_chip_cookies-8.jpg
crispy_thin_chocolate_chip_cookies-9.jpg
crispy_thin_chocolate_chip_cookies-10.jpg

Crispy Thin Chocolate Chip Cookies

  • 8 ounces (225g) (2 sticks) unsalted butter, at room temperature

  • 1 cup (200g) superfine sugar (or put regular sugar in blender for a few seconds)

  • 1/2 cup (100g) firmly-packed dark brown sugar

  • 1 large egg, at room temperature

  • 3 tablespoons (45g) water

  • 2 teaspoons vanilla extract

  • 1 3/4 cups (245g) flour

  • 1 1/4 teaspoon flaky sea salt or kosher salt (if using Morton's kosher salt, use 3/4 teaspoon or 1 teaspoon for more profound saltiness)

  • 1 teaspoon baking soda

  • 1 1/2 cups (280g, 7-10 ounces) bittersweet or semisweet chocolate (chopped or chips)

In a stand mixer fitted with the paddle attachment beat the butter and sugars on medium speed until light and creamy, about 5 minutes. Or use a hand mixer, doing this by hand will wear you out and take much much longer.

Stop the mixer and scrape down the sides with a rubber spatula, add in the egg, water, and vanilla and mix until well combined.

In a medium bowl mix together the flour, salt, and baking soda. Add the chopped chocolate and toss in the flour mixture. With the mixer on low speed, stir in the flour and chocolate chunk mixture until thoroughly combined. Cover the bowl (or transfer to a container and cover) refrigerate the dough at least 3 to 4 hours, or overnight.

To bake the cookies, preheat the oven to 350ºF (180ºC). Line two large baking sheet with parchment paper. Arrange the dough, formed in 1-inch to 1 1/4-inch balls on the baking sheet, spaced at least 3-inches (8cm) apart. (They will spread, so expect to get 5 or 6 on a standard baking sheet.) Press the cookies down slightly with your hand and bake until the cookies have spread and just until there are no light patches across the center, rotating the baking sheet(s) midway during baking so they bake evenly. They'll take about 13-15 minutes, check the cookies a few minutes before the timer goes off and see if they need longer. The time will depend on the size of the cooker, larger will take a bit longer but only a minute or two more.

Remove the cookies from the oven and let cool for 5 minutes. Transfer the cookies to a wire rack and cool completely.

Storage: The dough can be refrigerated up to four days, or frozen for up to three months. The cookies will keep in an airtight container for up to three days but are best the day they are baked.

Adapted from David Lebovitz who adapted it from Joanne Chang

Pumpkin Cake with Salted Caramel Buttercream

pumpkin_cake_salted_caramel_buttercream-1.jpg

Last week at New Seasons Market I picked up some pumpkin cupcakes with a salted caramel frosting which were good but way way too much frosting, tons on the top and more inside. But the flavor was great. With that I wanted to make my own Pumpkin Cake with Salted Caramel Buttercream. So here we are.

Both the recipes below are half-recipes of the original versions. You can easily double the ingredients and make a layered cake if you like. As much as I like (love!) a big layered cake, it’s just so much cake for Jeff and I. Usually I’ll freeze leftover cake but even then it can be a bit much, we still have coconut cake in the freezer from July! So figured this smaller cake might work, it’s not as sexy as the layered cakes but it tastes just as good and is more manageable for the two of us.

Originally I wanted to maybe do a buttercream frosting with caramel drizzled over that, or just drizzle caramel sauce over the cake, so I set out to make my own caramel sauce, which I’ve made before. The only thing different than the last time I made it was that I used a different pot. It was a bit bigger but has a heavier base that seemed suitable. Well, when the sugar started to brown it was only browning on one side of the pan, I moved it slightly off the burner so that it would cook more evenly, but that just wasn’t happening and I ended up with burnt caramel sauce. Not having time to run out to the store to buy more cream, I decided to just make the buttercream frosting and add some store-bought caramel sauce I had in the fridge (which I’m not crazy about because it’s kind of gritty in texture). Even though the cake didn’t come out exactly how I planned it, I have no complaints with the finished product and I think you will love it too.

One more thing, the texture of the cake is somewhat light, so if you want to double up this recipe and do a layer cake, I’d recommend baking in 2-3 cake pans and layering those cakes, I don’t think this cake would hold up well to a horizontal cut across. Recipes below, enjoy!

pumpkin_cake_salted_caramel_buttercream-2.jpg
pumpkin_cake_salted_caramel_buttercream-3.jpg
pumpkin_cake_salted_caramel_buttercream-4.jpg
pumpkin_cake_salted_caramel_buttercream-5.jpg

Pumpkin Cake with Salted Caramel Buttercream

  • 1 1/3 cups all-purpose flour

  • 1 teaspoons baking soda

  • 1/4 teaspoon salt

  • 1 tsp cinnamon

  • 1 tsp pumpkin pie spice

  • 1/2 tsp cardamom

  • 1/2 cup Olive oil

  • 2 large eggs

  • 1/2 cup packed brown sugar

  • 1/3 cup granulated sugar

  • 1 cup pumpkin puree, about 1/2 can pumpkin puree

  • 1/2 teaspoon pure vanilla extract

  • Salted Caramel Buttercream Frosting (recipe below)

  • Crushed toasted hazelnuts (or nuts of choice)

Preheat the oven to 350°F, grease a 9” round springform cake pan with butter, add a parchment round to the bottom and butter that as well.

Whisk the flour, baking soda, salt, cinnamon, pumpkin pie spice and cardamom together in a large bowl. Set aside. Whisk the eggs in medium sized bowls, then whisk in the oil, brown sugar, granulated sugar, pumpkin puree, and vanilla extract until combined. Pour the wet ingredients into the dry ingredients and whisk until completely combined.

Pour the batter into the cake pan and tap it on the counter until evenly distributed, it will be somewhat thick.

Bake for 45-50 minutes or until a toothpick inserted into the cake comes out clean.

Once done, remove from the oven and allow to cool on rack. Remove springform (if using) and slide onto serving dish. Once completely cool top with icing (recipe below) and crushed nuts.

Cover leftover cake tightly and store at room temperature for a couple days or in the refrigerator for up to 5 days.

Adapted from Sally’s Baking Addiction

Salted Caramel Buttercream

  • 1/2 cup salted butter (1 stick)

  • 2 cups powdered sugar

  • 1 tsp vanilla extract

  • 1/4 cup salted caramel

  • 1/8 tsp kosher salt

In a stand mixer fitted with the paddle attachment, whip the butter on high until it’s fluffy and light, about 5-6 minutes, scraping down the bowl and paddle a few times in between. Turn the mixer to low and add the powdered sugar a little bit at a time, scraping down the bowl and paddle after each interval. With the mixer still on low, add the salted caramel, the vanilla and salt, set the speed to medium and mix for 2 full minutes, scraping down the sides as needed.

Honey Peanut Butter Rice Crispy Treats

honey_peanut_butter_rice_crispy_treats-1.jpg

Last week I stopped by a small vegan cafe in my neighborhood Tiny Moreso, in the case they had Peanut Butter Rice Crispy Treats which I bought along with some type of Apricot Balls full of flax and other healthy stuff, both were delicious. I looked online for a recipe, which there are many and all pretty simple. This recipe had more peanut butter so I went with it, and wow it’s so good! And it’s vegan if that matters to you. It comes together very quick, 10 or 15 minutes and then you just have to refrigerate the treats for about an hour and they’re done. It doesn’t get any easier. Tiny Moreso treats were tall and big, probably 3” tall, and most of the recipes online put the mixture in a more shallow dish, but I wanted that height so I put the mixture in a loaf pan and it worked out really well, this recipe works out to 8 servings, I only have six in the photos because Jeff and I couldn’t wait to try them! I haven’t had a Rice Crispy treat in so long but I do remember the version with Marshmallow was super sweet, I think using honey is so much better because it’s sweet but not toothache sweet. If you want you can pour the warmed chocolate over the entire mixture but I like the chocolate drizzle (Jackson Pollock) style. 

honey_peanut_butter_rice_crispy_treats-2.jpg
honey_peanut_butter_rice_crispy_treats-3.jpg
honey_peanut_butter_rice_crispy_treats-4.jpg
honey_peanut_butter_rice_crispy_treats-5.jpg
honey_peanut_butter_rice_crispy_treats-6.jpg

Honey Peanut Butter Rice Crispy Treats

  • 3/4 cup creamy peanut butter

  • 1/3 cup honey

  • 1/4 tsp kosher salt

  • 1/2 tsp pure vanilla extract

  • 3 cups rice crispy cereal

  • 2 oz Chopped chocolate (I like 72% cacao)

In a small pot add the peanut butter and honey, warm over a medium heat, stirring until well combined. Stir in the salt and vanilla. In a large bowl add the rice crispy cereal, pour the peanut butter mixture over the cereal and mix until all the cereal is covered. Place the mixture into a parchment lined loaf pan. Press down to fill any gaps and smooth over for an even top. Heat the chocolate in the microwave or over a double boiler on the stove top. When melted drizzle the chocolate over the rice crispy mixture. Cover with foil and refrigerate for at least 1 hour. Slice into 8 servings and enjoy! Store refrigerated in covered container.

Adapted from Joy Food Sunshine


Panzanella

panzanella-1.jpg

Hello tomatoes! Wow it’s been such a cool summer that it has taken a bit longer for them to ripen in the garden, but last week all four plants decided it was time. The yellow Taxi tomatoes along with the Sungold cherry tomatoes were the first on the scene, followed by Black Krim, and lastly the Brandywine. I’ve been wanting to make this Panzanella for a while, and since I had made a loaf of No-Knead bread a couple days prior it worked out great. Most recipes say to put the bread cubes in the oven, but I opted for the skillet which went pretty quick and ya know, fried bread? So good. You could serve this as a side dish or appetizer, or it makes a great vegetarian meal when you want something light. 

And speaking of serving, I received sample dishes from Carthage.co Stoneware which you see here and they are just beautiful! The large white plate is the Dadasi Dinner plate in chalk and the dark bowl is the Zaghwan Soup Bowl in Old Silver. I think they both look great but especially love the Zaghwan bowl with these bright colored tomatoes. And the prices are quite reasonable for high-end ceramic dishes. You can read more about these hand-crafted ceramics here. They have a nice weight to them and they’re a pleasure to photograph. I’ll be back with more tomato and/or zucchini dishes this month. Until then I recommend this Panzanella, enjoy!

panzanella-2.jpg
panzanella-3.jpg
panzanella-4.jpg
panzanella-5.jpg
panzanella-6.jpg
panzanella-7.jpg
panzanella-8.jpg
panzanella-9.jpg
panzanella-11.jpg
panzanella-10.jpg
panzanella-13.jpg
panzanella-12.jpg

Panzanella

  • 3 cups baguette or rustic bread, preferably stale, cut into 1-inch cubes

  • 6 tablespoons extra-virgin olive oil, more to taste

  • 3/4 teaspoon kosher sea salt, more to taste

  • 2 pounds very ripe tomatoes, preferably a mix of varieties and colors

  • 6 ounces small fresh mozzarella balls (or shredded chunks of fresh mozzarella)

  • 1/2 cup torn basil leaves

  • Salt and pepper to taste

  • 1/2 teaspoon Dijon mustard

  • 2 tablespoons Champagne vinegar (or white balsamic vinegar)

  • 1/4 cup Olive Oil

  • Salt and Pepper

In a large bowl mix together the bread cubes with olive oil and salt. Add a bit of olive oil to a  large cast iron skillet and heat on medium, when warm place the cubes in a single layer, tossing as needed until crisp on all sides. When done place the bread cubes on a plate and allow to cool a bit. 

To make the dressing, in a small bowl whisk together the Dijon and vinegar, then whisk in the olive oil.

Cut the tomatoes into chunks and then add them to a large bowl, add the mozzarella, bread cubes and the basil leaves (but leave a few to top the dish), add some salt and pepper and stir gently. Let sit for at least 30 minutes. Top with remaining basil leaves. Serve at room temp.

Pickled Kirby Cucumbers

kirby_cucumber_dill_pickles-1-2.jpg

This is my favorite time of the year, the garden is in full swing and in addition to tomatoes ripening this week, I have a bunch of these cute Kirby cucumbers. I wanted to pickle them whole but they’re so fat I couldn’t even fit two of them in the mason jar, so I quartered them for this recipe. This version of pickling is the quick refrigerator pickle. There is no cooking involved and you simply let it sit in the refrigerator for a few days until it’s ready to eat. What I like most about this style is that the pickles stay crisp. I pickled some zucchini a couple weeks ago, which involved cooking the zucchini a bit, and while it tasted really good I think they were too soft. But hey, it’s all good.

The best pickle I ever had was Guss’ Pickles on the Lower East Side in NYC. It’s no longer there but it looks like they kept the business going in Brooklyn. And they sell them at Whole Foods? I’ll have to keep my eye out for them, but until then I have a good supply of pickles in the fridge. Hope you’re having a great summer, I’ll be back with some tomato recipes soon!

kirby_cucumber_dill_pickles-6.jpg
kirby_cucumber_dill_pickles-1.jpg
kirby_cucumber_dill_pickles-3.jpg
kirby_cucumber_dill_pickles-4.jpg
kirby_cucumber_dill_pickles-5.jpg

Pickled Kirby Cucumbers

  • 2-3 Kirby Cucumbers, quartered

  • 1 cups white vinegar

  • 1 cups water

  • 1 tablespoon mustard seeds

  • 1 tablespoon kosher salt

  • 1 tablespoon sugar

  • 1 teaspoon crushed red pepper

  • 1 tablespoon peppercorns

  • 1 garlic clove

  • Fresh dill, a few sprigs

Place the quartered pickles in a quart mason jar. Add all the spices, garlic and dill to the jar. Pour in the water and vinegar, top off with more if needed. Place the cap on and give it a good shake. Pickles will be ready in a week or so. Store in the refrigerator. They should last a couple months. But you will have eaten them by then  ;)