Cherry Crumble pie

cherry_pie_crumble_topping-1.jpg

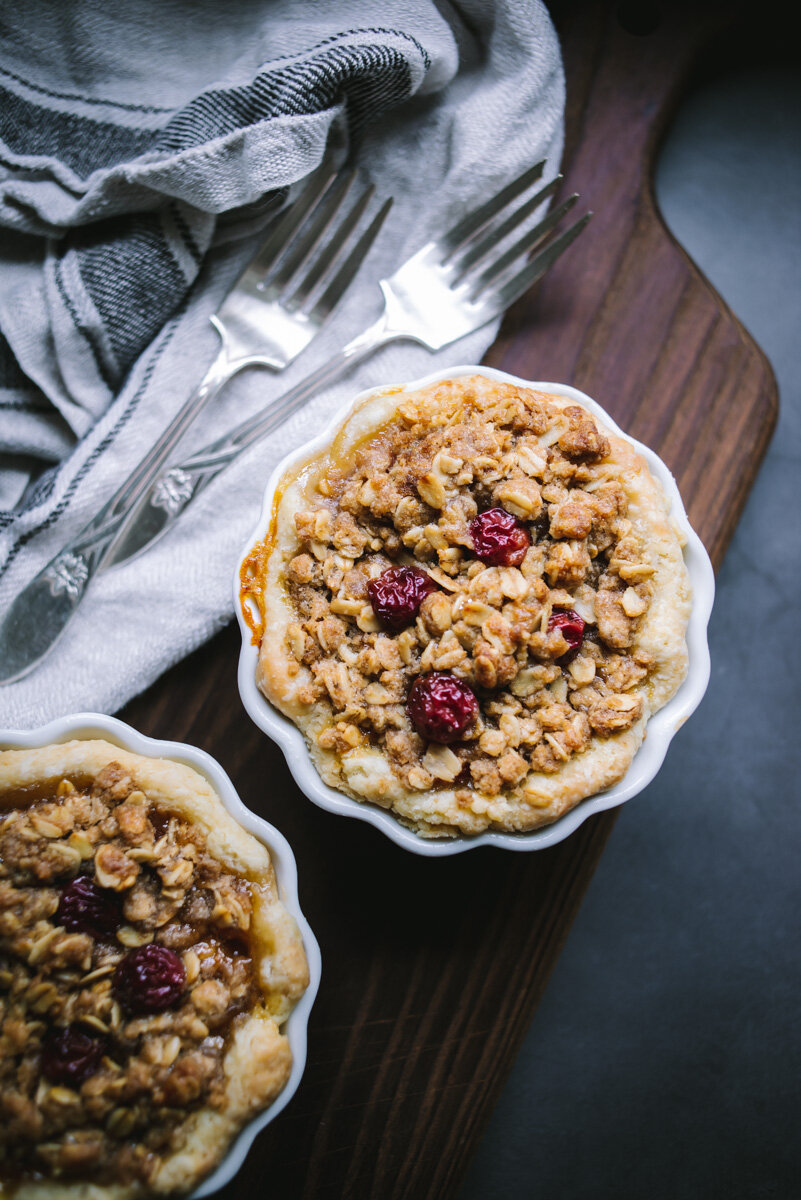
We had such a nice surprise a few weeks back. We have a cherry tree in our front yard that has been here ever since we bought the house several years ago, but it never really produced much fruit. Maybe a few at the very top for the squirrels to eat. But this year was a different story. Tons of cherries and within reach! So Jeff and I spent an afternoon picking cherries in our front yard. We ended up with about five pounds of cherries! We pitted and froze about half, and the other half I made into a pie which came out incredibly good! The recipe below is for a full-size pie that I made a few weeks ago, but you can make four mini-pies instead which is what I did this week. One thing I noted below in the recipe is to bake the pie in the lower third of the oven. Rather than pre-bake your pie shell to avoid “soggy bottom” you can refrigerate the rolled out pie dough in the pie pan prior to baking, add your filling and bake on the lower rack and it will brown the bottom. That is if your oven heats from the bottom up. I had read about this somewhere and tried it and it worked really well! Recipe below, enjoy!

cherry_tree-1.jpg
cherry_pie_crumble_topping-2.jpg
cherry_pie_crumble_topping-3.jpg
cherry_pie_crumble_topping-4.jpg
cherry_pie_crumble_topping-5.jpg

Cherry Crumble pie

Crumble:

  • 2/3 cup rolled oats

  • 1/2 cup all-purpose flour

  • 1/2 cup brown sugar

  • 1/4 teaspoon ground cinnamon

  • 1/4 teaspoon Cardamom 

  • 1/2 teaspoon kosher salt

  • 6 tablespoons unsalted butter, melted and cooled

Sour cherry filling:

  • 3/4 cup sugar

  • 3 tablespoons cornstarch

  • 1/4 teaspoon kosher salt

  • 2 1/4 pounds fresh sour cherries, pitted, or 2 pounds frozen sour cherries, partially thawed

  • 1 Pie Dough, recipe here

Prepare your pie crust in advance so it’s well chilled. Roll out your pie dough, place in pie dish, cover with plastic wrap and refrigerate for at least 1 hour. 

Preheat oven to 375°. 

Prepare the cherry filling by mixing sugar, cornstarch and salt together in a medium bowl, then toss in the cherries until well coated.

In another medium bowl whisk together the oats, flour, brown sugar, spices and salt. Pour the cooled melted butter over the flour mixture and stir to combine well (sometimes it’s easier to do this with your hands).

When the pie crust is good and chilled, pour in the cherry filling mixture, then top with the crumble mixture. Place the pie on a baking sheet and bake for 50-60 minutes on the bottom third of your oven (this helps the bottom crust to cook better). About 45 minutes for the mini-pies. Remove from oven and cool before serving.

Recipe adapted from Smitten Kitchen

Black Forest Cake

black_forest_cake-1.jpg

Black Forest Cake. or rather a Black Forest Gateau. Gateau just means cake with cream and fruit filling. I didn’t know that so thought to pass that along. I asked Jeff what kind of cake he would like for his birthday and he showed me this Black Forest Gateau on BBC good food. It looked amazing! I searched around for other recipes online and came up with the one I’m posting here. I’m really happy with the results so decided to take some photos and do a blog post. The cake part of the recipe is from Call Me Cupcake and the rest, the filling and topping, is from my previous cake recipes, with the exception of the brandied cherries which I sort of made up, there are so many different ways to make them, but they came out really good! It’s not cherry season so I used frozen cherries. I couldn’t find any Bada Bing cherries in a jar (I didn’t need 6 jars!), which would have looked nice on top of the cake, but I just worked with what I could find. It’s weird these days why it’s hard to find certain things, not just toilet paper but jalapeños at Whole Foods? None? Really? oh well. We just have to make do with what we have and appreciate what we do have. 

I’d like to think of this as a beautiful mess. It came out much messier than I expected, I wanted a few drips of ganache down the sides and it proceeded to pour over like a waterfall out of control. But hey that’s ok. Jeff sort of marveled at all the layers and things going on. Puddles of chocolate? Who can complain about that. This cake will make you smile, I promise. Most of this is make-ahead-recipes so it’s quick to assemble on the day your serving it. You really could make everything the day before, then just warm the ganache, assemble and chill before serving.

Oh, I just remembered, another thing I couldn’t get with my grocery delivery was Mascarpone for the frosting. So I ordered an extra pint of whipping cream and made it myself, you can find the recipe here, it’s very easy to make. It needs to strain for at least 12 hours so it’s best to do it at night and it will be ready the next day. I’m finding all these weird things I’ve made over the years coming in very handy lately!

black_forest_cake-2.jpg
black_forest_cake-3.jpg
black_forest_cake-4.jpg
black_forest_cake-5.jpg
black_forest_cake-6.jpg

The Cake

  • 4 ounces butter, 1 stick

  • 2 1/2 cups all purpose flour

  • 3/4 cup cocoa powder

  • 2 teaspoons baking powder

  • 2 teaspoons baking soda

  • pinch of salt

  • 2 cup granulated sugar

  • 2 large egg

  • 1 1/3 cup sour cream

  • 3/4 cup hot water

Heat oven to 350°F (175°C). Butter and flour three parchment-lined 9-inch cake pans. Cut the butter into chunks and melt in the microwave or stove top and set aside to cool.

Sift the flour, cocoa powder, baking powder and baking soda in a large bowl, stir to combine. Add the salt, sugar, eggs and sour cream, whisk together, then slowly whisk in the melted butter and hot water (so you don’t cook the eggs!) Stir until completely smooth. Divide the batter between the three prepared cake pans.

Bake for 25-30 minutes until the center is set and a test knife comes out clean. Let the cakes cool for 10 minutes in their pans before inverting them onto a cooling rack. Let cakes cool completely, wrap in plastic wrap and refrigerate for at least an hour before assembling. Cakes can be made ahead and refrigerated.

The Cherries

You could buy brandied cherries and use straight from the jar but I couldn’t find any. I had frozen cherries so this is how to prepare either frozen or fresh cherries.

  • 1 pound frozen cherries (defrosted in refrigerator)

  • 1 cup brandy

  • 1/2 cup water

  • 1/4 cup sugar

Add the cherries, brandy, water, and sugar to a small saucepan and heat over medium until the sugar has dissolved. Simmer for 15 minutes and remove from stove, allow to cool and refrigerate in sealed container. 

The Mascarpone Whipped Cream Frosting

  • 1 cup mascarpone

  • 1 cup heavy whipping cream

  • 1 tablespoon granulated sugar

  • 1/2 teaspoon vanilla extract

Beat together the mascarpone, whipping cream, sugar, and vanilla extract in the bowl of a stand mixer fitted with a whisk attachment at medium high speed until fluffy, about 1 to 2 minutes. Refrigerate until ready to use.

The Ganache

  • 2 ounces dark chocolate, chopped finely (or semi-sweet chocolate chips)

  • 1/4 cup heavy cream

  • Plus more dark chocolate for shaving on top of cake later

Place the chopped chocolate in a bowl. Heat the cream over a medium heat until just simmering, then pour over the chocolate, allow the chocolate to melt for a bit then whisk briskly until well combined. Set aside. (this should be your last step in cooking before assembling the cake)

Assemble!

Place your first layer of cake on a cake stand or plate. Spread a good amount, about 1/2” thick with the mascarpone frosting. Top that with almost half the brandied cherries. Place your second layer of cake and repeat with mascarpone frosting and cherries, but leaving a few cherries aside for the final top, unless you have extra fresh or jarred cherries to use. Place your final cake layer on top of that, then pour on the ganache, let it dribble down the sides of the cake. Add some chocolate shavings on top (a vegetable peeler works great for shavings) and add the remaining cherries. Chill well, at least an hour, before slicing. It’s kind of a mess, but a good mess!

Photo by Jeff McDonald

Photo by Jeff McDonald

Pumpkin Cake with Salted Caramel Buttercream

pumpkin_cake_salted_caramel_buttercream-1.jpg

Last week at New Seasons Market I picked up some pumpkin cupcakes with a salted caramel frosting which were good but way way too much frosting, tons on the top and more inside. But the flavor was great. With that I wanted to make my own Pumpkin Cake with Salted Caramel Buttercream. So here we are.

Both the recipes below are half-recipes of the original versions. You can easily double the ingredients and make a layered cake if you like. As much as I like (love!) a big layered cake, it’s just so much cake for Jeff and I. Usually I’ll freeze leftover cake but even then it can be a bit much, we still have coconut cake in the freezer from July! So figured this smaller cake might work, it’s not as sexy as the layered cakes but it tastes just as good and is more manageable for the two of us.

Originally I wanted to maybe do a buttercream frosting with caramel drizzled over that, or just drizzle caramel sauce over the cake, so I set out to make my own caramel sauce, which I’ve made before. The only thing different than the last time I made it was that I used a different pot. It was a bit bigger but has a heavier base that seemed suitable. Well, when the sugar started to brown it was only browning on one side of the pan, I moved it slightly off the burner so that it would cook more evenly, but that just wasn’t happening and I ended up with burnt caramel sauce. Not having time to run out to the store to buy more cream, I decided to just make the buttercream frosting and add some store-bought caramel sauce I had in the fridge (which I’m not crazy about because it’s kind of gritty in texture). Even though the cake didn’t come out exactly how I planned it, I have no complaints with the finished product and I think you will love it too.

One more thing, the texture of the cake is somewhat light, so if you want to double up this recipe and do a layer cake, I’d recommend baking in 2-3 cake pans and layering those cakes, I don’t think this cake would hold up well to a horizontal cut across. Recipes below, enjoy!

pumpkin_cake_salted_caramel_buttercream-2.jpg
pumpkin_cake_salted_caramel_buttercream-3.jpg
pumpkin_cake_salted_caramel_buttercream-4.jpg
pumpkin_cake_salted_caramel_buttercream-5.jpg

Pumpkin Cake with Salted Caramel Buttercream

  • 1 1/3 cups all-purpose flour

  • 1 teaspoons baking soda

  • 1/4 teaspoon salt

  • 1 tsp cinnamon

  • 1 tsp pumpkin pie spice

  • 1/2 tsp cardamom

  • 1/2 cup Olive oil

  • 2 large eggs

  • 1/2 cup packed brown sugar

  • 1/3 cup granulated sugar

  • 1 cup pumpkin puree, about 1/2 can pumpkin puree

  • 1/2 teaspoon pure vanilla extract

  • Salted Caramel Buttercream Frosting (recipe below)

  • Crushed toasted hazelnuts (or nuts of choice)

Preheat the oven to 350°F, grease a 9” round springform cake pan with butter, add a parchment round to the bottom and butter that as well.

Whisk the flour, baking soda, salt, cinnamon, pumpkin pie spice and cardamom together in a large bowl. Set aside. Whisk the eggs in medium sized bowls, then whisk in the oil, brown sugar, granulated sugar, pumpkin puree, and vanilla extract until combined. Pour the wet ingredients into the dry ingredients and whisk until completely combined.

Pour the batter into the cake pan and tap it on the counter until evenly distributed, it will be somewhat thick.

Bake for 45-50 minutes or until a toothpick inserted into the cake comes out clean.

Once done, remove from the oven and allow to cool on rack. Remove springform (if using) and slide onto serving dish. Once completely cool top with icing (recipe below) and crushed nuts.

Cover leftover cake tightly and store at room temperature for a couple days or in the refrigerator for up to 5 days.

Adapted from Sally’s Baking Addiction

Salted Caramel Buttercream

  • 1/2 cup salted butter (1 stick)

  • 2 cups powdered sugar

  • 1 tsp vanilla extract

  • 1/4 cup salted caramel

  • 1/8 tsp kosher salt

In a stand mixer fitted with the paddle attachment, whip the butter on high until it’s fluffy and light, about 5-6 minutes, scraping down the bowl and paddle a few times in between. Turn the mixer to low and add the powdered sugar a little bit at a time, scraping down the bowl and paddle after each interval. With the mixer still on low, add the salted caramel, the vanilla and salt, set the speed to medium and mix for 2 full minutes, scraping down the sides as needed.

10 Summer Favorites

It’s summer! I love summer even when it’s scorching hot. I’ve put together ten of my favorite-make-again summer recipes. Below is a mix of salads, desserts and keepin’ kewl iced drinks. Picking berries, shucking corn, drinking bourbon iced tea - oh yeah!

Berry + Cherry Galette

Berry Clafoutis

Margarita Ice Pops

A Summer Salad!

Watermelon with Feta + Basil

Cherry Tomato Galette

Quick Dill Pickles

Cold Brew Iced Coffee

Cucumber Infused Vodka

Bourbon Iced Tea with Mint