CBD Coconut Bites

CBD_coconut_haze_snack-1.jpg

CBD Coconut Bites. Depending on where you live you might be seeing more CBD food and drinks around these days, which can be very expensive! But you can make your own for a fraction of the price. I’ve been making these for a while now, I was trying to get the right amount so that you could just have one piece, but I think two is better for the calming effects. A while back I worked with a hemp farm in Southern Oregon and posted the recipe for making your own CBD coconut oil which is pretty easy. Once you have that done these come together in no time. Recently I made them using a regular size muffin pan and they came out more like a peanut butter cup size and produced six pieces. The mini muffin pan will give you a dozen. They’re delicious, and pretty healthy too, made with CBD coconut oil, honey, chocolate, oats, nuts, good stuff. I’m looking forward to more CBD recipe development in the year ahead! Recipe below, enjoy!

CBD_coconut_haze_snack-2.jpg
CBD_coconut_haze_snack-3.jpg
CBD_coconut_haze_snack-4.jpg
CBD_coconut_haze_snack-6.jpg
CBD_coconut_haze_snack-7.jpg
CBD_coconut_haze_snack-8.jpg
CBD_coconut_haze_snack-9.jpg
CBD_coconut_haze_snack-10.jpg
CBD_coconut_haze_snack-11.jpg
CBD_coconut_haze_snack-12.jpg

CBD Coconut Bites

  • 1/3 cup (1.5 oz) Dark Chocolate, chopped in small bits

  • 1/3 cup  (1.5 oz) dry roasted hazelnuts

  • 1/4 cup Cocoa powder

  • 1/8 teaspoon kosher salt

  • 1/4 cup toasted oats

  • 1/3 cup CBD coconut oil

  • 3 tablespoons honey

  • 1/4 cup toasted coconut

In a non-stick skillet toast the oats until golden and set aside, then toast coconut for a minute or two until golden brown, set aside to cool.

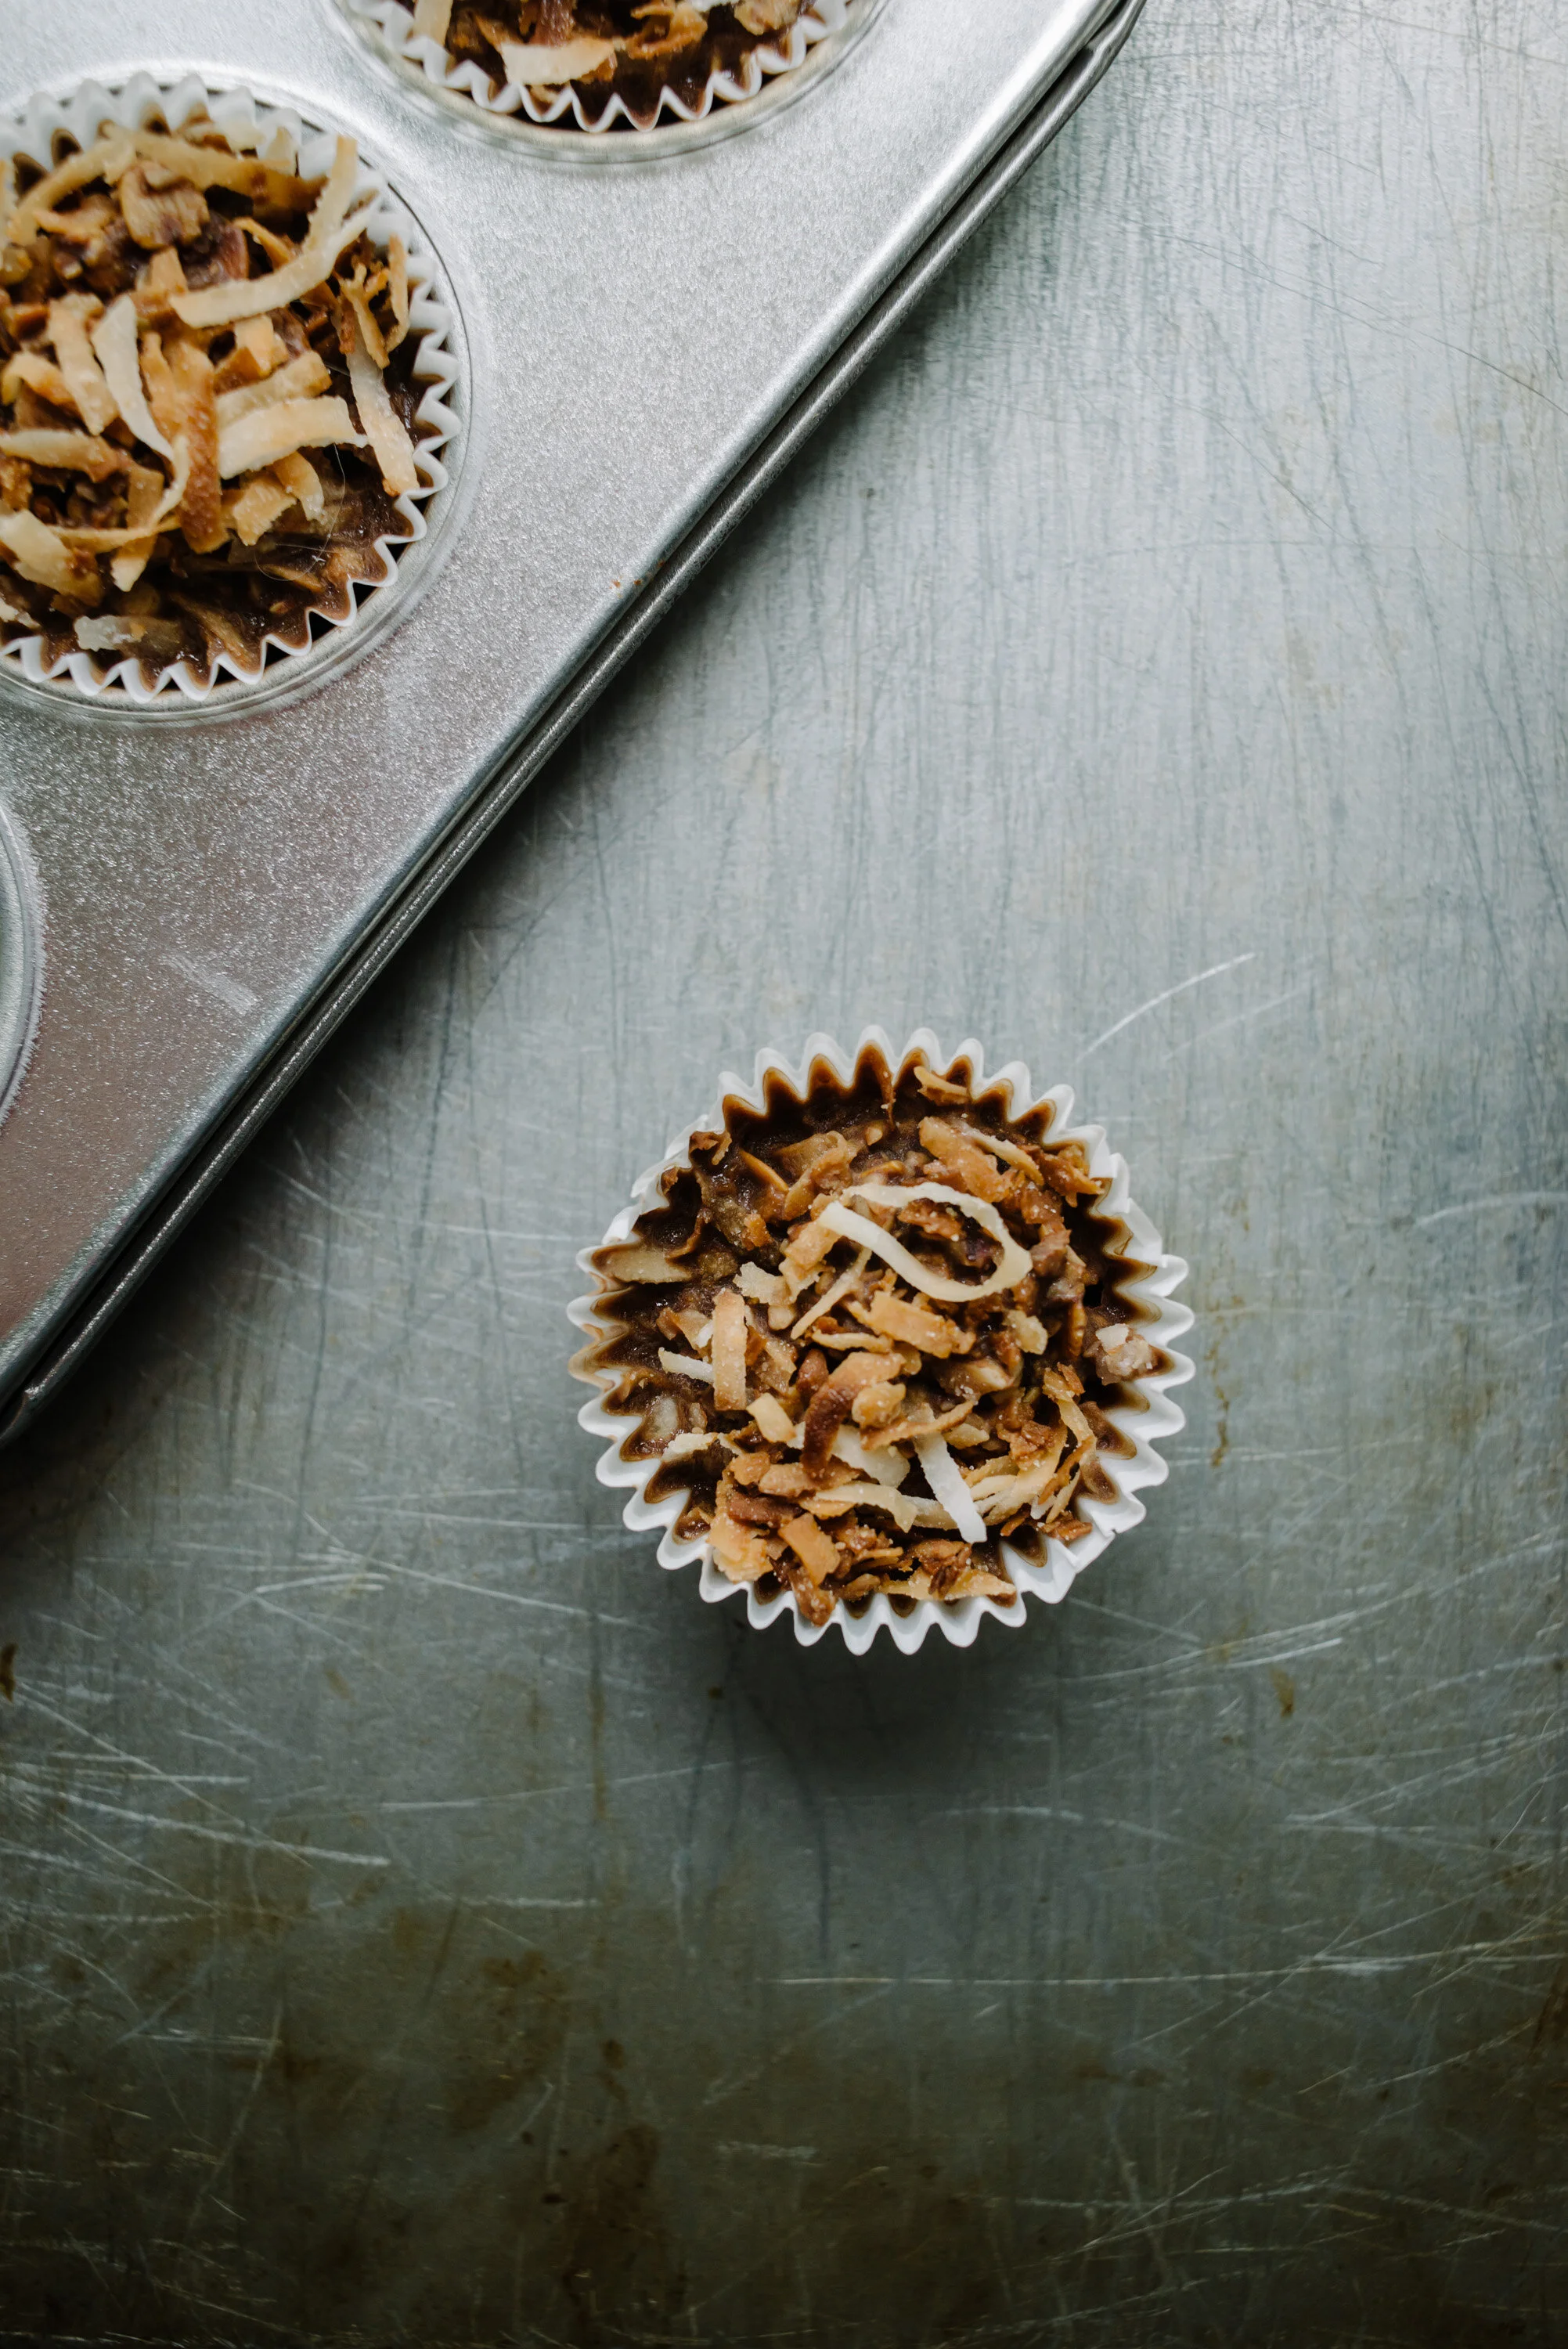
Line a mini muffin pan with paper liners for 12 pieces, or regular size muffin pan for 6 pieces.

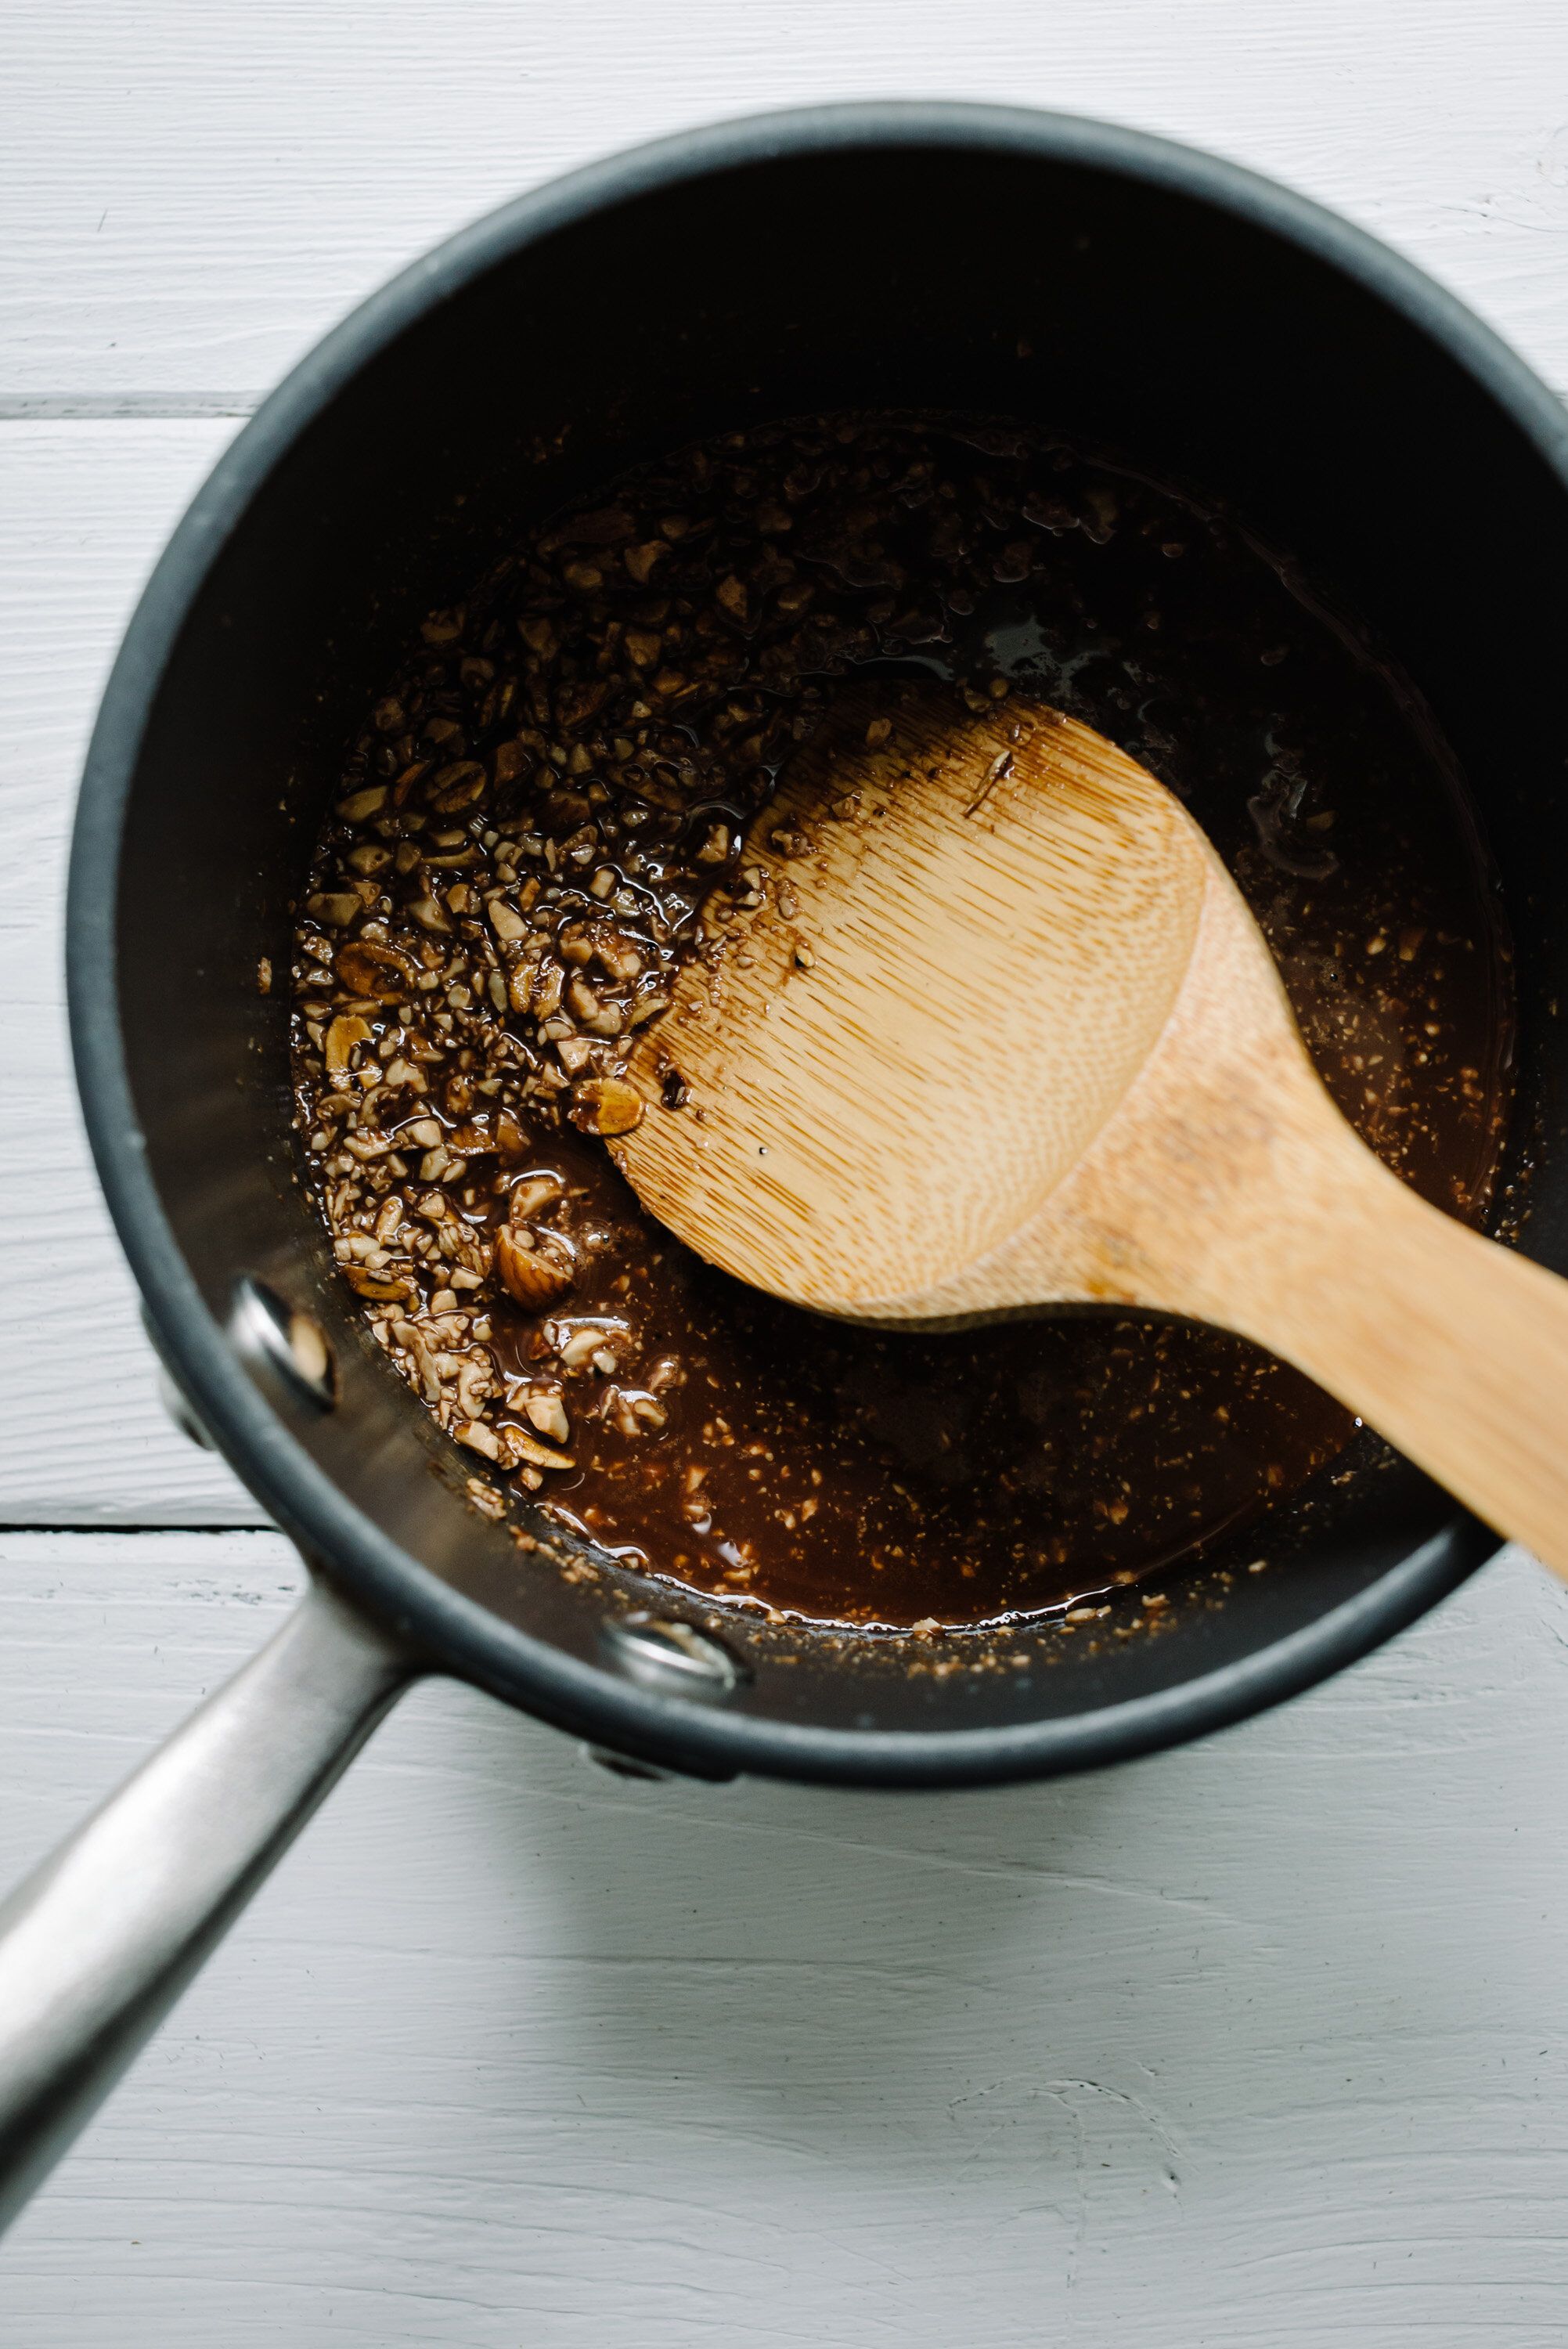
In a food processor place the nuts, cocoa and salt. Pulse a few times until the nuts are roughly chopped.

Place the CBD Coconut oil and honey in a medium pot and bring to a boil. Remove from heat and stir in the chopped chocolate until mostly melted, then stir in the nut mixture and toasted oats. 

Fill each cupcake tin with the mixture and top with toasted coconut flakes. Refrigerate for at least 1 hour or place in the freezer for 30 minutes. Store in refrigerator or cool place. 

Pumpkin Cake with Salted Caramel Buttercream

pumpkin_cake_salted_caramel_buttercream-1.jpg

Last week at New Seasons Market I picked up some pumpkin cupcakes with a salted caramel frosting which were good but way way too much frosting, tons on the top and more inside. But the flavor was great. With that I wanted to make my own Pumpkin Cake with Salted Caramel Buttercream. So here we are.

Both the recipes below are half-recipes of the original versions. You can easily double the ingredients and make a layered cake if you like. As much as I like (love!) a big layered cake, it’s just so much cake for Jeff and I. Usually I’ll freeze leftover cake but even then it can be a bit much, we still have coconut cake in the freezer from July! So figured this smaller cake might work, it’s not as sexy as the layered cakes but it tastes just as good and is more manageable for the two of us.

Originally I wanted to maybe do a buttercream frosting with caramel drizzled over that, or just drizzle caramel sauce over the cake, so I set out to make my own caramel sauce, which I’ve made before. The only thing different than the last time I made it was that I used a different pot. It was a bit bigger but has a heavier base that seemed suitable. Well, when the sugar started to brown it was only browning on one side of the pan, I moved it slightly off the burner so that it would cook more evenly, but that just wasn’t happening and I ended up with burnt caramel sauce. Not having time to run out to the store to buy more cream, I decided to just make the buttercream frosting and add some store-bought caramel sauce I had in the fridge (which I’m not crazy about because it’s kind of gritty in texture). Even though the cake didn’t come out exactly how I planned it, I have no complaints with the finished product and I think you will love it too.

One more thing, the texture of the cake is somewhat light, so if you want to double up this recipe and do a layer cake, I’d recommend baking in 2-3 cake pans and layering those cakes, I don’t think this cake would hold up well to a horizontal cut across. Recipes below, enjoy!

pumpkin_cake_salted_caramel_buttercream-2.jpg
pumpkin_cake_salted_caramel_buttercream-3.jpg
pumpkin_cake_salted_caramel_buttercream-4.jpg
pumpkin_cake_salted_caramel_buttercream-5.jpg

Pumpkin Cake with Salted Caramel Buttercream

  • 1 1/3 cups all-purpose flour

  • 1 teaspoons baking soda

  • 1/4 teaspoon salt

  • 1 tsp cinnamon

  • 1 tsp pumpkin pie spice

  • 1/2 tsp cardamom

  • 1/2 cup Olive oil

  • 2 large eggs

  • 1/2 cup packed brown sugar

  • 1/3 cup granulated sugar

  • 1 cup pumpkin puree, about 1/2 can pumpkin puree

  • 1/2 teaspoon pure vanilla extract

  • Salted Caramel Buttercream Frosting (recipe below)

  • Crushed toasted hazelnuts (or nuts of choice)

Preheat the oven to 350°F, grease a 9” round springform cake pan with butter, add a parchment round to the bottom and butter that as well.

Whisk the flour, baking soda, salt, cinnamon, pumpkin pie spice and cardamom together in a large bowl. Set aside. Whisk the eggs in medium sized bowls, then whisk in the oil, brown sugar, granulated sugar, pumpkin puree, and vanilla extract until combined. Pour the wet ingredients into the dry ingredients and whisk until completely combined.

Pour the batter into the cake pan and tap it on the counter until evenly distributed, it will be somewhat thick.

Bake for 45-50 minutes or until a toothpick inserted into the cake comes out clean.

Once done, remove from the oven and allow to cool on rack. Remove springform (if using) and slide onto serving dish. Once completely cool top with icing (recipe below) and crushed nuts.

Cover leftover cake tightly and store at room temperature for a couple days or in the refrigerator for up to 5 days.

Adapted from Sally’s Baking Addiction

Salted Caramel Buttercream

  • 1/2 cup salted butter (1 stick)

  • 2 cups powdered sugar

  • 1 tsp vanilla extract

  • 1/4 cup salted caramel

  • 1/8 tsp kosher salt

In a stand mixer fitted with the paddle attachment, whip the butter on high until it’s fluffy and light, about 5-6 minutes, scraping down the bowl and paddle a few times in between. Turn the mixer to low and add the powdered sugar a little bit at a time, scraping down the bowl and paddle after each interval. With the mixer still on low, add the salted caramel, the vanilla and salt, set the speed to medium and mix for 2 full minutes, scraping down the sides as needed.

Honey Peanut Butter Rice Crispy Treats

honey_peanut_butter_rice_crispy_treats-1.jpg

Last week I stopped by a small vegan cafe in my neighborhood Tiny Moreso, in the case they had Peanut Butter Rice Crispy Treats which I bought along with some type of Apricot Balls full of flax and other healthy stuff, both were delicious. I looked online for a recipe, which there are many and all pretty simple. This recipe had more peanut butter so I went with it, and wow it’s so good! And it’s vegan if that matters to you. It comes together very quick, 10 or 15 minutes and then you just have to refrigerate the treats for about an hour and they’re done. It doesn’t get any easier. Tiny Moreso treats were tall and big, probably 3” tall, and most of the recipes online put the mixture in a more shallow dish, but I wanted that height so I put the mixture in a loaf pan and it worked out really well, this recipe works out to 8 servings, I only have six in the photos because Jeff and I couldn’t wait to try them! I haven’t had a Rice Crispy treat in so long but I do remember the version with Marshmallow was super sweet, I think using honey is so much better because it’s sweet but not toothache sweet. If you want you can pour the warmed chocolate over the entire mixture but I like the chocolate drizzle (Jackson Pollock) style. 

honey_peanut_butter_rice_crispy_treats-2.jpg
honey_peanut_butter_rice_crispy_treats-3.jpg
honey_peanut_butter_rice_crispy_treats-4.jpg
honey_peanut_butter_rice_crispy_treats-5.jpg
honey_peanut_butter_rice_crispy_treats-6.jpg

Honey Peanut Butter Rice Crispy Treats

  • 3/4 cup creamy peanut butter

  • 1/3 cup honey

  • 1/4 tsp kosher salt

  • 1/2 tsp pure vanilla extract

  • 3 cups rice crispy cereal

  • 2 oz Chopped chocolate (I like 72% cacao)

In a small pot add the peanut butter and honey, warm over a medium heat, stirring until well combined. Stir in the salt and vanilla. In a large bowl add the rice crispy cereal, pour the peanut butter mixture over the cereal and mix until all the cereal is covered. Place the mixture into a parchment lined loaf pan. Press down to fill any gaps and smooth over for an even top. Heat the chocolate in the microwave or over a double boiler on the stove top. When melted drizzle the chocolate over the rice crispy mixture. Cover with foil and refrigerate for at least 1 hour. Slice into 8 servings and enjoy! Store refrigerated in covered container.

Adapted from Joy Food Sunshine


Harvest Tart

harvest_tart-1.jpg

You might remember a few posts back I harvested a ton of grapes off of our vine this year. I gave some to my neighbors but still have quite a bit, so I was happy to see this Harvest Tart from David Lebovitz includes grapes! And let me tell you it’s absolutely delicious with apples, figs and grapes. My grapes were on the small side compared to what you buy in the store, but wow they taste so much better, very sweet and without that bit of tartness you sometimes get with green grapes. I wish I knew what kind I planted so that I could recommend them, but I can’t seem to locate the tag that came with it, which means it was probably on the container itself and after two years is long gone. Oh well. I used my usual pie dough but you can use David’s recipe below if you’d like to try it out. I was kinda sad to see summer end, but the fall is such a wonderful time to bake and make soups and all that good stuff. I’m fully embracing it!

harvest_tart-2.jpg
harvest_tart-3.jpg

Harvest Tart

For the dough

  • 2 3/4 cups (400g) flour

  • 1 tablespoon sugar

  • pinch of salt

  • 9 ounces (250g) unsalted butter, chilled

  • 2 large eggs (total)

  • 3 tablespoons water

For the filling

  • 2 1/4 pounds (1kg) apples, peeled and cored (about 4-5 large apples)

  • 12 figs, halved

  • 1 small bunch (2 to 4 ounces, 60-120 grams) fresh grapes, stemmed

  • 1/3 cup (65g) sugar, plus additional sugar for sprinkling

  • a big handful of whole walnuts

  • 1 1/2 tablespoons Armagnac (or brandy or 1 teaspoon vanilla extract)

  • 1 cup (250g) crème fraîche

  • 1 large egg

1. To make the dough, in a large mixing bowl, stir together the flour, sugar, and salt. Cut the butter into cubes and mix together with your hands or using a pastry blender until it’s in small pieces no larger than the size of corn kernels. (I used a pastry cutter, the last couple times I’ve used the food processor I over processed and the butter pieces were too small)

2. Add one egg and the water, and mix until the dough holds together. Roll the dough out on a lightly floured surface until it’s about 18-inches (45 cm) round.

Brush off any excess flour and fit into a 9- or 10-inch high-sided round baking  or pie dish. (There’s a lot of liquid in this tart so you will want to use a baking dish, unlike my other galettes)

3. Beat the remaining egg in a small bowl with a fork, then brush the insides of the dough with the egg. (I skipped this part)

4. Prepare the filling by slicing the apples into eighths. Mix them together with the figs, grapes, 1/3 cup (65 g) sugar, and Armagnac, then transfer the filling into the tart dough. Strew the walnuts over the top of the fruit. (I used hazelnuts which tasted great!)

5. In a small bowl, mix together the crème fraîche with the egg and pour it over the fruit and nuts. Lift the edges of the dough and cover the fruit, then sprinkle a good amount additional sugar over the top of the dough. (Here I did an egg wash over the top of the crust, I think you get a better looking, more golden, crust with egg, beat 1 egg and then brush on top of crust before sprinkling sugar)

6. Put the tart on a baking sheet and bake in a 425Fº (218ºC) oven for 55 minutes to 1 hour, until the top of the dough is browned and the fruit is cooked through, which you can verify by poking the center with a paring knife; when done, it should meet no resistance. (at 55 minutes mine was well done)

7. Remove the tart from the oven and let cool down a bit before serving. (It’s better to serve in a bowl because of the cream base. Store any extra in the refrigerator, then warm before serving)

Adapted from David Lebovitz

Stone Fruit Galette

stone_fruit_galette-1-2.jpg

Stone Fruit Galette. This came out so good I wanted to share it with you here on the blog. With summer fruit in its prime right now there is no better time to make this. You can use any combination of fruit, but I highly recommend doing a mix of peaches, nectarines, plums, cherries and apricots. And I also recommend this pie crust that I made a couple months ago, it’s so flaky and soft, it’s more like a pastry and works so perfect with this fruit. The difference is cake flour!

On the home front here, our vegetable garden is just getting started with some green tomatoes here and there, squash and peppers are still too small to pick, but the raspberry bush has been a real bounty, I’ve been picking and flash freezing almost daily, they taste so good on their own but I’d like to make something, maybe a jam or a tart. If this doesn’t get eaten within a day (how is that possible? ha ha) you’ll need to refrigerate the galette. I hope you are having a great summer, or winter depending on where you are in the world (hello Australia!). Enjoy!

stone_fruit_galette-2.jpg
stone_fruit_galette-3.jpg
stone_fruit_galette-4.jpg
stone_fruit_galette-5.jpg
stone_fruit_galette-7.jpg
stone_fruit_galette-6.jpg

Stone Fruit Galette

  • 3 cups stone fruit (peaches, nectarines, plums, cherries, apricots) sliced

  • 1/3 cup sugar

  • 4 tablespoons cornstarch

  • 1/4 teaspoon cardamom

  • 1/2 teaspoon cinnamon 

  • 1 pie crust (recipe here)

Preheat oven to 400°F. Cut the fruit to about 1” pieces, save a few slices aside to arrange on the top. Place the cut fruit in a bowl along with the sugar, cornstarch and spices. Set aside. Roll out your dough to a 13” round.  Place the dough on a parchment lined baking sheet or in a cast-iron skillet. Spoon the filling onto the dough, leaving a 2-inch border around the edge. Fold the edges up and over the filling, forming loose pleats. Top with remaining fruit slices and cherry halves. Bake until the filling is bubbling and the pastry is golden brown, about 30-40 minutes. 

Strawberry Rhubarb Galette

strawberry_rhubarb_galette-1.jpg

Strawberries! I love this time of year, not only is it warm and sunny, but my little strawberry patch in the back yard starts producing berries. I didn’t have enough for a whole galette so what could be better than to add rhubarb? I haven’t had rhubarb in so long I forgot how much I like it. When we were kids my sister and I used to eat it raw with sugar. But I think it’s better in this Strawberry Rhubarb Galette. Oh, and when I was making the pie dough I ran out of flour, I had some cake flour on hand and used about one cup hoping it would turn out ok, I’ve never heard of cake flour in a pie dough, in any case not only did it turn out ok I think I like it better! The crust is very flaky and a bit softer than I’ve made before, a little closer to a pastry dough. So there’s that little magic to add if you like. Until next time, enjoy!

strawberry_rhubarb_galette-2.jpg
strawberry_rhubarb_galette-3.jpg
strawberry_rhubarb_galette-4.jpg
strawberry_rhubarb_galette-5.jpg
strawberry_rhubarb_galette-6.jpg
strawberry_rhubarb_galette-7.jpg
strawberry_rhubarb_galette-8.jpg
strawberry_rhubarb_galette-9.jpg
strawberry_rhubarb_galette-10.jpg

Strawberry Rhubarb Galette

  • 2 cups of Strawberries (cut in half or whole if they’re small)

  • 2 cups peeled and chopped rhubarb, about 1/2” pieces

  • Lemon juice, about a half a lemon

  • 1/4 cup sugar

  • 3 tablespoons flour

  • 13” pie dough, recipe below

Preheat an oven to 425°F. Line a baking sheet with parchment paper. 

Place the dough on a lightly floured surface and roll out into a 13-inch round. Transfer to the baking sheet lined with parchment paper. 

In a bowl, mix together the fruit, lemon juice, sugar and flour. Spoon the filling onto the dough, leaving a 2-inch border uncovered around the edge. Fold the edge up and over the filling, forming loose pleats. Bake until the filling is bubbling and the pastry is golden brown, about 25-30 minutes. 

Remove from oven and let cool slightly. Cut into wedges and serve. Makes one 9-inch galette

Pie Dough

  • 2-1/2 cups all-purpose flour (you can swap out 1 cup of flour for cake flour for a softer crust)

  • 2 tablespoons sugar

  • 1/2 teaspoon salt

  • 2 sticks of butter (1 cup), cut into 1/2-inch pieces and chilled

  • 7-8 tablespoons ice water

In a large bowl, mix together the flour, sugar, and salt. Cut in the chilled butter using a stand mixer, a food processor, or a pastry blender until the butter is evenly distributed but still in large, visible pieces. Add the ice water to the flour and butter and mix by hand or with a wooden spoon so you don’t overwork the dough. The dough will be shaggy, place on floured workspace and work it together quickly until if forms a ball. Divide into two disks, wrap each with plastic wrap and refrigerate for at least 1 hour or overnight. Remove the dough from the refrigerator about 30 minutes before you want to use it. 


CBD Infused Coconut Oil

CBD_infused_coconut_oil-11.jpg

CBD Infused Coconut Oil is surprisingly easy to make thanks to Jeff Danzer’s recipe. I’ve seen CBD Hemp infused oil for sale online and it’s very expensive. Not only is making your own more economical, you have more control over the type of oil you want to use and the strength. Why CBD Infused Coconut Oil? I’ve been meaning to cook with Cannabis for some time now. I’ve been reluctant because it’s hard to know the exact potency unless it’s been tested in a lab, or you try your recipe yourself and take the whole day off as a precautionary. That can be a bit much. But CBD is derived from Hemp and it’s a whole different experience.

I’m working with a farm in Southern Oregon, Cascadia Blooms, to develop some recipes with the Hemp they grow. If you’re not familiar with CBD, Cascadia Blooms has a great FAQ section here, basically CBD Hemp will relax your body without the psychoactive high you would experience with THC in Cannabis. Adding it to your food or drink is a great way to consume it. 

You can use the CBD Infused Coconut Oil the same way you would use any Coconut Oil. I wanted to try it without making a whole batch of cookies, so I first tried about a teaspoon in coffee (people are doing that? yes) but I didn’t like it, I drink my coffee black but if you use cream and sugar you might like it, in any case the 1 teaspoon did nothing for me, so then I smeared a heaping tablespoon on toast, and that was the right amount. (Keep in mind it takes at least an hour to feel the effects, so best to take your time and see how you feel after 1-2 hours.)

The effects? Within about an hour I felt relaxed, it definitely reduces anxiety. As a result I felt more focused on whatever I might be doing, it’s kind of incredible how many distractions there are, never mind social media and email, sometimes I have a hard time focusing because of my mile-long list of things to do. I can’t seem to walk through any room in the house or the yard without seeing something to do, fix, clean, update, really around every corner (and our house isn’t even messy!). I think that creates a kind of low level anxiety for me. But with CBD it felt different, I know those things to do are there, but I’m not anxious about it. That’s the most profound effect that I experienced. It lasts for about 4 hours and tapers off.

I’ve included the cleaning process below but it is optional as Cascadia Blooms takes care to keep their Hemp flower clean, organic and ready for food consumption. The cleaning process also produces a lighter tasting oil which helps to control flavor. The coconut oil I infused had very little smell or flavor of the Hemp, however you might want to skip that process if you want that flavor depth, it will be determined by the flower you use, but it generally has an herb-like flavor, a little peppery that would be suitable for savory dishes. The entire process is done in a French Press, which I think is rather brilliant, it worked out great for steeping and straining. This is first of a series of CBD Recipes as you will need the infused ingredients to work with (butter, coconut oil, olive oil, etc). I look forward to sharing more with you!

You can order online everywhere in the U.S. (except Idaho and South Dakota, sorry!) and the Hemp is shipped in double-lined sealed bags so that there is no odor at all in your mailbox. You can read more about their packaging and shipping info here.

This is a sponsored post on behalf of Cascadia Blooms, all thoughts and opinions are my own, the recipe below provided by Jeff Danzer.

So let’s get started!

CBD_infused_coconut_oil-1.jpg
CBD_infused_coconut_oil-2.jpg

Break the large hemp flower into popcorn size pieces

CBD_infused_coconut_oil-3.jpg
CBD_infused_coconut_oil-4.jpg

Soak the hemp flower in French Press with distilled water, submerged, for 2-3 days until water is clean, changing water twice a day

CBD_infused_coconut_oil-5.jpg
CBD_infused_coconut_oil-6.jpg

Run through salad spinner to remove excess water. Dry and decarb on baking sheet, bake 60-90 minutes until dry (foil should be loosely covering the pan, not too tight or it will steam!)

CBD_infused_coconut_oil-7.jpg

Add the oil and dried Hemp flower to French Press

CBD_infused_coconut_oil-8.jpg

Steep in boiling water for 2 hours

CBD_infused_coconut_oil-9.jpg
CBD_infused_coconut_oil-10.jpg

Strain oil through French Press into sterile jar or container

CBD_infused_coconut_oil-12.jpg
CBD_infused_coconut_oil-13.jpg

As I mentioned above, I recommend a tablespoon per serving for optimal effect, but use your own discretion as to what works for you best

Hemp CBD Infused Cooking Oil

  • 4g Hemp Flower

  • 8 ounces Olive or Coconut Oil

  • Distilled water

  • French Press

  • Pot of boiling water

Hemp CBD Infused Cooking Oil - Cleaning and Drying

Soak

Pick the buds off the stem. In a French Press Completely immerse the buds and stems in distilled water and soak for 2 to 3 days, changing the water twice a day until the water in the French press is clear.

Rinse

Remove the herb from the French Press and place in a salad spinner. Spin for about 30 seconds to remove excess water.

Dry and Decarb

Preheat oven to 240º F.

Spread the hemp evenly over a large baking sheet and place a large piece of light aluminum foil loosely over the top of it. Crimp the edges to keep in any odor (but don’t seal it too tight or it will steam.) Bake for 60 to 90 minutes until completely dry. Your Hemp is now clean and ready for infusion into your butter, oil, alcohol or vegetable glycerin.

Hemp CBD Infused Cooking Oil - Simple Steeping Method

Place Hemp flower buds in French Press along with the oil. Fill a pot halfway or so with water and bring to a boil. Your water line should not be much higher than the oil level in the French Press. 

Stand the French Press in the pot of boiling water and let steep for 2 hours. Adding more water as needed if it boils down.

Strain the oil through the French Press into a sterile jar or container. It is now ready to use. 

Pear Galette with Blue Cheese, Hazelnut and Thyme

Pear_bluecheese_hazelnut_galette-2.jpg

This Pear Galette with Blue Cheese, Hazelnut and Thyme came out incredible, I created the recipe on the fly and it worked perfectly. So I kept notes on what I did so that I could share it with you here. I think you will enjoy it. As you know (or may not know) I’ve been doing some videos lately, I wanted to do a stop motion video and thought it might be fun to make a galette since there’s a lot of assembly involved. Well mostly assembly as there is very little to do other than chop and slice a few things, and if you already have pie dough on hand it’s even easier. Which I recommend, pie dough freezes great, this is what I had leftover from the holidays. 

The stop motion video was fun to make, although it does take quite a while to create. The video below contains 56 photos, by the time I got to arranging the pears, Jeff helped out by hitting the shutter so that I didn’t have to clean my hands each time, which is what I did while rolling out the dough and I was getting flour all over my laptop (I worked with my camera tethered to my computer), so that was really helpful (thank you Jeff!), I would recommend getting some assistance if you plan on doing a stop motion video like this, where there’s mess involved. I’m curious to know if you enjoy the videos and if there are any recipes that you would like to see in video format in addition to photos? You can leave comments here or Instagram or wherever you like. Recipe below! Enjoy!

Pear_bluecheese_hazelnut_galette-1.jpg
Pear_bluecheese_hazelnut_galette-4.jpg
Pear_bluecheese_hazelnut_galette-3.jpg

Pear Galette with Blue Cheese, Hazelnut and Thyme

  • 1 pear, halved and sliced 1/4” thick

  • 1/4 cup blue cheese, crumbled

  • 1 teaspoon fresh thyme leaves

  • 1/4 cup roasted hazelnuts, roughly chopped

  • 1 teaspoon brown sugar

  • 1 pie dough (recipe below)

  • 1 egg beaten (for egg wash)

Heat oven 400°

Roll out your pie dough to roughly a 10-inch round. Sprinkle the brown sugar on the dough leaving a 1-2 inch border. Add cheese, nuts and thyme (leaving a few ingredients aside for the top), then add sliced pears in a circular pattern, fold the edges in a circular pattern, top the center with the remaining cheese, nuts and thyme for color and texture.  Brush the egg wash on the dough. Place on parchment lined baking sheet and Bake at 400° for 25-30 minutes until golden. Remove from oven and serve warm or room temp. 

Pie dough (this makes 2 pie crusts, you will have extra for next time, yay!)

  • 2 1/2 cups all-purpose flour

  • 2 tablespoons sugar

  • 1 teaspoon salt

  • 2 sticks (16 tablespoons) cold unsalted butter, cut into 1/2-inch cubes

  • 6 to 8 tablespoons ice water

To make the dough in a food processor, pulse together the flour, sugar and salt until combined, about 5 pulses. Add the butter and process until the mixture resembles coarse meal, about 5-10 pulses. Remove from processor and place dough in large bowl, add 6 tablespoons of the ice water, combine with wood spoon. The dough should hold together when squeezed with your fingers but should not be sticky. If it is crumbly, add more water 1 teaspoon at a time. Turn the dough out onto a work surface, divide in half and shape each into a disk. Wrap separately with plastic wrap and refrigerate for at least 2 hours or up to overnight. You can freeze the extra pie dough for MONTHS, it holds up very well.


Chocolate Cake with Caramel, Ganache + Toasted Almonds

Chocolate Cake with Caramel, Ganache + Toasted Almonds

Happy 2019 everyone! I made this cake for New Year’s Eve last week. We went with a light dinner of Moroccan Tuna and Couscous with vegetables in hopes of having room for this cake. And we did!

Read More