Blueberry Granola Loaf Cake

blueberry_granola_loaf_cake-2.jpg

Hi there. I’m excited to share some news with you! I’ve been making granola on repeat all through the pandemic. It tastes really good so I had an idea a few months back to package and sell it (locally, at least for now). I set up a page here on Pixels + Crumbs with more info on Good Day Granola. I’m looking to be a vendor at some of Portland farmer’s markets over the next few months and I’ll be updating that page as things progress. I was at a Maker’s market last weekend and I managed to sell quite a few bags of granola. I had a lot of fun and I’ve enjoyed the whole process from recipe development, branding and packaging to being a vendor. It was also great to be around people. I’m fully vaccinated at this point and it feels so liberating! I know it’s not 100% guarantee but it gives me peace of mind. Once I can bake in a commercial kitchen I’ll be able to sell online and I’ll be sure to let you know.

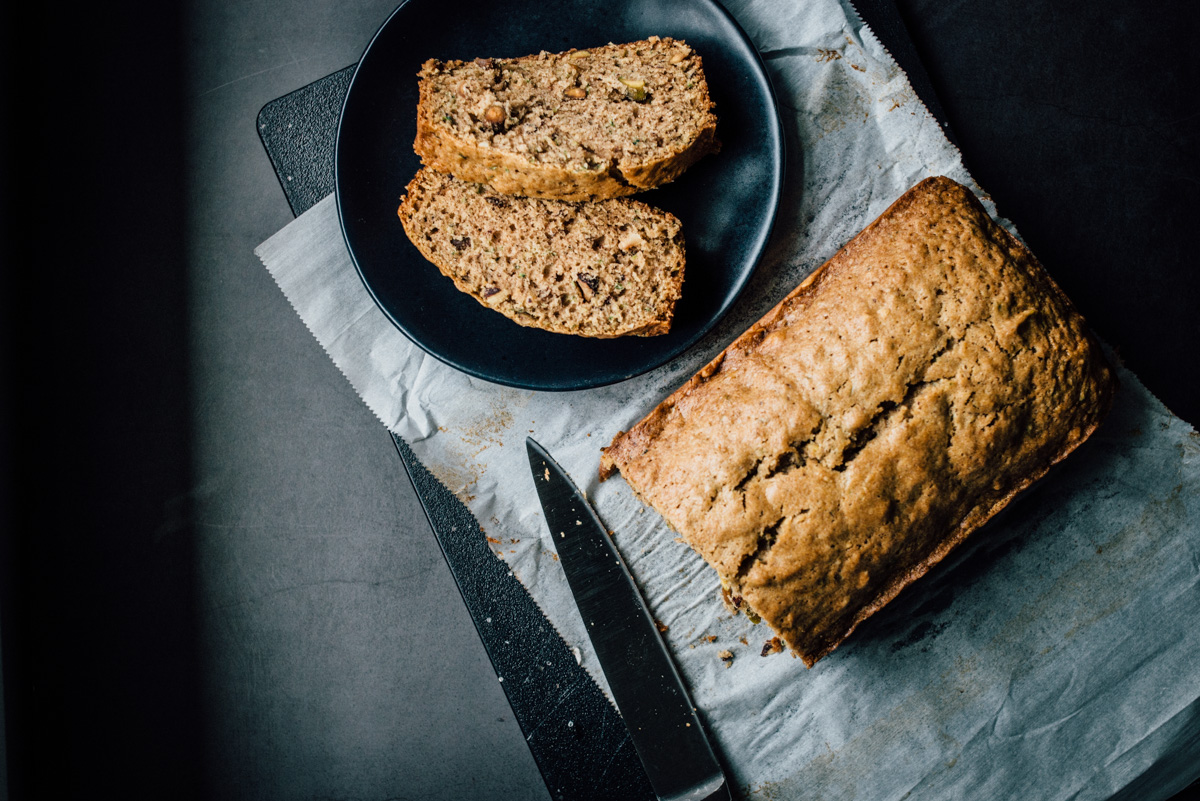
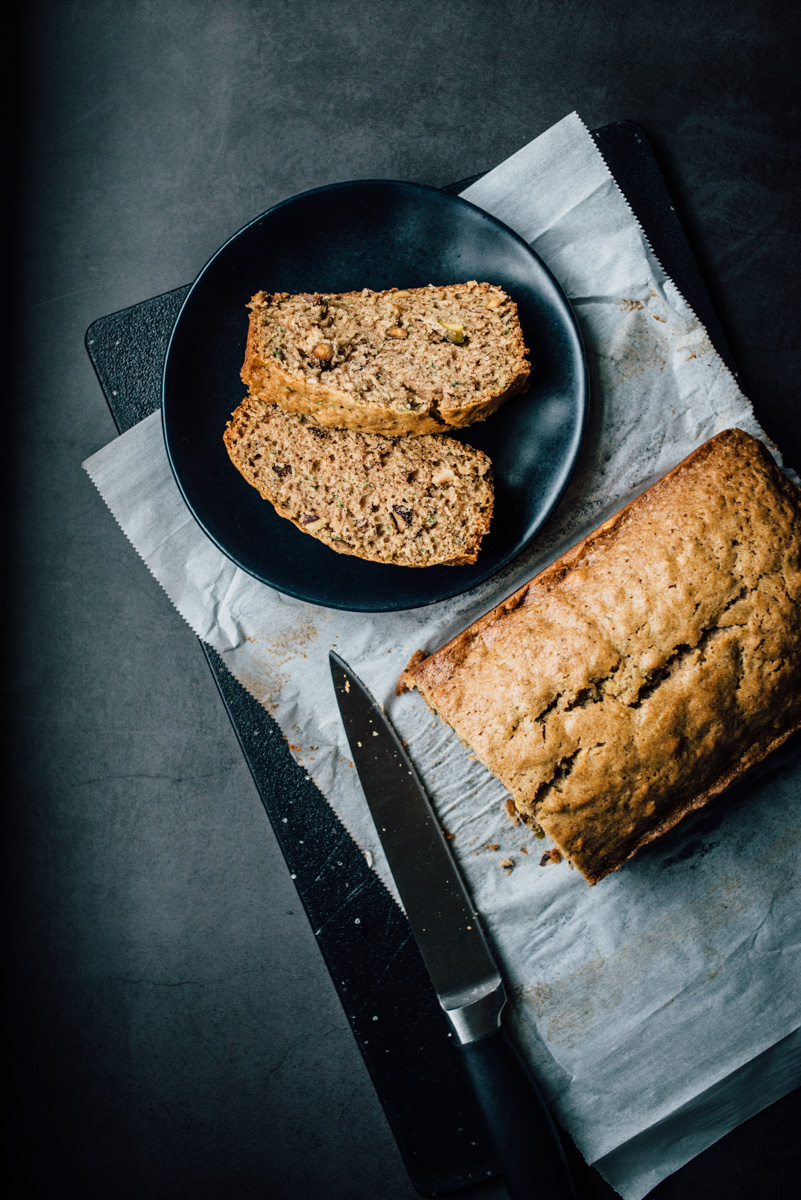
So moving on to this Blueberry Granola Loaf Cake. It’s similar to the Blueberry Lemon Yogurt Cake I made way back in the beginning of this blog. Here I used sour cream because I accidentally bought too much and had to use it. But you could use yogurt if that’s what you prefer. And the topping is granola! It works great on top of the cake and makes it a little more breakfasty.

One more thing, my cake took 1 hour and 20 minutes to thoroughly bake! Not sure why it took that long, it may have been the loaf pan I used, it’s cast-iron and really not the best for baking cakes like this, but I think it looks cute for the photos, lol, so I would recommend testing the center of the cake 50-60 minutes and take it from there. It might need to go longer. Enjoy!

blueberry_granola_loaf_cake-1.jpg

Blueberry Granola Loaf Cake 

  • 1 1/2 Cups all-purpose flour

  • 2 teaspoons baking powder

  • 1/2 teaspoon kosher salt

  • 1 cup sour cream

  • 1 cup sugar

  • 3 large eggs

  • 2 teaspoons lemon zest (about 2 lemons)

  • 1/2 teaspoon vanilla extract

  • 1/2 cup canola oil

  • 1 cup blueberries

  • 1 cup granola

Preheat oven to 350°. Grease loaf pan, line the bottom and longer sides with parchment paper and grease the paper with butter.

Whisk the flour, baking powder and salt in a medium bowl.

In a large bowl whisk the yogurt, sugar eggs, lemon zest and vanilla until well combined. 

Mix the flour mixture into the liquid mixture.

Fold in the oil with a rubber spatula until thoroughly mixed then fold in the blueberries.

Pour the batter in the the pan, top with granola and bake for 1 hour, checking at the 50 minute mark until toothpick comes out clean in center.

Remove from oven to baking rack and cool for about 10 minutes leaving it in the pan, remove cake from pan with the parchment handles and let cool another 10 minutes or so until just warm.

Peanut Butter Chocolate Chip Cookies

peanut_butter_chocolate_cookies-1.jpg

Here’s another treat to get you through the winter months. Peanut Butter Chocolate Chip Cookies! We had a big snow fall last week, 8-10 inches of snow (with a layer of ice sandwiched in-between) which is a big deal around here. The city practically shut down. Businesses closed. They don’t plow most streets because it’s… sort of rare, but not that rare! And they don’t use salt on the roads because it’s bad for the roads and the environment and will end up costing more money in the end with repair work. So you have to drive with chains on your tires or plan to walk to places, hunker down and light a fire. And maybe make some cookies if you have power. And we did! I couldn’t believe it. Huge snow/ice storm and we didn’t lose power. 

I was almost going to make the Peanut butter and Chocolate Blondies again, but they are so rich. Amazing as they are I really just wanted something a tad lighter. And these are just that. A little less butter, and a little less peanut butter. And also cookies, so rather than baked all at once in one pan, you can do as I did and bake small batches at a time. The dough stays fine in the fridge for a week and you can have fresh baked cookies in just a matter of minutes. Bake 6-12 cookies at a time. Whatever you want. Easy. You can freeze the dough as well if you want to take a break from cookie baking/eating. Since it’s just the two of us I find it makes more sense to do these small batch desserts. Some things freeze well post-baked and taste good defrosted, like cakes, but cookies? I think fresh baked is best.

The original recipe was named “Chewy” Peanut Butter Chocolate Chip Cookies, which mine were not, maybe because I used honey rather than corn syrup? I’m not sure. The only thing I changed here was that I used honey instead of Corn Syrup. But I don’t have corn syrup and didn’t have any plans to use it so I replaced it with honey. No complaints! These cookies were awesome! I would definitely make them again. Enjoy! And stay warm!

peanut_butter_chocolate_cookies-2.jpg
peanut_butter_chocolate_cookies-3.jpg
peanut_butter_chocolate_cookies-4.jpg
peanut_butter_chocolate_cookies-5.jpg
peanut_butter_chocolate_cookies-6.jpg

Peanut Butter Chocolate Chip Cookies

  • 1/2 cup butter, softened 

  • 1/2 cup peanut butter 

  • 1 cup packed brown sugar 

  • 1/2 cup white sugar 

  • 2 eggs 

  • 2 tablespoons honey

  • 2 tablespoons water 

  • 2 teaspoons vanilla extract 

  • 2 1/2 cups all-purpose flour 

  • 1 teaspoon baking soda 

  • 1/2 teaspoon salt 

  • 2 cups chopped semisweet chocolate 10 oz bag

Preheat oven to 375F° (190C°). Line a baking sheet with parchment paper.

In a large bowl cream together the butter, peanut butter, brown sugar, and white sugar until smooth. Beat in the eggs one at a time, then stir in the honey, water, and vanilla. In a separate bowl whisk together the flour, baking soda, and salt. Then stir the flour mixture into the peanut butter mixture. Fold in chocolate chunks. Drop by 1/4 cupfuls 3 inches apart onto the parchment-lined baking sheet.

Bake for 12 to 15 minutes in preheated oven, or until edges are golden. Allow cookies to cool for a few minutes on the cookie sheet before removing to wire racks to cool completely. Makes about 36 cookies.

Cranberry Orange Pecan Loaf Cake

cranberry_orange_pecan_loaf_cake-1.jpg

Cranberry Orange Pecan Loaf Cake. I had some fresh cranberries leftover from Thanksgiving and wanted to make some type of cake with them, I made a Cranberry Cobbler years ago but wanted something different, so here we are. This is such a great cake! I adapted the recipe from Sally’s Baking Addiction and made a few changes. For one, I melted the butter for the streusel, a lot of recipes say to use cold butter and crumble it into the flour and sugar, but sometimes I end up with flour that’s not quite mixed in with the butter after it’s done, I find it’s easier and more reliable to just add the sugar, spice and flour to melted butter. Also instead of buttermilk I used a mixture of greek yogurt and milk, and I added some Pecans to the recipe.

My baking time was a lot different than the 45 minutes to an hour suggested in the original recipe, it may have been due to the pan I used, a cast iron loaf pan, but in any case the total bake time for me was 1 hour and 20 minutes! It didn’t seem quite done after an hour so I took the temperature and let it go longer until it reached 200°. That worked! It’s a great cake, enjoy!

Oh and be careful out there friends, Covid-19 cases are going through the roof! We’re so close to getting a vaccine, it’s not that much longer, do your best to stay safe for you, your family, your neighbors, friends, we’re all in this together! 

cranberry_orange_pecan_loaf_cake-2.jpg
cranberry_orange_pecan_loaf_cake-3.jpg
cranberry_orange_pecan_loaf_cake-4.jpg
cranberry_orange_pecan_loaf_cake-5.jpg
cranberry_orange_pecan_loaf_cake-6.jpg
cranberry_orange_pecan_loaf_cake-7.jpg
cranberry_orange_pecan_loaf_cake-8.jpg

Cranberry Orange Pecan Loaf Cake

Streusel

  • 1/4 cup all-purpose flour

  • 2 Tablespoons granulated sugar

  • 1/2 teaspoon ground cinnamon

  • 3 Tablespoons salted butter, melted

Cake

  • 2 cups all-purpose flour

  • 1 teaspoon baking soda

  • 1/2 teaspoon salt

  • 1 large egg

  • 1/2 cup dark brown sugar

  • 1/2 cup granulated sugar

  • 2/3 cup milk

  • 1/3 cup greek yogurt

  • 1/3 cup vegetable oil 

  • 1 teaspoon pure vanilla extract

  • 2 teaspoons orange zest (about 1 orange zested)

  • 1 cup fresh cranberries (more for topping)

  • 1/2 cup crushed pecans (more for topping)


Glaze

  • 1/2 cup powdered sugar

  • 1 Tablespoon orange juice

Preheat oven to 350°F. Grease a 9×5 inch loaf pan with butter, line with parchment paper and butter that as well.

Make the streusel: Whisk the flour, sugar, and cinnamon together in a medium bowl. Add the melted butter and stir with a fork until combined. Set aside.

Make the cake: Whisk the flour, baking soda, and salt together in a large bowl. 

In a medium bowl, whisk the egg, brown sugar, and granulated sugar together until combined. Whisk in the milk, yogurt, oil, vanilla, and orange zest. 

Pour the wet ingredients into the dry ingredients, then fold with a rubber spatula to completely combine. Fold in the cranberries and Pecans.

Pour the batter into prepared loaf pan. Scatter the streusel on top, add a few cranberries and crushed pecans. Cover the baking dish with foil and bake for 35 minutes. Then remove foil and bake for an additional 25-45 minutes. Cake is done when cake tester or toothpick comes out clean (or at 200° temp, I started using a thermometer because sometimes it comes out clean and it’s not bake all the way through!)

Cool bread completely in the pan set on a wire rack. Then remove using your “parchment handles” onto serving plate or board.

The glaze! In a small bowl, whisk the powdered sugar and orange juice together. Drizzle over cooled bread.

Slice and serve. Cover and store leftover bread at room temperature for 1 day or in the refrigerator for up to 1 week.

Adapted from Sally’s Baking Addiction

Oatmeal Raisin Molasses Cookies

oatmeal_Raisin_molasses_cookies-1.jpg

First. Election. If you’re voting by mail and haven’t yet, please drop your ballot in a ballot box or at your local election ballot drop-off location, more info here! So you are sure your vote will be counted! Late ballots by mail might not be counted if they’re received late and your vote really does matter!

So cookies. I’ve been meaning to try out this recipe for a while. We had some incredibly good cookies from Costco recently, their oatmeal raisin cookies were amazing. I could taste the molasses. So I ventured onto this recipe. It’s really good! But it’s definitely heavier on molasses than the ones I had from Costco. Still, this recipe makes a great cookie, it’s chewy and falls somewhere between oatmeal raisin and gingerbread. I love molasses and wonder why I don’t bake with it more? I made a few adjustments with butter and sugar but I think you will like it.

And so, you know, we have this election coming up (which is a big freakin’ deal!) but I feel remarkably calm about it. I really think that Biden is going to win. I do. Obviously I could be totally wrong, but… everything is telling me that he is going to win. Trump will blame everyone and everything possible, because of course nothing is ever his fault according to him. But man, I want that moment next week where the American people can say to Trump: “You’re Fired!”

I want that so bad.

I didn’t expect Joe Biden to be the one that could make this happen. But the people have spoken and here we are, which I’m totally ok with. And also, Kamala Harris! Here we have a woman (also POC) running as vice-president and it’s like not even a big deal! How awesome is that?! :) I’m old enough to have voted for Geraldine Ferraro in 1984 and it’s kind of incredible that there has not been one woman on the Presidential ticket since then, with the exception of Hillary in 2016, but really, why not?

Let’s hope I’m right.

Good Vibes going into this. And good cookies to get us through. We can do this. #votebiden

oatmeal_Raisin_molasses_cookies-2.jpg
oatmeal_Raisin_molasses_cookies-3.jpg
oatmeal_Raisin_molasses_cookies-4.jpg
oatmeal_Raisin_molasses_cookies-5.jpg
oatmeal_Raisin_molasses_cookies-6.jpg

Oatmeal Raisin Molasses Cookies

  • 1 1/2 cups raisins

  • 1/2 cup unsalted butter

  • 3/4 cup sugar

  • 3/4 cup brown sugar

  • 2 large eggs, room temp

  • 1/2 cup molasses

  • 2 cups rolled oats

  • 1-3/4 cups all-purpose flour

  • 1 teaspoon baking soda

  • 1 teaspoon salt

  • 1 (heaping) teaspoon cinnamon

Plump the raisins, place raisins in a bowl, cover with boiling water and let stand for 5 minutes. Then drain and set aside.

In a large bowl (or stand mixer) beat together the butter and sugars until light and fluffy. Add eggs one at a time, beating well after each. Beat in molasses. In a separate bowl whisk together the oats, flour, baking soda, salt and cinnamon. Gradually add the oat mixture to the butter mixture with a wooden spoon and mix well. Stir in raisins.

Place a tablespoon of cookie dough 2 inches apart onto parchment lined baking sheet. Bake at 350° for 12-14 minutes (mine were done in 14 minutes). Remove from oven and let cool a few minutes, then transfer to cooling rack. This recipe makes a lot of cookies! 5 dozen at this size cookie. I make a couple batches then refrigerate the rest of the dough. You can also freeze the dough so you can make the cookies at your own pace. 

Recipe adapted from Taste of Home

Sourdough Focaccia with Flaked Sea Salt

focaccia-4.jpg

Sourdough Focaccia with Flaked Sea Salt. Sourdough is totally new to me, for years I thought to try it out but felt intimidated by the whole process. And it is a process! But not nearly as bad I was expecting, I’m enjoying it quite a bit. A few weeks ago I got the sourdough starter from a local pizzeria, Red Sauce Pizza, I was purchasing flour and yeast there and they offer a free sourdough starter with purchase. They actually forgot to include it in my bag, I contacted them and they delivered it to my house the next day! That was so nice.

I put the starter (which was super sticky and not bubbly) in the fridge and fed it a few days later, then it started up! I kept it in the fridge and fed it once a week and had no problems at all. 

The recipe below is from Alexandra Cooks and I highly recommend going to her blog, she has so much experience and information that I couldn’t possibly explain here since this is so new to me.

The main things I want to point out about sourdough bread making:

  • It’s not as complicated as it seems

  • You don’t have to buy a sourdough starter, ask your neighborhood bakery, family, friends or neighbors, they’re all throwing away starter discard! .

  • You can feed the refrigerated sourdough starter every 1-2 weeks to keep it active

  • It’s mainly hands off, most of the time is letting it rise

  • This focaccia definitely needs a non-stick pan like this USA Bake pan

  • It’s totally worth it because the bread is amazing!

You may have seen on my instagram feed that I made some Focaccia for a fund raiser through The Side Yard Farm.

This week I’m participating in @bakersagainstracism with @thesideyardfarm’s local bake sale here in Portland to support Black United Fund of Oregon! 100% of the proceeds from this event will be going directly to BUFOR to aid in their mission to directly fund social and economic development initiatives in the underserved communities of Portland. I’ll be baking this Sourdough Focaccia with flaked sea salt.The bake sale will run from 11am Monday 6/15 through Friday 6/19. Pick-up of all purchased items will be at The Side Yard Farm on Saturday 6/20 between 10am-4pm, no shipping or delivery available.

Here’s where you can pre-order, it looks like a lot of great baked goods on the site! 

https://pdx-bakers-against-racism.square.site

It’s now Wednesday and they’re nearly sold out of everything! More baked items are being added I’m told and they are also accepting donations.

Just a friendly reminder when you pick up your baked goods be sure to wear a mask! Coronavirus cases are on the rise here in Oregon and we all want this to go away as fast as possible!

Below is the recipe for this fantastic Focaccia! 

focaccia-1.jpg
focaccia-3.jpg
focaccia-2.jpg

Sourdough Focaccia with Flaked Sea Salt

  • 50 g – 100 g (1/4 to 1/2 cup) active sourdough starter

  • 10 g (about 2.5 teaspoons) kosher salt

  • 430 – 440 g water, room temperature (about 100°F)

  • 512 g (about 4 cups) bread flour

  • 3 tablespoons extra-virgin olive oil, divided, plus more for drizzling

  • Flaky sea salt, such as Maldon

I recommend watching her video here, it helped me a lot! 

Place the starter, salt, and water in a large bowl. Stir with a spatula to combine — it doesn’t have to be uniformly mixed. Add the flour. Mix again until the flour is completely incorporated.

Perform one “fold”: 30 minutes after you mix the dough, reach into the bowl and pull the dough up and into the center. Turn the bowl quarter turns and continue this pulling 8 to 10 times. 

Drizzle with a splash of olive oil and rub to coat. Cover bowl with a tea towel or bowl cover and set aside to rise at room temperature (70ºF/21ºC) for 4 to 18 hours (the time will vary depending on the time of year, the strength of your starter, and the temperature of your kitchen — in summer, for instance, sourdoughs double in 6 hours; in winter, they double in 18 hours. A straight-sided vessel makes monitoring the bulk fermentation especially easy because it allows you to see when your dough has truly doubled. You will also see bubbles in the dough which is a good sign that it is ready.

When dough has doubled, place 2 tablespoons of olive oil into a 9×13-inch pan (use a non-stick pan if possible or guess what, it will stick!).

Drizzle dough with a tablespoon of olive oil. Use your hand to gently deflate the dough and release it from the sides of the bowl. Gently scoop the dough into the center of the pool of oil in your prepared pan. Fold dough envelope style from top to bottom and side to side to create a rough rectangle. Turn dough over so seam-side is down. (watch her video for better reference).  

Rub top of dough with oil. Leave alone for 4 to 6 hours (At this point you can also put it in the refrigerator overnight for a slow rise, just take it out prior to baking and proceed as below instructions, you will get a higher rise and I think it’s better!), uncovered, or until puffy and nearly doubled.  

Heat oven to 425ºF. Rub hands lightly with oil, and using all ten fingers, press gently into the dough to dimple and stretch the dough to nearly fit the pan. Sprinkle generously with a flaked sea salt. Transfer pan to the oven and bake for about 25 minutes or until golden all around. Remove pan from oven and transfer bread to a cooling rack. Cool at least 20 minutes before slicing.

Adapted from Alexandra’s Kitchen

Cornbread

corn_bread-1.jpg

How is everyone doing? We’re ok here, adapting to the stay at home rule. Granted, Jeff and I have been working from home for some time now so this wasn’t any kind of huge transition, but staying away from grocery stores, restaurants and people has proved to be more challenging than I expected. Last week we could not get deliveries through Amazon PrimeNow for several days, rather than the same-day 2-hour window we’ve relied on. And all delivery services had massive delays. I was down to two eggs by the weekend and figured I would have to go to the grocery store. But I was able to find a local grocer that uses Instacart for delivery service and got a delivery on Saturday night! I was so happy. It really is the little things in life, like food! I’m trying to reserve my trips out to the store for only things I can’t get online or get delivered (hello Bourbon!). The less contact we have now the faster we can get through this Pandemic, and hopefully return to something somewhat normal. But I think that will be a long time from now. We’ll be toting around hand sanitizer until we’re like “Corona who? what?” Well, that day will never come because nobody in the whole world will forget this.

So, Cornbread! This recipe is adapted from Sprouted Kitchen Cooking Club. I’ve made Cornbread maybe a few times and it’s generally, ok. Nothing to blog about. But I’m really happy with how this came out. Not sure if it’s the type of cornmeal I used or what, I get very confused about cornmeal, there are so many different kinds, fine, medium, course, corn grits, corn polenta, grits/polenta, Masa Harina, it’s almost endless. I had Course Grind Cornmeal on hand so I used that. I was worried the texture would be too sandy, but it came out great, I really love it.

I made a couple adjustments to the original recipe, I didn’t have a can of green chiles and I forgot to add the cheese! I’ll keep those in the recipe as optional. I added some defrosted frozen corn which I highly recommend. Also Sarah’s recipe is for Cornbread Muffins, I’ve adjusted the recipe for a 10” cast-iron skillet, but you could make muffins instead, it will be about 10 minutes less bake time.

I made this for a Black-eyed Peas and Collard Greens dish we had the other day and I’ll be posting that recipe soon, it tasted so good! Take care friends.

corn_bread-2.jpg
corn_bread-4.jpg

Cornbread

  • 1 1/4 cup buttermilk or to make it: mix in 1 tbsp white vinegar to 1 1/4 cup milk

  • 2 eggs

  • 1/3 cup avocado oil or other neutral oil

  • 3 Tbsp. butter or ghee, melted

  • 1/2 tsp. sea salt

  • 1/3 cup cane sugar

  • 1 cup cornmeal (course grind)

  • 1 cup all-purpose flour

  • 2 tsp. baking powder

  • 1 tsp. baking soda

  • 1 cup frozen corn, defrosted to room temp

  • 1 4 oz. can mild green chiles, drained well (optional)

  • 3/4 cup grated cheddar cheese (optional)

  • A grind of fresh ground pepper

Preheat the oven to 375’ and grease a 10” cast-iron skillet or equivalent baking dish. 

In a large mixing bowl, whisk the buttermilk and eggs together really well. Add the oil, melted butter, salt and sugar and whisk until combined. In a separate medium bowl, whisk together the cornmeal, flour, baking powder and baking soda. Add the flour mixture to the wet ingredients, stir to just combine. Add the corn and some fresh ground pepper. (if using add the drained chiles, cheese and stir one more time). 

Pour into the cast-iron pan, top with a bit of sugar or honey if you like. Bake for 30 minutes or until done in the center (muffins will take 20-25 minutes). Remove and allow cool. 

Crispy Thin Chocolate Chip Cookies

crispy_thin_chocolate_chip_cookies-1.jpg

Crispy Thin Chocolate Chip Cookies. I’ll tell you right now, this recipe is a keeper! I’ve been eager to make these cookies ever since I saw David Lebovitz’s blog post recently. I’ve made chocolate chip cookies before, you might remember my 2-ways post back a few years ago with that giant cast-iron pan cookie! And while those are good, these are much much better. These are absolutely delicious. They’re similar to Tate’s Chocolate Chip Cookies. What makes them thinner and crisper? I compared the two recipes and while they’re quite similar in ingredients, this one here has less flour, less egg and the addition of water. Water? Maybe that’s the secret ingredient! 

In any case I made a couple changes, using dark brown sugar rather than light brown sugar, I think it works fine. And I chopped up 7 ounces of 72% Cacao dark chocolate bars rather than using chocolate chips, it’s up to you but I like the big chocolate pieces in the cookie. David has the dough balls scooped out around a 1/4 cup each, I think that might be too much, I used a heaping tablespoon of cookie dough, rounded it out into a ball and they were pretty large, you can see from my photo below that even spacing them out a lot they still ran into each other. You basically want a 1”-1 1/4” ball. I got out my big-ass baking sheet on the next round so they had plenty of room to spread. The following batches I went for more of a 1” size ball. And all of them were done more close to 15 minutes. Not only will the time depend on the size of the cookie, but if the cookie dough is left out of the fridge longer they might be done a minute or two sooner. So keep an eye on them towards the end.

It’s January which marks the 7th anniversary of this blog! I can’t believe I’m still doing this, lol. I’ve learned a lot and have become much more comfortable cooking and baking and of course photographing the whole business. Much thanks to those that stop by to see what I’m up to, I appreciate your comments and such. I know blogging is not so much a thing these days but personally appreciate everyone out there that’s sticking to it and sharing recipes, how-tos and all that. The internet has become so toxic over the years, sometimes it’s nice to just chill out and read about cookies. I have quite a few recipes I want to share with you over the next few weeks, some of my favorites that have been on repeat. I think you’ll enjoy them. Speaking of enjoy, please please make these cookies, you won’t be disappointed.  David’s recipe is adapted from Joanne Chang’s Pastry Love: A Baker’s Journal of Favorite Recipes.

crispy_thin_chocolate_chip_cookies-2.jpg
crispy_thin_chocolate_chip_cookies-3.jpg
crispy_thin_chocolate_chip_cookies-4.jpg
crispy_thin_chocolate_chip_cookies-5.jpg
crispy_thin_chocolate_chip_cookies-6.jpg
crispy_thin_chocolate_chip_cookies-7.jpg
crispy_thin_chocolate_chip_cookies-8.jpg
crispy_thin_chocolate_chip_cookies-9.jpg
crispy_thin_chocolate_chip_cookies-10.jpg

Crispy Thin Chocolate Chip Cookies

  • 8 ounces (225g) (2 sticks) unsalted butter, at room temperature

  • 1 cup (200g) superfine sugar (or put regular sugar in blender for a few seconds)

  • 1/2 cup (100g) firmly-packed dark brown sugar

  • 1 large egg, at room temperature

  • 3 tablespoons (45g) water

  • 2 teaspoons vanilla extract

  • 1 3/4 cups (245g) flour

  • 1 1/4 teaspoon flaky sea salt or kosher salt (if using Morton's kosher salt, use 3/4 teaspoon or 1 teaspoon for more profound saltiness)

  • 1 teaspoon baking soda

  • 1 1/2 cups (280g, 7-10 ounces) bittersweet or semisweet chocolate (chopped or chips)

In a stand mixer fitted with the paddle attachment beat the butter and sugars on medium speed until light and creamy, about 5 minutes. Or use a hand mixer, doing this by hand will wear you out and take much much longer.

Stop the mixer and scrape down the sides with a rubber spatula, add in the egg, water, and vanilla and mix until well combined.

In a medium bowl mix together the flour, salt, and baking soda. Add the chopped chocolate and toss in the flour mixture. With the mixer on low speed, stir in the flour and chocolate chunk mixture until thoroughly combined. Cover the bowl (or transfer to a container and cover) refrigerate the dough at least 3 to 4 hours, or overnight.

To bake the cookies, preheat the oven to 350ºF (180ºC). Line two large baking sheet with parchment paper. Arrange the dough, formed in 1-inch to 1 1/4-inch balls on the baking sheet, spaced at least 3-inches (8cm) apart. (They will spread, so expect to get 5 or 6 on a standard baking sheet.) Press the cookies down slightly with your hand and bake until the cookies have spread and just until there are no light patches across the center, rotating the baking sheet(s) midway during baking so they bake evenly. They'll take about 13-15 minutes, check the cookies a few minutes before the timer goes off and see if they need longer. The time will depend on the size of the cooker, larger will take a bit longer but only a minute or two more.

Remove the cookies from the oven and let cool for 5 minutes. Transfer the cookies to a wire rack and cool completely.

Storage: The dough can be refrigerated up to four days, or frozen for up to three months. The cookies will keep in an airtight container for up to three days but are best the day they are baked.

Adapted from David Lebovitz who adapted it from Joanne Chang

Zucchini + Herb Ricotta Tarts

zucchini_ricotta_tart-1.jpg

Zucchini and Herb Ricotta Tarts. I’m looking for all ways to eat zucchini lately. This is the first time we’ve grown zucchini and wow! it grows quickly, seems every 3 days or so there are a couple more to pick. It’s easy enough just to grill but I want to try some new ways to prepare it. I pickled some last week and they came out great. I’d like to get that recipe in a post soon, but you might start calling me The Zucchini Lady, ha ha. This tart dough is different than other doughs I’ve made, you make it with melted butter which is the opposite of 99% pie doughs out there as they use cold butter, but I thought I’d give it a try because with this dough you don’t have to roll it out, you simply press it in the pan. It was much easier and faster to make. You just mix it in a bowl by hand in one minute. Done. I was surprised by how much I liked it! Really nice texture, almost like a cookie type texture. I would make this again no doubt, but for savory tarts I would cut back on the sugar and add more salt, other than that it’s a winner. This Zucchini + Herb Ricotta Tart is super delicious, we had it with a side of Radicchio salad, it’s good for a lunch or light dinner. Oh and pan size, you can make one 9” tart or make a few smaller ones, I used a 6” tart pan and two 4” tart pans, the math doesn’t quite work out on that but it worked for me! ¯\_(ツ)_/¯ Enjoy :)

zucchini_ricotta_tart-2.jpg
zucchini_ricotta_tart-3.jpg
zucchini_ricotta_tart-4.jpg
zucchini_ricotta_tart-5.jpg
zucchini_ricotta_tart-6.jpg

Zucchini + Herb Ricotta Tarts

  • 1/2-1 whole zucchini sliced 1/8” thick

  • 1 cup ricotta

  • 1/4 cup shredded mozzarella

  • 1 teaspoon fresh thyme

  • 1 teaspoon fresh oregano 

  • Olive oil

  • Salt & Pepper

  • Tart dough (recipe below)

In a bowl combine the cheeses and fresh herbs with some salt and pepper. Spread a layer of the cheese mixture into the prepared tart pans, then arrange the zucchini slices on top. Drizzle with some olive oil to cover all the vegetable. Lightly salt. Bake at 400°F for 25-35 minutes until just browned.

Tart Dough

  • 1 stick (1/2 cup) melted butter

  • 3 tablespoons sugar (or 1 1/2 tablespoons for less sweet)

  • 1/4 teaspoon salt

  • 1 1/4 cups flour

Preheat oven to 350°F. In a large bowl combine butter, sugar and salt, then add flour and mix with wood spoon until just combined. 

Distribute the dough on the bottom of your tart pan(s) and press the dough evenly over bottom and sides. You can use a floured cup to press it if necessary (i just used my fingers). Cover the tart shell with plastic wrap and refrigerate for 30 minutes to 1 hour. Once chilled, with a fork prick the shell all over and bake for 10 minutes. Remove from oven to cool. Then add filling and bake as directed.

Tart dough adapted from Chowhound

Zucchini Nut Bread

zucchini_nut_bread-8.jpg

Zucchini Nut Bread. I didn’t expect to make this so soon. Our zucchini plant is growing so quickly now and producing more than we anticipated. We’ve picked 4 zucchini in the past week and more are on the way. This is the first time we’ve grown it so I didn’t know what to expect. Last year I planted a yellow squash and that didn’t work out, all male blossoms and no squash. But we did some changes to our soil this year and it’s made a big difference. I’m not sure if I posted about this but we removed all our old soil in the garden beds (which was potting soil) and replaced it with a proper soil/compost mix and everything is growing great! The weather has been unusually mild so far this July, seriously rain in Portland in July? Almost unheard of. So it’s been more like a longer spring season. Which is ok with me, and the grass, but I think those tomatoes would appreciate a bit more heat. The weather forecast for this week is in the 70s!? Yep. Weird. 

The recipe is adapted from Sally’s Baking addiction and it’s good! It has lots of cinnamon which I love. I almost wish it had more zucchini in it. I’ll add more next time because I’m certain there will be a next time with all this zucchini, and I’ll update on this post. The original recipe added chocolate chips, but I didn’t really want that for this bread (cake!) so I added what nuts I had on hand, about 1/4 cup pistachios and 1/4 cup crushed hazelnuts. This Zucchini Bread is light in texture, and I kinda wish it were a bit more dense, I’ll experiment some more and let you know how it works out. 

It’s super delicious, easy to make and I’m sure you will enjoy this recipe.

zucchini_nut_bread-1.jpg
zucchini_nut_bread-2.jpg
zucchini_nut_bread-3.jpg
zucchini_nut_bread-4.jpg
zucchini_nut_bread-5.jpg
zucchini_nut_bread-6.jpg
zucchini_nut_bread-7.jpg
zucchini_nut_bread-9.jpg
zucchini_nut_bread-10.jpg

Zucchini Nut Bread

  • 1 and 1/2 cups all-purpose flour

  • 1/2 teaspoon baking powder

  • 1/2 teaspoon baking soda

  • 1/2 teaspoon salt

  • 2 teaspoons ground cinnamon

  • 1/4 teaspoon ground nutmeg

  • 1 cup chopped nuts 

  • 1/2 cup canola or vegetable oil

  • 1/2 cup packed light or dark brown sugar

  • 1/2 cup granulated sugar

  • 1 large egg, at room temperature

  • 2 teaspoons pure vanilla extract

  • 1 cup grated zucchini (about 1 medium)

Preheat the oven to 350°F (177°C). Grease a 9×5” loaf pan lined with parchment paper with butter.

In a large bowl whisk the flour, baking powder, baking soda, salt, cinnamon and nutmeg together then stir in the nuts. Set aside. In a medium bowl, whisk the oil, brown sugar, granulated sugar, egg, vanilla, and zucchini together until combined. Pour the wet ingredients into the dry ingredients. Gently combine with a wooden spoon; do not over mix. Spread the batter into prepared loaf pan. Bake for 45 – 55 minutes. The bread is done when a toothpick inserted in the center comes out clean. Remove the bread from the oven and set on a wire rack. Allow to cool completely before slicing.

Cover and store leftover bread at room temperature for up to 5 days (I’m not sure I would leave it out this long, and I’m not sure it wouldn’t get eaten in 5 days!)

Adapted from Sally’s Baking Addiction


Strawberry Rhubarb Galette

strawberry_rhubarb_galette-1.jpg

Strawberries! I love this time of year, not only is it warm and sunny, but my little strawberry patch in the back yard starts producing berries. I didn’t have enough for a whole galette so what could be better than to add rhubarb? I haven’t had rhubarb in so long I forgot how much I like it. When we were kids my sister and I used to eat it raw with sugar. But I think it’s better in this Strawberry Rhubarb Galette. Oh, and when I was making the pie dough I ran out of flour, I had some cake flour on hand and used about one cup hoping it would turn out ok, I’ve never heard of cake flour in a pie dough, in any case not only did it turn out ok I think I like it better! The crust is very flaky and a bit softer than I’ve made before, a little closer to a pastry dough. So there’s that little magic to add if you like. Until next time, enjoy!

strawberry_rhubarb_galette-2.jpg
strawberry_rhubarb_galette-3.jpg
strawberry_rhubarb_galette-4.jpg
strawberry_rhubarb_galette-5.jpg
strawberry_rhubarb_galette-6.jpg
strawberry_rhubarb_galette-7.jpg
strawberry_rhubarb_galette-8.jpg
strawberry_rhubarb_galette-9.jpg
strawberry_rhubarb_galette-10.jpg

Strawberry Rhubarb Galette

  • 2 cups of Strawberries (cut in half or whole if they’re small)

  • 2 cups peeled and chopped rhubarb, about 1/2” pieces

  • Lemon juice, about a half a lemon

  • 1/4 cup sugar

  • 3 tablespoons flour

  • 13” pie dough, recipe below

Preheat an oven to 425°F. Line a baking sheet with parchment paper. 

Place the dough on a lightly floured surface and roll out into a 13-inch round. Transfer to the baking sheet lined with parchment paper. 

In a bowl, mix together the fruit, lemon juice, sugar and flour. Spoon the filling onto the dough, leaving a 2-inch border uncovered around the edge. Fold the edge up and over the filling, forming loose pleats. Bake until the filling is bubbling and the pastry is golden brown, about 25-30 minutes. 

Remove from oven and let cool slightly. Cut into wedges and serve. Makes one 9-inch galette

Pie Dough

  • 2-1/2 cups all-purpose flour (you can swap out 1 cup of flour for cake flour for a softer crust)

  • 2 tablespoons sugar

  • 1/2 teaspoon salt

  • 2 sticks of butter (1 cup), cut into 1/2-inch pieces and chilled

  • 7-8 tablespoons ice water

In a large bowl, mix together the flour, sugar, and salt. Cut in the chilled butter using a stand mixer, a food processor, or a pastry blender until the butter is evenly distributed but still in large, visible pieces. Add the ice water to the flour and butter and mix by hand or with a wooden spoon so you don’t overwork the dough. The dough will be shaggy, place on floured workspace and work it together quickly until if forms a ball. Divide into two disks, wrap each with plastic wrap and refrigerate for at least 1 hour or overnight. Remove the dough from the refrigerator about 30 minutes before you want to use it.