Panzanella

panzanella-1.jpg

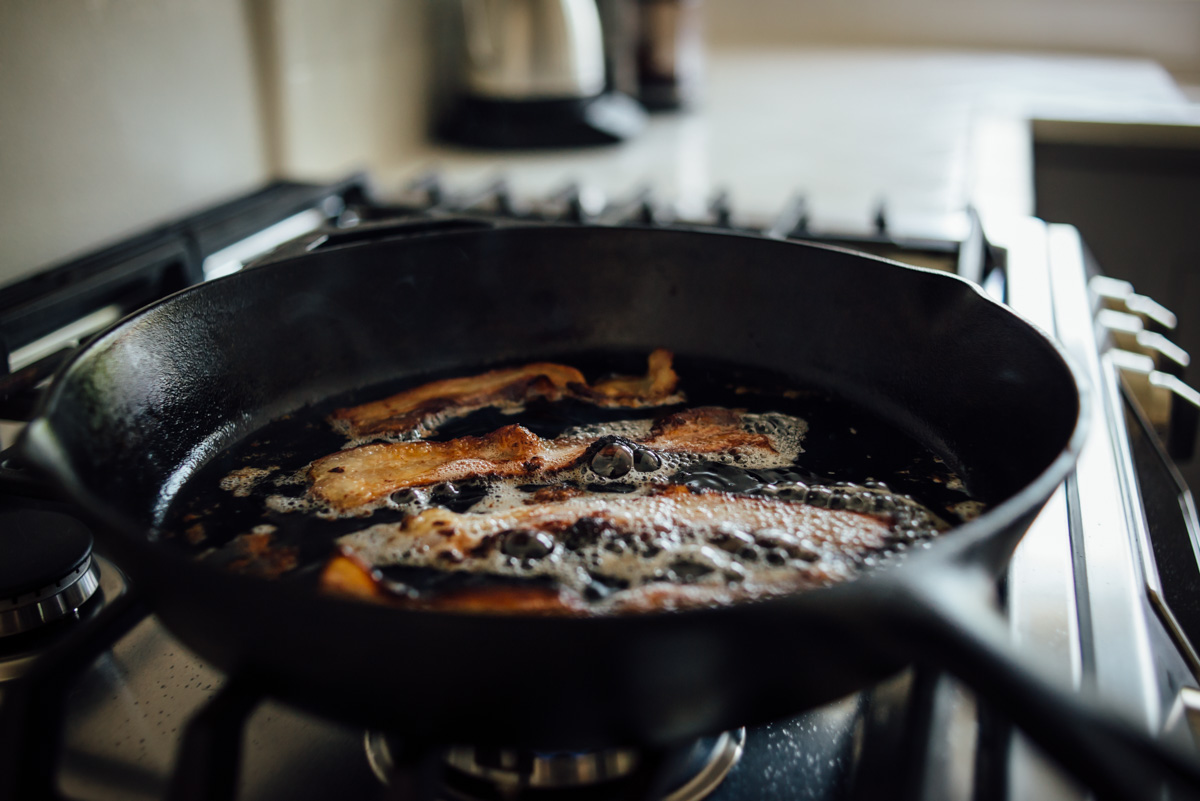
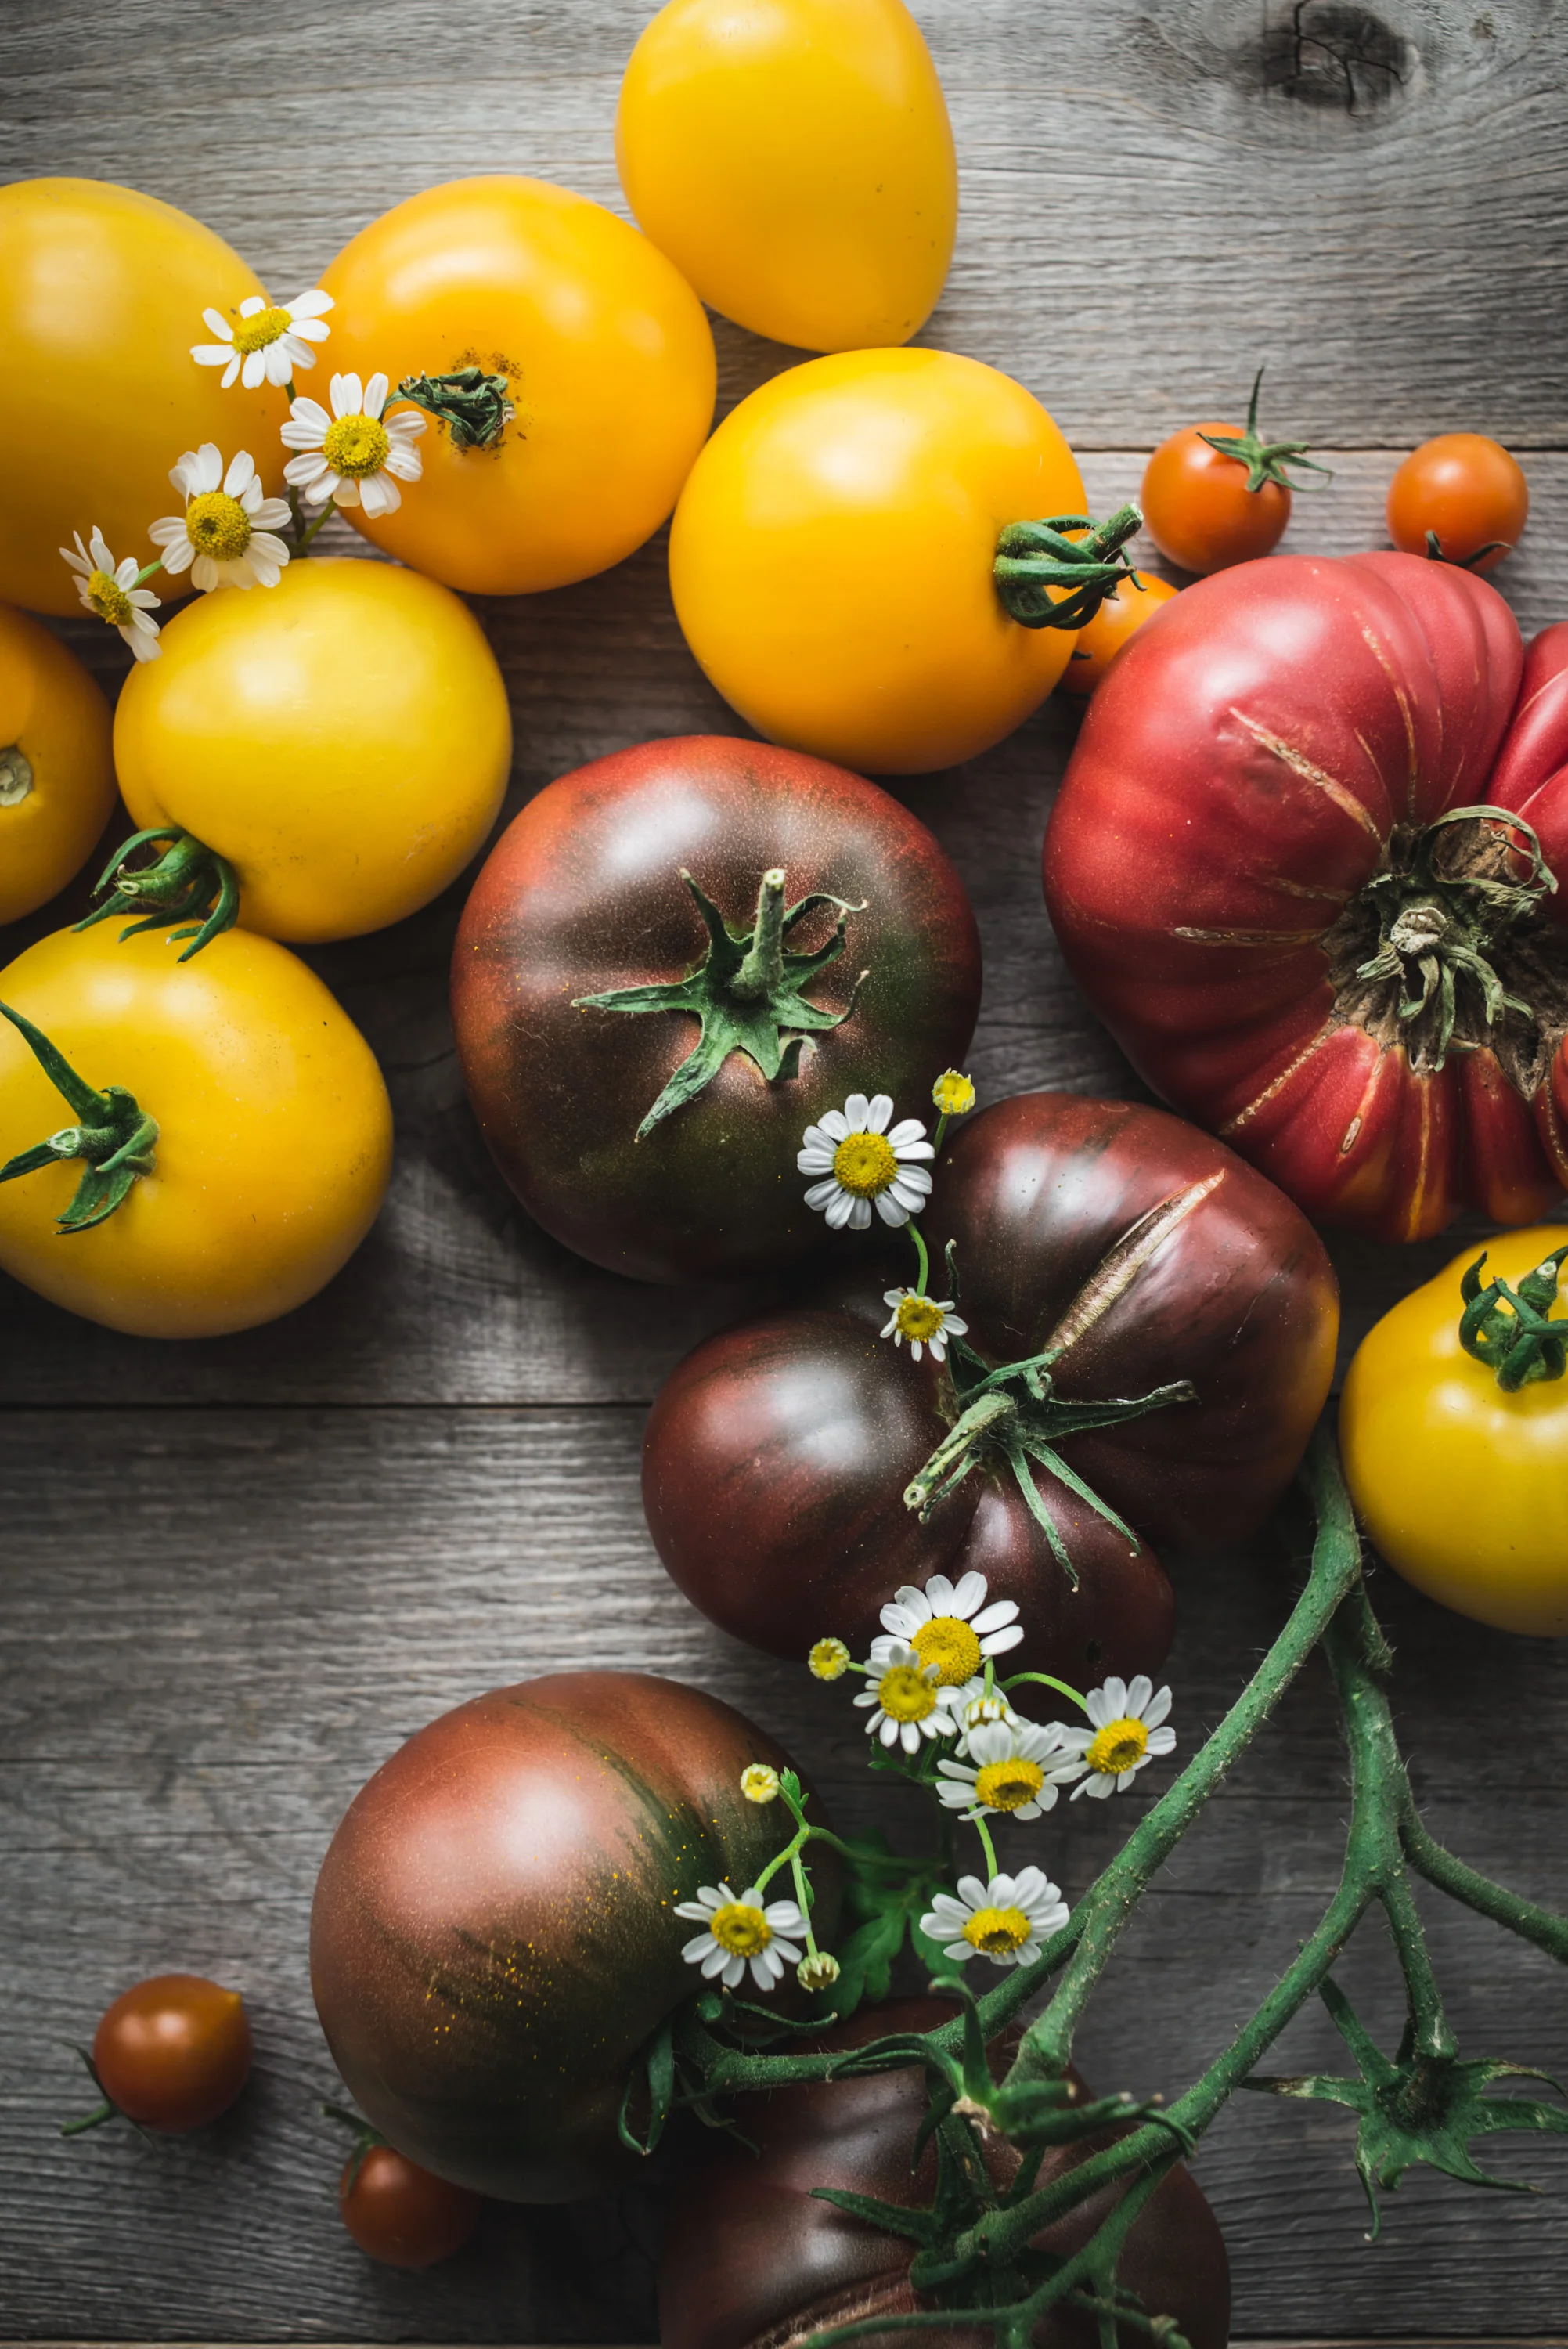
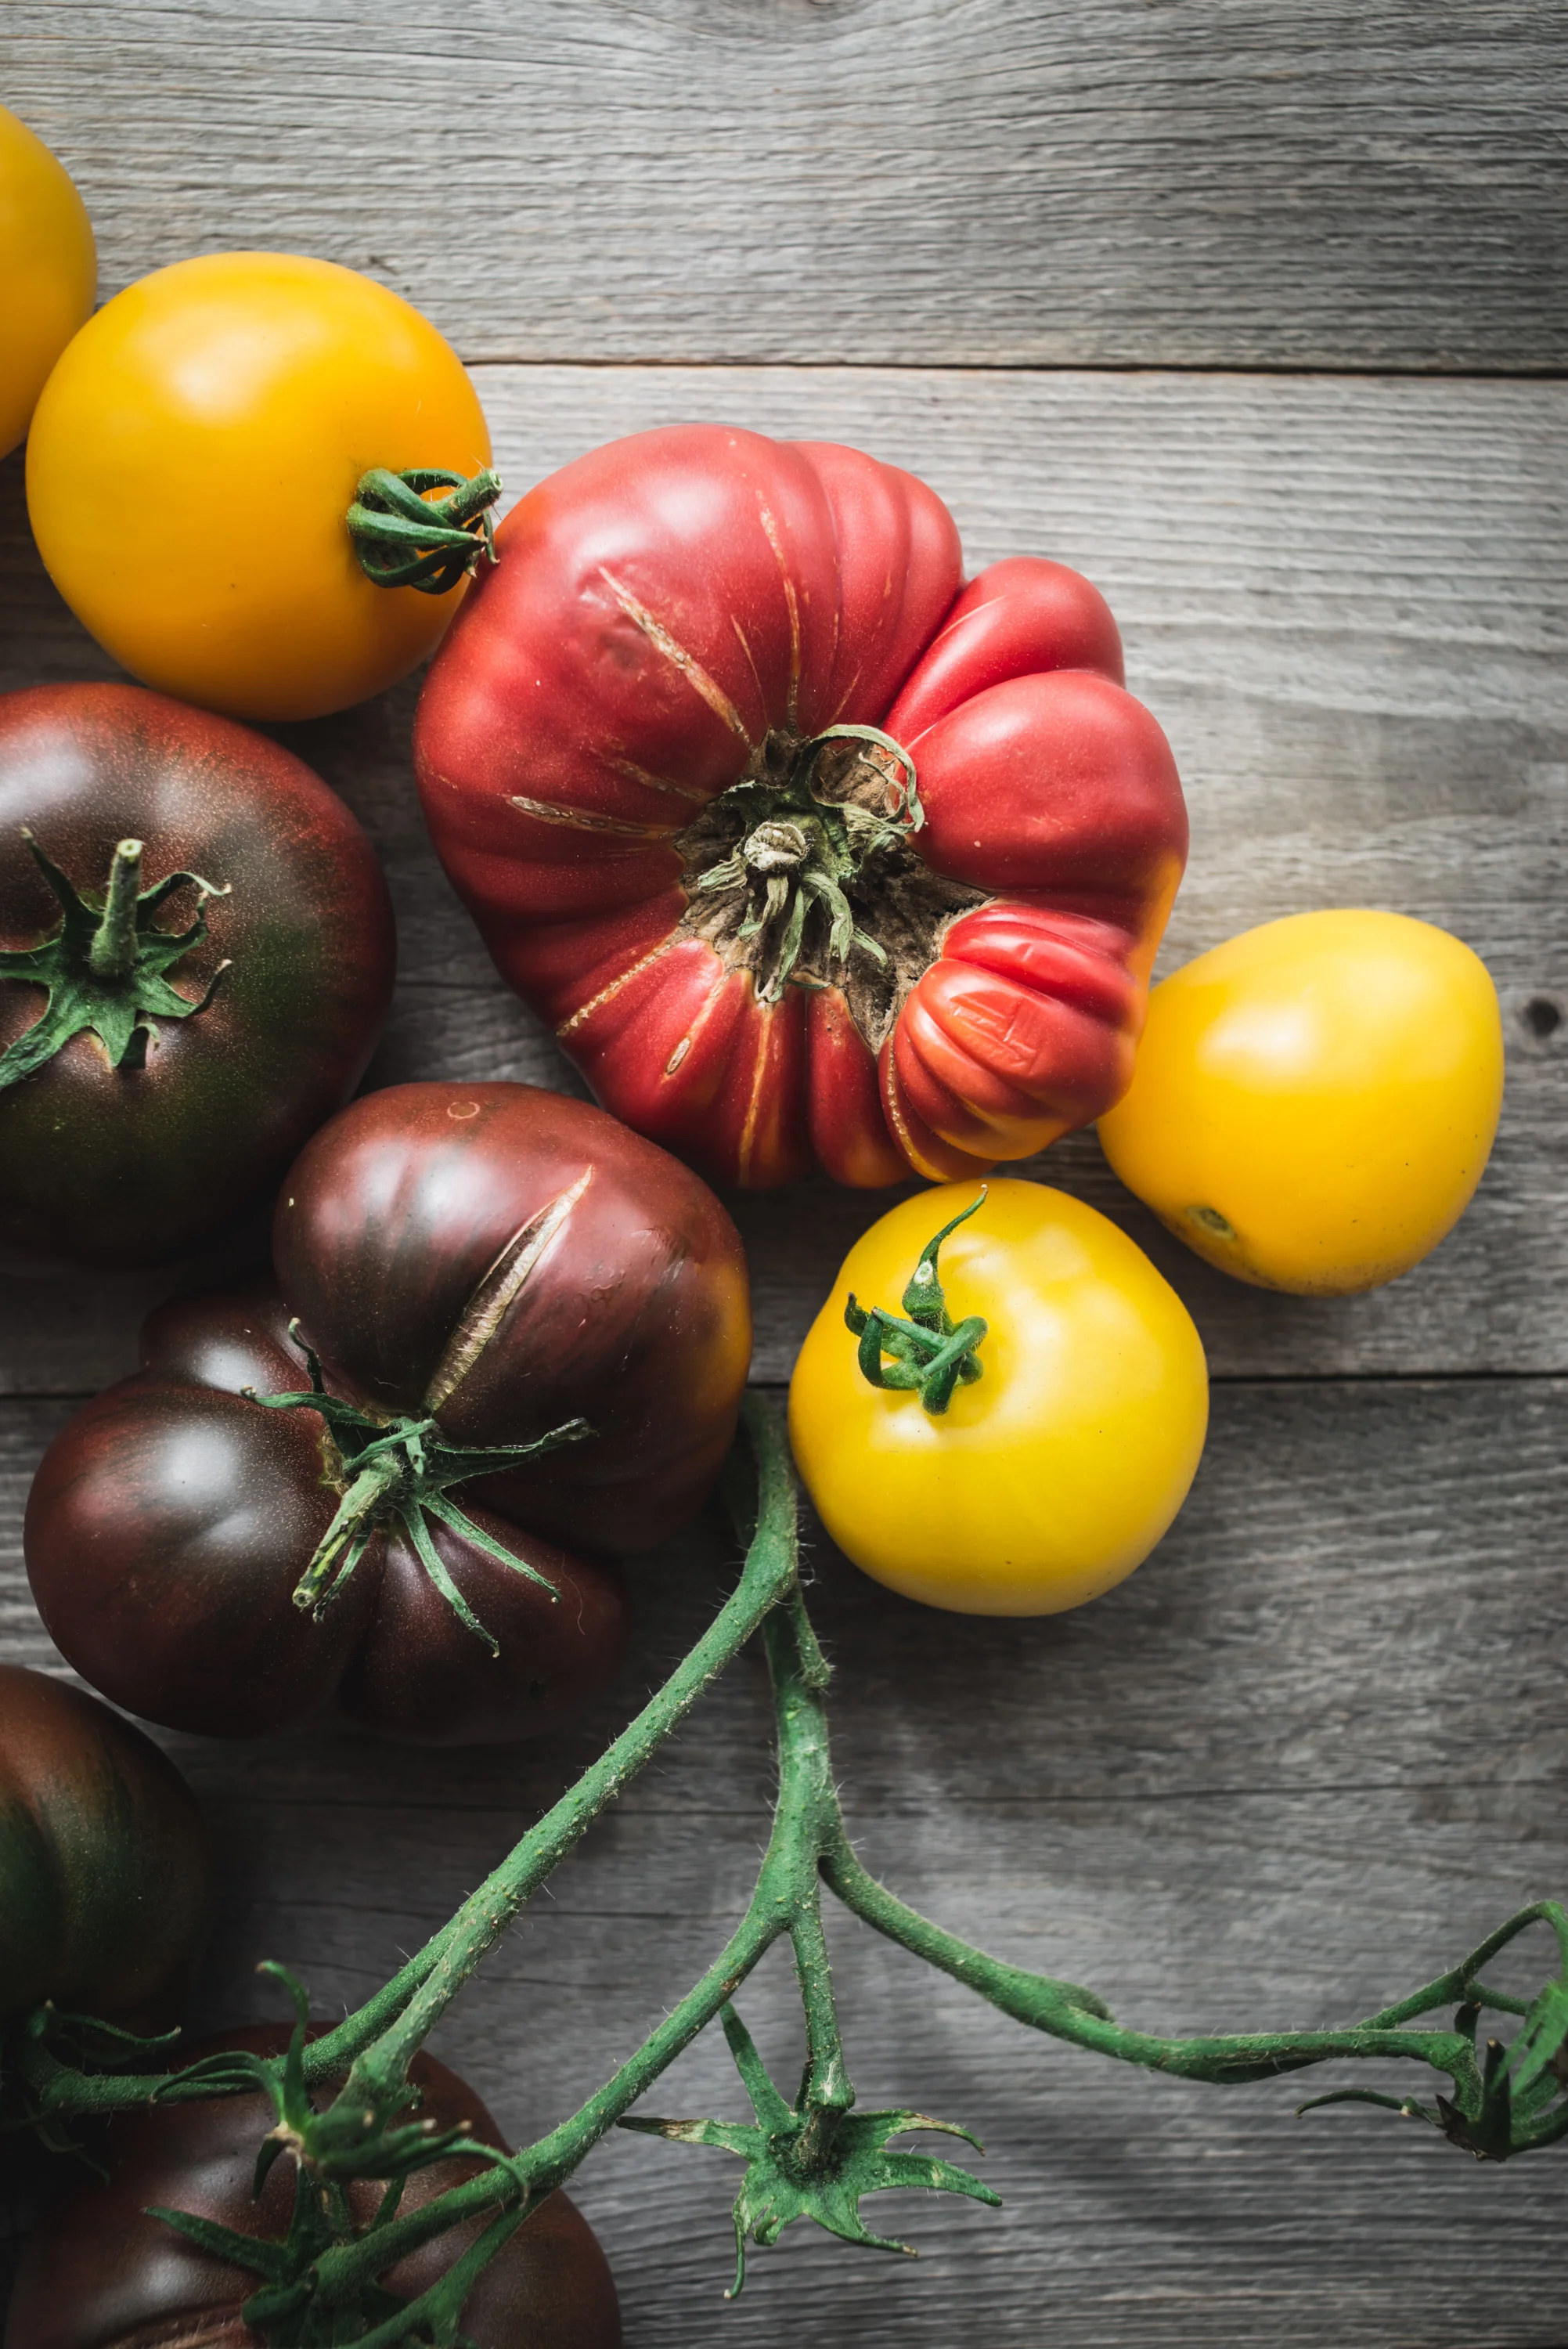
Hello tomatoes! Wow it’s been such a cool summer that it has taken a bit longer for them to ripen in the garden, but last week all four plants decided it was time. The yellow Taxi tomatoes along with the Sungold cherry tomatoes were the first on the scene, followed by Black Krim, and lastly the Brandywine. I’ve been wanting to make this Panzanella for a while, and since I had made a loaf of No-Knead bread a couple days prior it worked out great. Most recipes say to put the bread cubes in the oven, but I opted for the skillet which went pretty quick and ya know, fried bread? So good. You could serve this as a side dish or appetizer, or it makes a great vegetarian meal when you want something light. 

And speaking of serving, I received sample dishes from Carthage.co Stoneware which you see here and they are just beautiful! The large white plate is the Dadasi Dinner plate in chalk and the dark bowl is the Zaghwan Soup Bowl in Old Silver. I think they both look great but especially love the Zaghwan bowl with these bright colored tomatoes. And the prices are quite reasonable for high-end ceramic dishes. You can read more about these hand-crafted ceramics here. They have a nice weight to them and they’re a pleasure to photograph. I’ll be back with more tomato and/or zucchini dishes this month. Until then I recommend this Panzanella, enjoy!

panzanella-2.jpg
panzanella-3.jpg
panzanella-4.jpg
panzanella-5.jpg
panzanella-6.jpg
panzanella-7.jpg
panzanella-8.jpg
panzanella-9.jpg
panzanella-11.jpg
panzanella-10.jpg
panzanella-13.jpg
panzanella-12.jpg

Panzanella

  • 3 cups baguette or rustic bread, preferably stale, cut into 1-inch cubes

  • 6 tablespoons extra-virgin olive oil, more to taste

  • 3/4 teaspoon kosher sea salt, more to taste

  • 2 pounds very ripe tomatoes, preferably a mix of varieties and colors

  • 6 ounces small fresh mozzarella balls (or shredded chunks of fresh mozzarella)

  • 1/2 cup torn basil leaves

  • Salt and pepper to taste

  • 1/2 teaspoon Dijon mustard

  • 2 tablespoons Champagne vinegar (or white balsamic vinegar)

  • 1/4 cup Olive Oil

  • Salt and Pepper

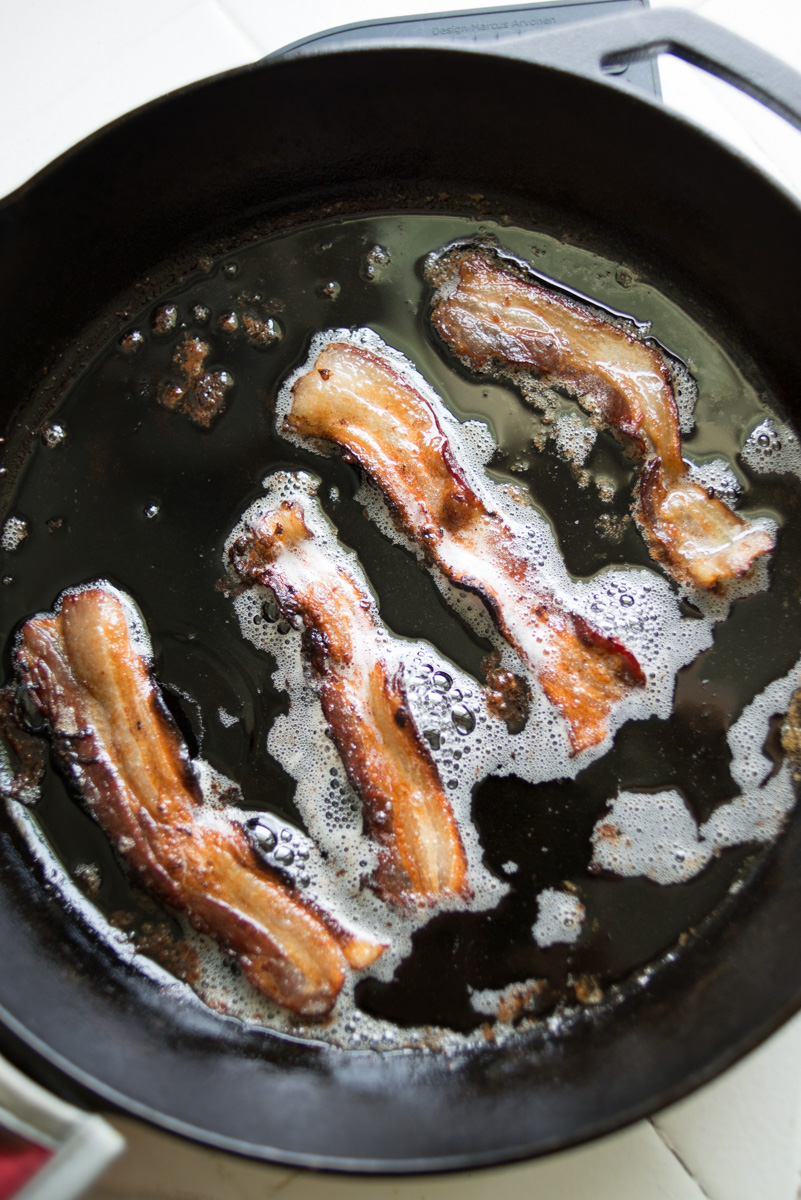
In a large bowl mix together the bread cubes with olive oil and salt. Add a bit of olive oil to a  large cast iron skillet and heat on medium, when warm place the cubes in a single layer, tossing as needed until crisp on all sides. When done place the bread cubes on a plate and allow to cool a bit. 

To make the dressing, in a small bowl whisk together the Dijon and vinegar, then whisk in the olive oil.

Cut the tomatoes into chunks and then add them to a large bowl, add the mozzarella, bread cubes and the basil leaves (but leave a few to top the dish), add some salt and pepper and stir gently. Let sit for at least 30 minutes. Top with remaining basil leaves. Serve at room temp.

Zucchini + Herb Ricotta Tarts

zucchini_ricotta_tart-1.jpg

Zucchini and Herb Ricotta Tarts. I’m looking for all ways to eat zucchini lately. This is the first time we’ve grown zucchini and wow! it grows quickly, seems every 3 days or so there are a couple more to pick. It’s easy enough just to grill but I want to try some new ways to prepare it. I pickled some last week and they came out great. I’d like to get that recipe in a post soon, but you might start calling me The Zucchini Lady, ha ha. This tart dough is different than other doughs I’ve made, you make it with melted butter which is the opposite of 99% pie doughs out there as they use cold butter, but I thought I’d give it a try because with this dough you don’t have to roll it out, you simply press it in the pan. It was much easier and faster to make. You just mix it in a bowl by hand in one minute. Done. I was surprised by how much I liked it! Really nice texture, almost like a cookie type texture. I would make this again no doubt, but for savory tarts I would cut back on the sugar and add more salt, other than that it’s a winner. This Zucchini + Herb Ricotta Tart is super delicious, we had it with a side of Radicchio salad, it’s good for a lunch or light dinner. Oh and pan size, you can make one 9” tart or make a few smaller ones, I used a 6” tart pan and two 4” tart pans, the math doesn’t quite work out on that but it worked for me! ¯\_(ツ)_/¯ Enjoy :)

zucchini_ricotta_tart-2.jpg
zucchini_ricotta_tart-3.jpg
zucchini_ricotta_tart-4.jpg
zucchini_ricotta_tart-5.jpg
zucchini_ricotta_tart-6.jpg

Zucchini + Herb Ricotta Tarts

  • 1/2-1 whole zucchini sliced 1/8” thick

  • 1 cup ricotta

  • 1/4 cup shredded mozzarella

  • 1 teaspoon fresh thyme

  • 1 teaspoon fresh oregano 

  • Olive oil

  • Salt & Pepper

  • Tart dough (recipe below)

In a bowl combine the cheeses and fresh herbs with some salt and pepper. Spread a layer of the cheese mixture into the prepared tart pans, then arrange the zucchini slices on top. Drizzle with some olive oil to cover all the vegetable. Lightly salt. Bake at 400°F for 25-35 minutes until just browned.

Tart Dough

  • 1 stick (1/2 cup) melted butter

  • 3 tablespoons sugar (or 1 1/2 tablespoons for less sweet)

  • 1/4 teaspoon salt

  • 1 1/4 cups flour

Preheat oven to 350°F. In a large bowl combine butter, sugar and salt, then add flour and mix with wood spoon until just combined. 

Distribute the dough on the bottom of your tart pan(s) and press the dough evenly over bottom and sides. You can use a floured cup to press it if necessary (i just used my fingers). Cover the tart shell with plastic wrap and refrigerate for 30 minutes to 1 hour. Once chilled, with a fork prick the shell all over and bake for 10 minutes. Remove from oven to cool. Then add filling and bake as directed.

Tart dough adapted from Chowhound

Ratatouille with Polenta

ratatouille_with_polenta-1.jpg

Ratatouille with Polenta. This is the first time I’ve made Ratatouille. I received a complimentary cookbook Famous Dishes from Around the World that has 30 traditional dishes from various places around the globe, countries in Europe, Asia, South America, the Middle East. I picked French Ratatouille since there is such an abundance of vegetables this time of year, it makes a great summer dish. I changed a few things from the original recipe, for example the recipe had 10 cloves of garlic and I used 3, because I can’t handle too much garlic, as much as I like the flavor. I also used 2 cans of diced tomatoes rather than using marinara sauce and tomato paste. In any case it came out really good! I’ve had good and bad Ratatouille and this was definitely good. It tastes very fresh. 

I like the cookbook, it’s fun and all the recipes are fairly easy, and it has some cooking tips as well. I love all kinds of food so I think I would be happy to make any of these recipes. I want to try the Moroccan Tagine with Chicken next! Oh and It’s bilingual, each recipe is in English and Spanish, so if you’re learning either language you might enjoy this. The Ratatouille recipe here is vegetarian, but you could easily add some meat if you like. If you do add something like sausage, simply cook the meat first in the pot, then remove and add it in later with all the vegetables. Enjoy!

ratatouille_with_polenta-2.jpg
ratatouille_with_polenta-3.jpg
ratatouille_with_polenta-4.jpg
ratatouille_with_polenta-5.jpg

Ratatouille

  • 1 large eggplant, 1” slices

  • 1/2 cup olive oil

  • 1 red onion, chopped

  • 10 cloves garlic, minced (I used 3 cloves of garlic)

  • 2 large beefsteak tomatoes, cut into 1” cubes

  • 2 medium zucchini, sliced

  • 2 medium yellow squash, sliced

  • 2 cups mushrooms, sliced

  • 3 bell peppers (red, green and yellow), cut 1” pieces

  • 2 14oz cans of diced tomatoes

  • 5 bay leaves

  • 1 1/2 cups fresh basil

  • 2 teaspoons fresh or dried oregano (or rosemary if you prefer)

  • 2 teaspoons fresh or dried thyme

  • Salt & pepper to taste

(Note: the original recipe cooks each vegetable separately in another pan, then added to the larger pot, I cooked everything in one pot and it worked out fine)

Place eggplant slices on paper towels and sprinkle slices with salt for one hour to make them sweat. Blot them dry with a paper towel. Cut into quarters.

In a large dutch oven cook the eggplant in some olive oil until about half way cooked. Add the onions, garlic and tomato to the pot, sauté a few minutes until soft. Add the zucchini, squash, mushrooms, peppers, adding more olive oil as needed. Cook for 5 more minutes or so. Stir in the cans of tomatoes and the herbs (save some basil for garnish). Cover the pot and cook for about 30 minutes on a very low heat, stirring every so often. 

While the Ratatouille is simmering prepare the Polenta.

Serves 6-8 (This completely filled my dutch oven and I could not add one more thing, so it makes quite a bit!)

Recipe adapted from Famous Dishes from Around the World: Healthy, Tasty, and Affordable

Polenta

  • 1 cup Polenta (I use Bob’s Redmill Polenta Corn Grits)

  • 1 cup water

  • 1 cup milk

  • 1 cup chicken stock

Bring water, milk and chicken stock to a boil, stir in the polenta, then reduce heat to low. Cook for 5 minutes, then let it sit for a few more minutes until ready to serve.

Kale Pistachio Pesto

kale_pistachio_pesto-1.jpg

I made this pesto a few weeks ago with hazelnuts, and wow it was so good. But I’ve been seeing folks make it with pistachios and since I had some leftover from the pistachio cake I made last week I thought I’d give this a try. Honestly I love it with either nut. What’s nice about this kind of pesto is that you can change the nuts or the greens, add basil or not, add parsley or cilantro, there’s a lot of room to get creative and it just tastes so good. It’s really perfect for a vegetarian dish, or you could add bits of roast chicken if you wanted more protein. I joined Sprouted Kitchen Cooking Club a while back where Sara has made some variations on this pesto, and David Lebovitz posted a Kale Pistachio Pesto on Instagram that got me going on this. Most recipes say to pulse all the ingredients except the olive oil, then slowly add olive oil, but I just put everything in the food processor and it comes out fine, you might need to add a little olive oil after it’s finished if you want a different consistency. I just put it in a bowl, drizzle a bit of olive oil and give a stir. Lacinato Kale (or Tuscan or Dino, so many names for the same thing!) is such a great vegetable. It will store fairly long in the fridge, you can add it to soups, you can make salads, here’s a whole bunch of Kale recipes, and now pesto! I think it’s delicious, let me know what you think. Enjoy!

kale_pistachio_pesto-2.jpg
kale_pistachio_pesto-3.jpg
kale_pistachio_pesto-4.jpg
kale_pistachio_pesto-5.jpg
kale_pistachio_pesto-6.jpg
kale_pistachio_pesto-7.jpg
kale_pistachio_pesto-8.jpg

Kale Pistachio Pesto

  • Tuscan kale, about 5 ounces chopped

  • A bit of basil or fresh herbs, but not needed

  • 2 garlic cloves

  • 1/4 cup roasted unsalted pistachio nuts

  • 1/2 cup olive oil

  • 1/3 grated parmesan cheese

  • Juice of half a lemon

Place all ingredients in a food processor and pulse several times until it’s a granular textured consistency. Place in container and add a little more olive oil if needed. Toss with pasta and add a dollop on top with some grated parmesan.

Beef Stew with Roasted Garlic

Beef Stew with Roasted Garlic

Years ago I made a Beef and Carrot Stew that has been my sorta go-to recipe to build off of and it’s evolved a bit over the years (wow almost 6 years now!). This new recipe, with the addition of Roasted Garlic and Roasted Garlic Olive Oil, is over the top good.

Read More

Mushroom Lasagna

mushroom_lasagna-1.jpg

This Mushroom Lasagna is absolutely delicious. It’s the second time I’ve made it and even changing the types of mushrooms and cheese did not disappoint. I saw the recipe about two years ago on Adventures in Cooking and finally gave it a try. Mushroom, cheese and pasta generally are a good combination, still sometimes things sound good but are just meh. Not this time. It was wow! it’s so good! And it makes quite a bit too, even with four people we had leftover. It’s even better the second day.

I shopped at Trader Joe’s knowing they would have better prices on the cheese, but I would sacrifice mushroom selection. The last time I made this Mushroom Lasagna I had shopped at Whole Foods, and the selection for Ricotta cheese was slim, I had the choice to fork over $7 for one container (and you need two for this recipe), or get the low fat version at around $4+. They were all out of the 365 brand, and this seems to be an ongoing problem with Whole Foods lately, the shelves are bare! They started a new inventory system called order-to-shelf (OTS), which was designed and implemented a year ago (long before Amazon purchased them, so don’t blame Amazon as tempting as it is), the new system is good in that it’s cost-cutting, and will help prevent food spoilage from excess inventory going bad in the storage room, but damn, if you look at some of those photos, I haven’t seen it that bad here in Portland but I have experienced times where some fairly basic items normally in stock are just not there. Mostly in produce, like where’s the parsley? Hopefully now that it’s had some press Amazon will do something about this. 

The recipe is very forgiving in that you can add whatever mushrooms or cheese you have. The original recipe used a sharp cheddar, which I did the first time, but then I opted for Trader Joe’s Quattro Formaggio on the second time. Both were delicious so you can mix up whatever kind of shredded cheese you want.

When this came out of the oven yesterday it smelled so amazing, but then I thought, no way was this going on the blog, it just looked like a big heap of stuff in my old ugly-ass pyrex dish, but a day later and a few food styling tweaks, it looked presentable. There are certain foods, dishes, that really don’t lend themselves to sexy food. For example, raw mushroom, sexy! Cooked mushroom, er, um, cover me up please. I took some photos of the sliced mushrooms cooking on the stove and it looked so unappetizing I didn’t include it here. Smelled great though.

By the way, January marks my five year anniversary with Pixels + Crumbs blog. And guess what, my very first post was a mushroom post! Mushroom Soup. I remember how I labored over it, the whole thing seemed to take forever and I wondered if I’d gotten myself into something a bit crazy. It’s like hours of cooking, hours of food styling, photos and editing and writing. Well the writing gets a bit short because I’m completely burnt out at that point, ha ha. But I’ve kept this blog alive after five years. I don’t post as much as I used to, now it’s more of a monthly post, but I can’t seem to let it go. 

See you next month and thanks for stopping by.

mushroom_lasagna-2.jpg
mushroom_lasagna-3.jpg
mushroom_lasagna-4.jpg

Mushroom Lasagna

Mushroom Layer

  • 1 large onion
  • 3 cloves garlic, minced
  • 4 tablespoons Unsalted Butter
  • 6 ounces shiitake mushrooms, sliced
  • 6 ounces crimini mushrooms, sliced
  • 2 ounces chantarelles, chopped (all mushrooms will work, I used only white button mushrooms and Crimini and it tasted great)
  • 2 tablespoons olive oil
  • 1/4 cup white wine

Cheese Layers

  • 1/4 cup unsalted butter
  • 1/4 cup flour
  • 30 ounces ricotta cheese
  • 1/3 cup whole milk
  • 1 teaspoon dried thyme leaves
  • 1 teaspoon fresh sage leaves chopped (or dried, but tastes better with fresh)
  • 1/2 teaspoon dried oregano
  • 1/4 teaspoon black pepper
  • 1 teaspoon salt
  • 3/4 pound (12 oz bag)  white cheddar, grated (or mixed cheeses)

Lasagna Layers

  • 9 sheets dried lasagna noodles
  • 1 lb crimini mushrooms, quartered
  • 1 teaspoon olive oil on bottom of pan
  • 1/4 teaspoon salt
  • pinch black pepper

For the mushroom layer, melt the butter in a large sauté pan over medium heat. Sautee onion and garlic in the butter until softened and transparent, about 5 minutes. Add the mushrooms and olive oil and sauté for about 5 minutes, then add the white wine. Cook until most of the liquid is gone for an additional 5 minutes or so. Remove the mushrooms and onion, place in a small bowl and set aside to cool.

For the cheese layer, add 1/4 cup butter to the pan and allow it to melt. Add the flour, a little bit at a time, whisking constantly until a roux forms. Place the roux in a large bowl and add the ricotta cheese, milk, thyme, sage, oregano, black pepper, and salt. Set aside.

Toss the quartered crimini mushrooms with the olive oil and salt in a medium bowl and set them aside.

Preheat the oven to 375°F. Bring a large pot of water to a boil. Place some of the lasagna noodles in the water and allow to cook until slightly bendable, about 3-4 minutes, working in batches as necessary. Remove with tongs and place three of the noodles on the bottom of a roughly 9 x 13-inch rectangular casserole dish, keeping them in a flat even layer.

Spread 1/4 of the sautéed mushroom mixture over the noodles, then sprinkle with 1/4 of the grated cheddar cheese. Spread 1/4 of the ricotta mixture over the cheddar, then place 3 to 4 noodles in an even layer on top of the ricotta. Repeat until you have used all of the sautéed mushrooms, cheddar, and ricotta, but do not place noodles over the top and final layer of ricotta. Instead, evenly distribute the quartered mushrooms over the top and sprinkle with a pinch of black pepper. Place the pan on a baking sheet and place the baking sheet in the oven. Cook until the cheese is bubbly around the edges and the mushrooms on top have turned a deep brown and wrinkled, about 45-50 minutes. 

Adapted from Adventures in Cooking


Bacon Making 101

A few weeks ago Jeff and I took a Bacon Making 101 class at Old Salt Marketplace, it’s a restaurant in our neighborhood that also serves as a butcher shop and deli. We go there for brunch quite often so we were already familiar with their delicious “Ben’s Bacon”. When I saw a class listed for bacon making by Ben himself, we signed up right away! It was a really fun class and bacon is not that hard to make, it just takes time. There was a lot of discussion on food safety, for example you will see that most people smoke their bacon to an internal temperature of 150-155°F, but Ben smokes his bacon slow to a 145°F temp. The reason people go a bit higher is that your thermometer might be off a bit so 150°F acts as a safeguard, but an accurate 145°F temp is fine with no risks. We were each given a full size pork belly which weighs around 10 lbs or so. Ben helped out with trimming the fat off each one. That looks a bit challenging and you will need a really long sharp knife. Then we cut our slabs in half so that they were easier to work with. Ben prepped the spice mix and the cure mix in large containers. I don’t think I’ve ever seen that much brown sugar and salt (enough for 12 pork bellies!). Each of us working with our own large bins, covered the slabs in the spice mix, followed by the sugar and salt cure mix. Then we placed our half slabs in large ziplock bags with the cure mixture to be taken home and that was it. We sampled some of the bacon they make at the restaurant and chatted about best ways to cook bacon (I prefer the oven method).

Pork bellies with the spice rub

Pork bellies with the spice rub

We carried home our 20 pounds of pork belly and put it in the refrigerator where it had to cure for at least 7 days. It can go up to 3 weeks in the fridge before smoking it. The curing process will create a lot of liquid, so even though they are in ziplock bags you might want to put them in a plastic tub or use additional bags so that it doesn’t accidentally leak in the fridge. During this curing time you flip the bellies over to redistribute the liquid.

After a week or so you remove the pork bellies from the fridge and rinse them well, then pat them dry and put them individually on a drying rack. We used a cooling rack over a sheet pan which worked really well and actually fit in the refrigerator. Note: two pork bellies will take up a lot of refrigerator space! Then you let them sit uncovered in the fridge for 24 hours to dry out. Before you smoke them you can rub them with pepper, herbs, maple syrup or molasses. We tried four different flavors: Black pepper, maple syrup, black pepper and thyme, molasses. Our favorite was maple syrup, but that is also the one that smoked properly and didn’t cook. Which brings me to the smoking process.

After they dried for 24 hours we rubbed molasses on one and black pepper + thyme on another

After they dried for 24 hours we rubbed molasses on one and black pepper + thyme on another

The biggest challenge was getting our smoker to hold a low temperature. The smoker is brand new to us so we learned a whole lot about smoking meat. We’ve been wanting to get a charcoal smoker grill and the bacon class sort of forced us to do it sooner rather than later. Ben said you can smoke over a fire pit or even in your fireplace, but it would be challenging to keep the temp low and not cook the bacon. We ended up getting the Vision Kamado grill. Our first go with one slab ended up cooked, then our second one, which was early evening at that point, came out perfect!

The next day we felt confident in what we were doing, so we put the remaining two slabs on when we had a steady 225°F temp, checked the internal temp in a little over an hour and, gasp!, they were cooked already, we didn’t know how this happened, the internal temp registered at around 170-180°F. What we do know is that our grill was in direct sunlight, and even though people will say weather doesn’t affect the ceramic grill, it most certainly does. So I would recommend smoking on a cooler day, or wait until evening. The following days brought us a heat wave, and wouldn’t you know, that grill that had cooled down was registering 150°+ with nothing burning. So it would be very difficult to keep a low temp under those conditions. 

Even though we ended up cooking the bacon in the smoker we sliced it up and tested it out and it tastes delicious. Some parts are a bit tougher than it should be, I guess due to the smoking issues, but overall we’re really happy with it. And I will totally do this again once we finish up the bacon we have. Which by the way yielded about 12 lbs of bacon total, from the two slabs. So if you get one slab of pork belly it should yield around 6 lbs. of bacon. That’s a lot of bacon! But you just slice it, then wrap it up in portion sizes and freeze it. Below is the recipe for “Ben’s Bacon”, and there are plenty of websites that are devoted to smoking meats with a Kamado grill, but really everyone is going to have a different experience depending on the weather, how much charcoal you’re using, what kind of smoker you use, but it’s really fun and it all tastes good, even when it’s not perfect. Makes for some great BLTs pictured below with our homemade bacon!

Bacon Making 101

Ingredients

1 Pork Belly

Spice Rub:

  • 1 part cayenne pepper
  • 1 park chile flake
  • 2 parts paprika

Bacon cure for one belly:

  • 3 lbs brown sugar
  • 2 cups kosher salt

Equipment

  • Ziplock bag (large enough for half a pork belly)
  • Kitchen scale
  • Mixing bowls
  • Racking pan (cookie cooling rack will work)
  • Smoker or smokehouse

The process

Skin and trim the fat to desired fat content. Cut the belly in half so that it’s easier to work with and store. Place the two pieces in a large container. Mix the spice blend together and rub liberally to all sides of the belly. Mix the salt and brown sugar together until completely blended. Generously apply the cure rub to all sides. Place each piece in large ziplock storage and refrigerate, you may want to put these inside another plastic bag or container to prevent leakage, the curing will create a lot of liquid over time. After 3 days flip them, then turn every couple days or so to redistribute liquid. After 7 days remove from refrigerator and rinse well and pat dry. Place them on a drying rack (cookie cooling rack on top of sheet pan works well) and place in the refrigerator uncovered for 24 hours. When ready to smoke the bellies, cover them with your choice of ground black pepper, maple syrup, molasses or whatever spices you might like to try. 

Start your smoker slowly, add applewood chips to coals. 

Smoke the bacon at around 170°F to an internal temperature of 145°F, which would take about 5 hours. Or smoke them at 200-225°F for about 2 1/2-3 hours. Most people smoke until internal temperature reaches 155°F to be on the safe side (if thermometer was off) but it is safe to eat at 145°F.

Remove the bacon and allow to cool. Place in refrigerator for several hours before slicing as this makes it easier to cut. Slice the bacon in desired thickness. Then freeze the slices in portion sizes. Wrap portions in plastic wrap and then put them all in freezer bags.