Cranberry Orange Pecan Loaf Cake

cranberry_orange_pecan_loaf_cake-1.jpg

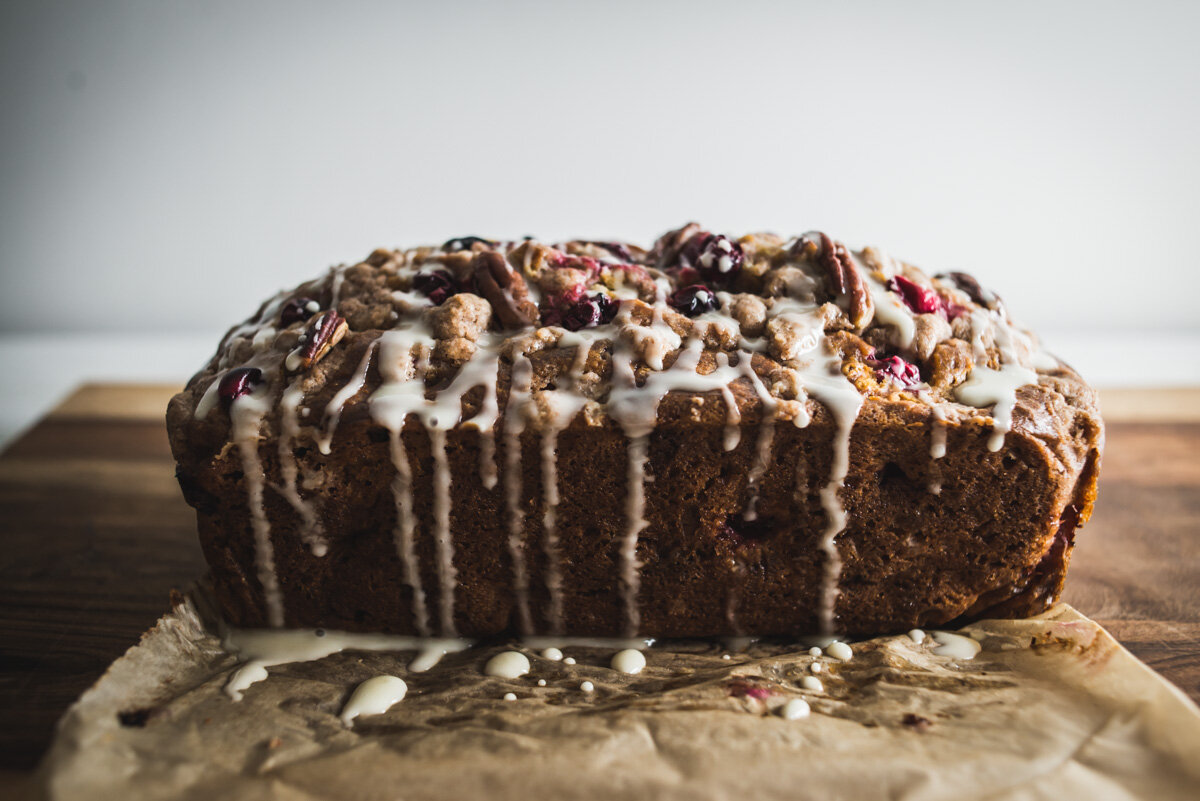
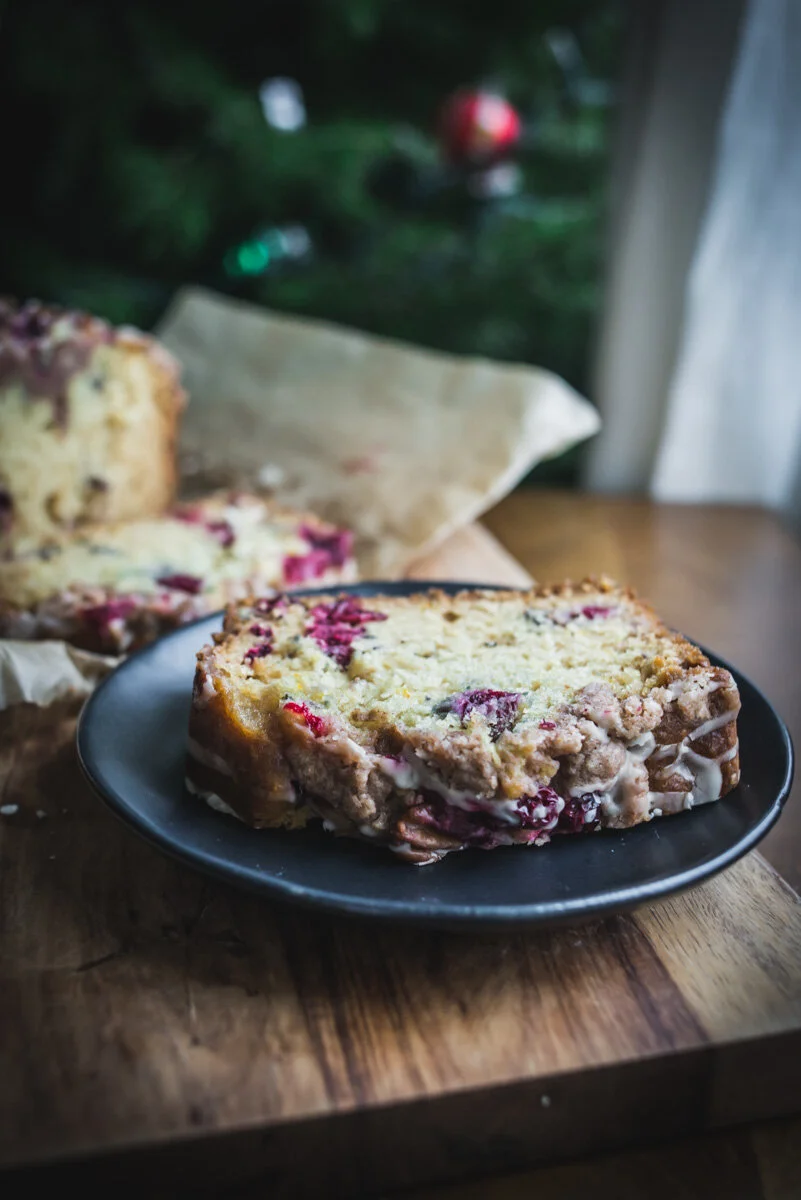
Cranberry Orange Pecan Loaf Cake. I had some fresh cranberries leftover from Thanksgiving and wanted to make some type of cake with them, I made a Cranberry Cobbler years ago but wanted something different, so here we are. This is such a great cake! I adapted the recipe from Sally’s Baking Addiction and made a few changes. For one, I melted the butter for the streusel, a lot of recipes say to use cold butter and crumble it into the flour and sugar, but sometimes I end up with flour that’s not quite mixed in with the butter after it’s done, I find it’s easier and more reliable to just add the sugar, spice and flour to melted butter. Also instead of buttermilk I used a mixture of greek yogurt and milk, and I added some Pecans to the recipe.

My baking time was a lot different than the 45 minutes to an hour suggested in the original recipe, it may have been due to the pan I used, a cast iron loaf pan, but in any case the total bake time for me was 1 hour and 20 minutes! It didn’t seem quite done after an hour so I took the temperature and let it go longer until it reached 200°. That worked! It’s a great cake, enjoy!

Oh and be careful out there friends, Covid-19 cases are going through the roof! We’re so close to getting a vaccine, it’s not that much longer, do your best to stay safe for you, your family, your neighbors, friends, we’re all in this together! 

cranberry_orange_pecan_loaf_cake-2.jpg
cranberry_orange_pecan_loaf_cake-3.jpg
cranberry_orange_pecan_loaf_cake-4.jpg
cranberry_orange_pecan_loaf_cake-5.jpg
cranberry_orange_pecan_loaf_cake-6.jpg
cranberry_orange_pecan_loaf_cake-7.jpg
cranberry_orange_pecan_loaf_cake-8.jpg

Cranberry Orange Pecan Loaf Cake

Streusel

  • 1/4 cup all-purpose flour

  • 2 Tablespoons granulated sugar

  • 1/2 teaspoon ground cinnamon

  • 3 Tablespoons salted butter, melted

Cake

  • 2 cups all-purpose flour

  • 1 teaspoon baking soda

  • 1/2 teaspoon salt

  • 1 large egg

  • 1/2 cup dark brown sugar

  • 1/2 cup granulated sugar

  • 2/3 cup milk

  • 1/3 cup greek yogurt

  • 1/3 cup vegetable oil 

  • 1 teaspoon pure vanilla extract

  • 2 teaspoons orange zest (about 1 orange zested)

  • 1 cup fresh cranberries (more for topping)

  • 1/2 cup crushed pecans (more for topping)


Glaze

  • 1/2 cup powdered sugar

  • 1 Tablespoon orange juice

Preheat oven to 350°F. Grease a 9×5 inch loaf pan with butter, line with parchment paper and butter that as well.

Make the streusel: Whisk the flour, sugar, and cinnamon together in a medium bowl. Add the melted butter and stir with a fork until combined. Set aside.

Make the cake: Whisk the flour, baking soda, and salt together in a large bowl. 

In a medium bowl, whisk the egg, brown sugar, and granulated sugar together until combined. Whisk in the milk, yogurt, oil, vanilla, and orange zest. 

Pour the wet ingredients into the dry ingredients, then fold with a rubber spatula to completely combine. Fold in the cranberries and Pecans.

Pour the batter into prepared loaf pan. Scatter the streusel on top, add a few cranberries and crushed pecans. Cover the baking dish with foil and bake for 35 minutes. Then remove foil and bake for an additional 25-45 minutes. Cake is done when cake tester or toothpick comes out clean (or at 200° temp, I started using a thermometer because sometimes it comes out clean and it’s not bake all the way through!)

Cool bread completely in the pan set on a wire rack. Then remove using your “parchment handles” onto serving plate or board.

The glaze! In a small bowl, whisk the powdered sugar and orange juice together. Drizzle over cooled bread.

Slice and serve. Cover and store leftover bread at room temperature for 1 day or in the refrigerator for up to 1 week.

Adapted from Sally’s Baking Addiction

Buttermilk Pull-Apart Dinner Rolls

Buttermilk_Pull-Apart_Dinner_Rolls-1.jpg

Buttermilk Pull-Apart Dinner Rolls. Ok, so rarely on this blog do I insist “You have to make these!” but I am now. I made these Buttermilk Pull-Apart Dinner Rolls last week for Thanksgiving and they tasted so incredibly good! But on my second try here they are even better! Last week I made the original recipe, halved, 12 rolls (rather than 24) and they didn’t really fill out the 9” square pan, although they were really good, I didn’t get the pull-apart effect I was expecting and they were on the small side. So this recipe I made slightly larger rolls in a smaller 8” round pan and they came out great! The recipe is adapted from Alexandra’s Kitchen, she has a great blog and I recommend watching her videos, they’re awesome! 

If you saw my Instagram stories you remember I made a buttermilk-brind chicken for Thanksgiving, and also made the Dried Cherries and Sausage Stuffing. Along with that we had mashed potatoes with roasted garlic, Rainbow Chard, Cranberry relish, and a Butternut Squash Kaddu which I really should blog about. I made this apple pie but decided on a crumble topping instead, which I really liked, I like a pie that has three different flavor experiences - pie crust, fruit, crumble (and/or cream). 

Getting back to the dinner rolls, they are soft and airy and still have a bit of chew on the outside, they are just so good. 

I thought these were called Parker House Rolls, but the wiki page on them describes something quite different, something moon shaped! Going back to the 19th century with angry pastry cooks throwing unfinished rolls into the oven? Anyways you won’t be throwing these around and only into your mouth.

Good stuff! Enjoy and I hope to get you some more recipes before the xmas holiday.

Also, these tastes great with butter and jam for a snack. :)

Buttermilk_Pull-Apart_Dinner_Rolls-2.jpg
Buttermilk_Pull-Apart_Dinner_Rolls-3.jpg
Buttermilk_Pull-Apart_Dinner_Rolls-4.jpg
Buttermilk_Pull-Apart_Dinner_Rolls-6.jpg
Buttermilk_Pull-Apart_Dinner_Rolls-5.jpg
Buttermilk_Pull-Apart_Dinner_Rolls-7.jpg
Buttermilk_Pull-Apart_Dinner_Rolls-8.jpg

Buttermilk Pull-Apart Dinner Rolls 

  • 2 cups all-purpose flour, plus more for shaping

  • 1 teaspoon kosher salt

  • 1 tablespoon sugar 

  • 1 teaspoon instant yeast

  • 1/2 cup boiling water 

  • 1/2 cup buttermilk*

  • 2 tablespoons melted butter

  • 1 tablespoon melted butter and flaky sea salt for topping

*You can make buttermilk by adding 1 tablespoon vinegar or lemon juice to a 1/2 cup of whole milk and let it sit for 5-10 minutes.

In a large bowl, whisk together the flour salt, sugar, and instant yeast.

In a 1-cup liquid measuring cup pour the boiling water over the buttermilk and let stand for 10 minutes, the buttermilk will look curdled then give it a stir.

Pour the buttermilk mixture and the 2 tablespoons of melted butter over the flour mixture. Stir until a sticky ball of dough forms. Cover the bowl with plastic wrap and set aside in a warm place to rise for 2 hours or until doubled in bulk.

Grease an 8×8-inch baking dish or 8” round cake pan. Flour a work surface and sprinkle flour lightly over the dough and around the edges. Gently fold the dough out of the bowl onto the floured work surface and shape into a rough ball, if it’s sticky add more flour. Use a bench scraper to divide the ball into 3 equal portions. Shape each portion roughly into a ball, then use a bench scraper to divide each ball into 3 roughly even portions to create 9 small round pieces total. If the sizes look odd just tear off the big ones to get the smaller ones up to size, the dough is very forgiving and won’t ruin the rolls!

Place the dough balls into the prepared pan, spacing them evenly apart.

Preheat the oven to 375°.

At this point, you can cover the pan and refrigerate overnight. Otherwise let the dough rise covered with plastic wrap for 25 to 35 minutes, or until the dough pieces have puffed to almost fill the pan. (Note: If you refrigerate overnight, remove the pan 30 to 45 minutes prior to baking.) 

Place the baking pan in the oven and bake for 20-25 minutes, or until golden brown. Remove pan from the oven and immediately brush the surface of the rolls with one tablespoon of melted butter, then sprinkle flaky salt over top. Let the rolls cool in the pan for a 10 minutes or so, then turn the pan out onto a cooling rack and invert onto a plate or serving platter. Serve warm with more butter on the side. 

Sourdough Focaccia with Flaked Sea Salt

focaccia-4.jpg

Sourdough Focaccia with Flaked Sea Salt. Sourdough is totally new to me, for years I thought to try it out but felt intimidated by the whole process. And it is a process! But not nearly as bad I was expecting, I’m enjoying it quite a bit. A few weeks ago I got the sourdough starter from a local pizzeria, Red Sauce Pizza, I was purchasing flour and yeast there and they offer a free sourdough starter with purchase. They actually forgot to include it in my bag, I contacted them and they delivered it to my house the next day! That was so nice.

I put the starter (which was super sticky and not bubbly) in the fridge and fed it a few days later, then it started up! I kept it in the fridge and fed it once a week and had no problems at all. 

The recipe below is from Alexandra Cooks and I highly recommend going to her blog, she has so much experience and information that I couldn’t possibly explain here since this is so new to me.

The main things I want to point out about sourdough bread making:

  • It’s not as complicated as it seems

  • You don’t have to buy a sourdough starter, ask your neighborhood bakery, family, friends or neighbors, they’re all throwing away starter discard! .

  • You can feed the refrigerated sourdough starter every 1-2 weeks to keep it active

  • It’s mainly hands off, most of the time is letting it rise

  • This focaccia definitely needs a non-stick pan like this USA Bake pan

  • It’s totally worth it because the bread is amazing!

You may have seen on my instagram feed that I made some Focaccia for a fund raiser through The Side Yard Farm.

This week I’m participating in @bakersagainstracism with @thesideyardfarm’s local bake sale here in Portland to support Black United Fund of Oregon! 100% of the proceeds from this event will be going directly to BUFOR to aid in their mission to directly fund social and economic development initiatives in the underserved communities of Portland. I’ll be baking this Sourdough Focaccia with flaked sea salt.The bake sale will run from 11am Monday 6/15 through Friday 6/19. Pick-up of all purchased items will be at The Side Yard Farm on Saturday 6/20 between 10am-4pm, no shipping or delivery available.

Here’s where you can pre-order, it looks like a lot of great baked goods on the site! 

https://pdx-bakers-against-racism.square.site

It’s now Wednesday and they’re nearly sold out of everything! More baked items are being added I’m told and they are also accepting donations.

Just a friendly reminder when you pick up your baked goods be sure to wear a mask! Coronavirus cases are on the rise here in Oregon and we all want this to go away as fast as possible!

Below is the recipe for this fantastic Focaccia! 

focaccia-1.jpg
focaccia-3.jpg
focaccia-2.jpg

Sourdough Focaccia with Flaked Sea Salt

  • 50 g – 100 g (1/4 to 1/2 cup) active sourdough starter

  • 10 g (about 2.5 teaspoons) kosher salt

  • 430 – 440 g water, room temperature (about 100°F)

  • 512 g (about 4 cups) bread flour

  • 3 tablespoons extra-virgin olive oil, divided, plus more for drizzling

  • Flaky sea salt, such as Maldon

I recommend watching her video here, it helped me a lot! 

Place the starter, salt, and water in a large bowl. Stir with a spatula to combine — it doesn’t have to be uniformly mixed. Add the flour. Mix again until the flour is completely incorporated.

Perform one “fold”: 30 minutes after you mix the dough, reach into the bowl and pull the dough up and into the center. Turn the bowl quarter turns and continue this pulling 8 to 10 times. 

Drizzle with a splash of olive oil and rub to coat. Cover bowl with a tea towel or bowl cover and set aside to rise at room temperature (70ºF/21ºC) for 4 to 18 hours (the time will vary depending on the time of year, the strength of your starter, and the temperature of your kitchen — in summer, for instance, sourdoughs double in 6 hours; in winter, they double in 18 hours. A straight-sided vessel makes monitoring the bulk fermentation especially easy because it allows you to see when your dough has truly doubled. You will also see bubbles in the dough which is a good sign that it is ready.

When dough has doubled, place 2 tablespoons of olive oil into a 9×13-inch pan (use a non-stick pan if possible or guess what, it will stick!).

Drizzle dough with a tablespoon of olive oil. Use your hand to gently deflate the dough and release it from the sides of the bowl. Gently scoop the dough into the center of the pool of oil in your prepared pan. Fold dough envelope style from top to bottom and side to side to create a rough rectangle. Turn dough over so seam-side is down. (watch her video for better reference).  

Rub top of dough with oil. Leave alone for 4 to 6 hours (At this point you can also put it in the refrigerator overnight for a slow rise, just take it out prior to baking and proceed as below instructions, you will get a higher rise and I think it’s better!), uncovered, or until puffy and nearly doubled.  

Heat oven to 425ºF. Rub hands lightly with oil, and using all ten fingers, press gently into the dough to dimple and stretch the dough to nearly fit the pan. Sprinkle generously with a flaked sea salt. Transfer pan to the oven and bake for about 25 minutes or until golden all around. Remove pan from oven and transfer bread to a cooling rack. Cool at least 20 minutes before slicing.

Adapted from Alexandra’s Kitchen

Cornbread

corn_bread-1.jpg

How is everyone doing? We’re ok here, adapting to the stay at home rule. Granted, Jeff and I have been working from home for some time now so this wasn’t any kind of huge transition, but staying away from grocery stores, restaurants and people has proved to be more challenging than I expected. Last week we could not get deliveries through Amazon PrimeNow for several days, rather than the same-day 2-hour window we’ve relied on. And all delivery services had massive delays. I was down to two eggs by the weekend and figured I would have to go to the grocery store. But I was able to find a local grocer that uses Instacart for delivery service and got a delivery on Saturday night! I was so happy. It really is the little things in life, like food! I’m trying to reserve my trips out to the store for only things I can’t get online or get delivered (hello Bourbon!). The less contact we have now the faster we can get through this Pandemic, and hopefully return to something somewhat normal. But I think that will be a long time from now. We’ll be toting around hand sanitizer until we’re like “Corona who? what?” Well, that day will never come because nobody in the whole world will forget this.

So, Cornbread! This recipe is adapted from Sprouted Kitchen Cooking Club. I’ve made Cornbread maybe a few times and it’s generally, ok. Nothing to blog about. But I’m really happy with how this came out. Not sure if it’s the type of cornmeal I used or what, I get very confused about cornmeal, there are so many different kinds, fine, medium, course, corn grits, corn polenta, grits/polenta, Masa Harina, it’s almost endless. I had Course Grind Cornmeal on hand so I used that. I was worried the texture would be too sandy, but it came out great, I really love it.

I made a couple adjustments to the original recipe, I didn’t have a can of green chiles and I forgot to add the cheese! I’ll keep those in the recipe as optional. I added some defrosted frozen corn which I highly recommend. Also Sarah’s recipe is for Cornbread Muffins, I’ve adjusted the recipe for a 10” cast-iron skillet, but you could make muffins instead, it will be about 10 minutes less bake time.

I made this for a Black-eyed Peas and Collard Greens dish we had the other day and I’ll be posting that recipe soon, it tasted so good! Take care friends.

corn_bread-2.jpg
corn_bread-4.jpg

Cornbread

  • 1 1/4 cup buttermilk or to make it: mix in 1 tbsp white vinegar to 1 1/4 cup milk

  • 2 eggs

  • 1/3 cup avocado oil or other neutral oil

  • 3 Tbsp. butter or ghee, melted

  • 1/2 tsp. sea salt

  • 1/3 cup cane sugar

  • 1 cup cornmeal (course grind)

  • 1 cup all-purpose flour

  • 2 tsp. baking powder

  • 1 tsp. baking soda

  • 1 cup frozen corn, defrosted to room temp

  • 1 4 oz. can mild green chiles, drained well (optional)

  • 3/4 cup grated cheddar cheese (optional)

  • A grind of fresh ground pepper

Preheat the oven to 375’ and grease a 10” cast-iron skillet or equivalent baking dish. 

In a large mixing bowl, whisk the buttermilk and eggs together really well. Add the oil, melted butter, salt and sugar and whisk until combined. In a separate medium bowl, whisk together the cornmeal, flour, baking powder and baking soda. Add the flour mixture to the wet ingredients, stir to just combine. Add the corn and some fresh ground pepper. (if using add the drained chiles, cheese and stir one more time). 

Pour into the cast-iron pan, top with a bit of sugar or honey if you like. Bake for 30 minutes or until done in the center (muffins will take 20-25 minutes). Remove and allow cool. 

Zucchini Nut Bread

zucchini_nut_bread-8.jpg

Zucchini Nut Bread. I didn’t expect to make this so soon. Our zucchini plant is growing so quickly now and producing more than we anticipated. We’ve picked 4 zucchini in the past week and more are on the way. This is the first time we’ve grown it so I didn’t know what to expect. Last year I planted a yellow squash and that didn’t work out, all male blossoms and no squash. But we did some changes to our soil this year and it’s made a big difference. I’m not sure if I posted about this but we removed all our old soil in the garden beds (which was potting soil) and replaced it with a proper soil/compost mix and everything is growing great! The weather has been unusually mild so far this July, seriously rain in Portland in July? Almost unheard of. So it’s been more like a longer spring season. Which is ok with me, and the grass, but I think those tomatoes would appreciate a bit more heat. The weather forecast for this week is in the 70s!? Yep. Weird. 

The recipe is adapted from Sally’s Baking addiction and it’s good! It has lots of cinnamon which I love. I almost wish it had more zucchini in it. I’ll add more next time because I’m certain there will be a next time with all this zucchini, and I’ll update on this post. The original recipe added chocolate chips, but I didn’t really want that for this bread (cake!) so I added what nuts I had on hand, about 1/4 cup pistachios and 1/4 cup crushed hazelnuts. This Zucchini Bread is light in texture, and I kinda wish it were a bit more dense, I’ll experiment some more and let you know how it works out. 

It’s super delicious, easy to make and I’m sure you will enjoy this recipe.

zucchini_nut_bread-1.jpg
zucchini_nut_bread-2.jpg
zucchini_nut_bread-3.jpg
zucchini_nut_bread-4.jpg
zucchini_nut_bread-5.jpg
zucchini_nut_bread-6.jpg
zucchini_nut_bread-7.jpg
zucchini_nut_bread-9.jpg
zucchini_nut_bread-10.jpg

Zucchini Nut Bread

  • 1 and 1/2 cups all-purpose flour

  • 1/2 teaspoon baking powder

  • 1/2 teaspoon baking soda

  • 1/2 teaspoon salt

  • 2 teaspoons ground cinnamon

  • 1/4 teaspoon ground nutmeg

  • 1 cup chopped nuts 

  • 1/2 cup canola or vegetable oil

  • 1/2 cup packed light or dark brown sugar

  • 1/2 cup granulated sugar

  • 1 large egg, at room temperature

  • 2 teaspoons pure vanilla extract

  • 1 cup grated zucchini (about 1 medium)

Preheat the oven to 350°F (177°C). Grease a 9×5” loaf pan lined with parchment paper with butter.

In a large bowl whisk the flour, baking powder, baking soda, salt, cinnamon and nutmeg together then stir in the nuts. Set aside. In a medium bowl, whisk the oil, brown sugar, granulated sugar, egg, vanilla, and zucchini together until combined. Pour the wet ingredients into the dry ingredients. Gently combine with a wooden spoon; do not over mix. Spread the batter into prepared loaf pan. Bake for 45 – 55 minutes. The bread is done when a toothpick inserted in the center comes out clean. Remove the bread from the oven and set on a wire rack. Allow to cool completely before slicing.

Cover and store leftover bread at room temperature for up to 5 days (I’m not sure I would leave it out this long, and I’m not sure it wouldn’t get eaten in 5 days!)

Adapted from Sally’s Baking Addiction


Pumpkin Bread

Pumpkin Bread

It’s that time of year again. All things Pumpkin! And dark. Well actually this October has been unusually sunny for Portland, but this past week the rain finally kicked in, raining every. single. day. oh no! But this time of year is also an opportunity for walks on misty mornings.

Read More