Preserved Lemon + Herb Focaccia
/
And I’m back with a Preserved Lemon recipe! You might remember I preserved lemons in April and wanted to follow up with some ideas on how to use them.
Read MoreAnd I’m back with a Preserved Lemon recipe! You might remember I preserved lemons in April and wanted to follow up with some ideas on how to use them.
Read MoreWouldn’t you know. On Jeff’s Birthday I’m ready to make this cake and… the oven is broken. It won’t heat and it’s only three years old! Luckily I had only prepared the cake pans while attempting to preheat the oven, so it wasn’t a total loss.
Read MoreYou might remember last year we purchased a smoker grill after the bacon making class. Since then we’ve used it for chicken and vegetables, but this is the first time trying a slow smoked pork shoulder.
Read MoreBrown Butter Bourbon Banana Bread. That’s some alliteration there.I wasn’t planning on posting this but it came out so good I decided to take a few photos and share the recipe here.
Read MoreIt’s strange. I forgot that I had wanted to make this bread back in late January and just now found the text doc I started,
Read More
This Mushroom Lasagna is absolutely delicious. It’s the second time I’ve made it and even changing the types of mushrooms and cheese did not disappoint. I saw the recipe about two years ago on Adventures in Cooking and finally gave it a try. Mushroom, cheese and pasta generally are a good combination, still sometimes things sound good but are just meh. Not this time. It was wow! it’s so good! And it makes quite a bit too, even with four people we had leftover. It’s even better the second day.
I shopped at Trader Joe’s knowing they would have better prices on the cheese, but I would sacrifice mushroom selection. The last time I made this Mushroom Lasagna I had shopped at Whole Foods, and the selection for Ricotta cheese was slim, I had the choice to fork over $7 for one container (and you need two for this recipe), or get the low fat version at around $4+. They were all out of the 365 brand, and this seems to be an ongoing problem with Whole Foods lately, the shelves are bare! They started a new inventory system called order-to-shelf (OTS), which was designed and implemented a year ago (long before Amazon purchased them, so don’t blame Amazon as tempting as it is), the new system is good in that it’s cost-cutting, and will help prevent food spoilage from excess inventory going bad in the storage room, but damn, if you look at some of those photos, I haven’t seen it that bad here in Portland but I have experienced times where some fairly basic items normally in stock are just not there. Mostly in produce, like where’s the parsley? Hopefully now that it’s had some press Amazon will do something about this.
The recipe is very forgiving in that you can add whatever mushrooms or cheese you have. The original recipe used a sharp cheddar, which I did the first time, but then I opted for Trader Joe’s Quattro Formaggio on the second time. Both were delicious so you can mix up whatever kind of shredded cheese you want.
When this came out of the oven yesterday it smelled so amazing, but then I thought, no way was this going on the blog, it just looked like a big heap of stuff in my old ugly-ass pyrex dish, but a day later and a few food styling tweaks, it looked presentable. There are certain foods, dishes, that really don’t lend themselves to sexy food. For example, raw mushroom, sexy! Cooked mushroom, er, um, cover me up please. I took some photos of the sliced mushrooms cooking on the stove and it looked so unappetizing I didn’t include it here. Smelled great though.
By the way, January marks my five year anniversary with Pixels + Crumbs blog. And guess what, my very first post was a mushroom post! Mushroom Soup. I remember how I labored over it, the whole thing seemed to take forever and I wondered if I’d gotten myself into something a bit crazy. It’s like hours of cooking, hours of food styling, photos and editing and writing. Well the writing gets a bit short because I’m completely burnt out at that point, ha ha. But I’ve kept this blog alive after five years. I don’t post as much as I used to, now it’s more of a monthly post, but I can’t seem to let it go.
See you next month and thanks for stopping by.


Mushroom Layer
Cheese Layers
Lasagna Layers
For the mushroom layer, melt the butter in a large sauté pan over medium heat. Sautee onion and garlic in the butter until softened and transparent, about 5 minutes. Add the mushrooms and olive oil and sauté for about 5 minutes, then add the white wine. Cook until most of the liquid is gone for an additional 5 minutes or so. Remove the mushrooms and onion, place in a small bowl and set aside to cool.
For the cheese layer, add 1/4 cup butter to the pan and allow it to melt. Add the flour, a little bit at a time, whisking constantly until a roux forms. Place the roux in a large bowl and add the ricotta cheese, milk, thyme, sage, oregano, black pepper, and salt. Set aside.
Toss the quartered crimini mushrooms with the olive oil and salt in a medium bowl and set them aside.
Preheat the oven to 375°F. Bring a large pot of water to a boil. Place some of the lasagna noodles in the water and allow to cook until slightly bendable, about 3-4 minutes, working in batches as necessary. Remove with tongs and place three of the noodles on the bottom of a roughly 9 x 13-inch rectangular casserole dish, keeping them in a flat even layer.
Spread 1/4 of the sautéed mushroom mixture over the noodles, then sprinkle with 1/4 of the grated cheddar cheese. Spread 1/4 of the ricotta mixture over the cheddar, then place 3 to 4 noodles in an even layer on top of the ricotta. Repeat until you have used all of the sautéed mushrooms, cheddar, and ricotta, but do not place noodles over the top and final layer of ricotta. Instead, evenly distribute the quartered mushrooms over the top and sprinkle with a pinch of black pepper. Place the pan on a baking sheet and place the baking sheet in the oven. Cook until the cheese is bubbly around the edges and the mushrooms on top have turned a deep brown and wrinkled, about 45-50 minutes.
Adapted from Adventures in Cooking

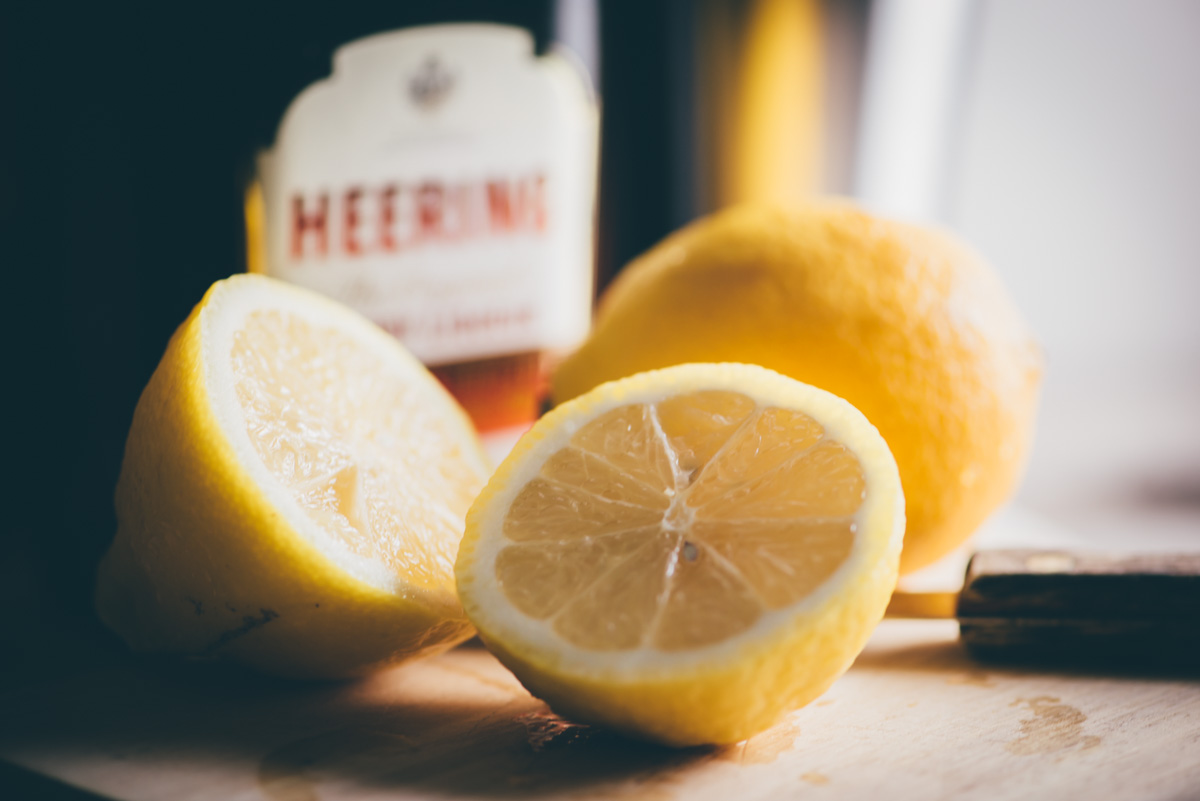
I was poking around our bookcase the other day and came across the book Imbibe! which I’ve never read, and still haven’t. But it did get me googling the author’s name David Wondrich, which brought me to Imbibe Magazine’s website (what a great site!) There are so many cocktail recipes it’s hard to pick one. I chose “The Dewberry Hotel’s Panic Button” definitely not for it’s name (although it's not hard to imagine a cocktail being named as such in 2017) but that it contained bourbon and two liqueurs that I’ve been wanting to try out for a long time. Amaro Averna, an Italian digestif, and Heering Cherry liqueur. I made the drink exact to the recipe, but it didn’t look like the drink in the article, however it tastes really good. Jeff thought it was sweet, but I didn’t find it too sweet, lots of earthy flavors with a taste of cherry that’s not overwhelming. I recommend using a large ice cube since they melt much slower than traditional ice cubes, here I used Tovolo Sphere ice molds, we have similar size large cube trays but these seemed to work nice for this style glass, plus they look like snow balls. Oh and just about the best maraschino cherries I’ve ever tasted are Bada Bing Cherries. Wishing you all well for the new year! Goodbye 2017, you were a really weird year. Cheers to 2018!


Shake all the ingredients with ice to chill, then strain into a glass holding a single large ball or cube of ice. Garnish with cherry.
Recipe adapted from Imbibe Magazine


As simple as it can be to make Apple Pie, I still found myself searching for a recipe last week. You might remember I’ve made a French Apple Pie, but it’s actually been a very long time since I’ve made a traditional Apple Pie. So here it is! And the pie crust here is really my favorite, it’s easy to roll out and work with, when baked it keeps it form nicely without falling apart and at the same time doesn’t taste like cardboard. The apples? For this pie I used King David apples that we picked up at an apple festival last month. I’m never sure which apples are which these days with so many varieties, is it good for baking? eating? This was a good choice, they didn’t mush up and had a really nice texture, some bite to it, with a spicy flavor. So thumbs up on the King David Apples.
We had a lovely Thanksgiving for two this year. I made a turkey roulade - a turkey breast rolled with dried cherry and sausage stuffing. It was the third time I’ve made this and it works out really great for a small feast. It’s deserving of a blog post so I’ll just have to make it again. I’m sure Jeff won’t mind.


To make the dough in a food processor, pulse together the flour, sugar and salt until combined, about 5 pulses. Add the butter and process until the mixture resembles coarse meal, about 5-7 pulses (you don’t want to over work the dough too much or it will become tough.) Remove from processor and place dough in large bowl, add 6 tablespoons of the ice water, combine with wood spoon. The dough should hold together when squeezed with your fingers but should not be sticky. If it’s crumbly, add more water 1 tablespoon at a time. Turn the dough out onto a work surface, divide in half (I make one half slightly larger for the bottom crust) and shape each into a disk. Wrap separately with plastic wrap and refrigerate for at least 2 hours or overnight.
Preheat oven to 375°F.
In small bowl combine flour, sugars, salt and spices. In large bowl place sliced apples, squeeze lemon juice, then add flour mixture and toss until well combined. Set aside.
Roll out your bottom crust about 2-3” larger than diameter of pie dish, place in pie dish and trim around the edges. Add the apple mixture. Roll your top crust to fit, cut out any desired designs, place on top of pie, trim any excess and pinch the edges together with thumb and forefinger. Roll out any additional dough and use pie cutter to top with leaf or apple design. Adding a leaf pattern around the edges looks pretty. Whisk the egg in a small bowl and brush over top of pie, sprinkle some granulated sugar.
Bake for 45-50 minutes until brown. Allow to cool a bit before serving. It will slice better if you refrigerate and then bring to room temp.

Also, I’m sorry to see these pie cutters are no longer available, I’m sure there are more out there but this was a nice selection of designs.
“Oh no! Not another kitchen gadget!” That was my response when Jeff suggested we get a Sous Vide. But the more I read about it the more I wanted it. The Egg Bites were fun and easy to make, but where the Sous Vide really excels is for cooking chicken breasts. Because of the precise temperature control the meat will cook remarkably consistent. And it’s also good for cooking steak followed by a quick sear. When I was researching what to make with the Sous Vide I came across this recipe for Egg Bites, apparently made popular by Starbucks. This recipe is for 6 servings, so you can make ahead, refrigerate and reheat them. It looks a bit like a science-lab, and with food sealed you can’t smell anything cooking so it tends to not feel like cooking at all. But the results are impressive and it’s been a good addition to our kitchen. One note on the jars, you want to make sure they are loosely secured so a little air can release (or they will explode!), when you tighten the lid, loosen it then tighten lightly with two fingers. If the jars float and will not stay on the bottom you will have to fix the lids, once they are sealed properly you will see some air bubbles rising and they will stay on the bottom of your container. The final result is a perfectly creamy cooked egg dish, similar to baked eggs, but not one part of it is overcooked.
Oh and I just came across this article about Sous Vide which is pretty silly about men trying to impress women with their mad cooking skills, more interesting comments on David Lebovitz Facebook post here, it’s not for everyone or for every type of cooking, but it really is amazing for certain things like meat. And Egg Bites too!


Preheat water to 172°F
Butter mason jars and set aside. In a blender mix eggs and cream until combined. Use any variation of ingredients you like, I made three using cheese, oven dried tomatoes, basil, and three with Gruyere and bacon.
Place bacon, herbs, cheese in bottom of jars, pour egg mixture in each jar, top with a bit more cheese, loosely secure lids on jars, submerge in water (if the jars float the lids are on too tight, adjust and they should remain on bottom of container releasing air bubbles), cook for 90 minutes, remove from jars and serve or place in refrigerator for up to 1 week.
Adapted from Anova

Food and Photography Blog.
All Rights Reserved. Copyright © 2021 Pixels + Crumbs LLC | Privacy Policy


